从源码角度一步步窥探Nacos配置拉取与动态刷新、监听原理_监听nacos配置中心刷新回调-程序员宅基地
技术标签: 配置中心 java spring cloud Nacos
在分析原理前,我们先来回顾一些nacos的几个用法。
用法一:读取nacos配置中心的值。这种语法跟注入本地的配置一样。是spring的注解,从当前环境的属性集合获取值。
@Value(value = "${info:Local Hello world}")
private String info;
配置中心的值变化后,应用无法实时感知,需要重启应用,值才会相应变更。
用法二:动态获取nacos配置中心的值。用的是nacos的注解NacosValue,autoRefreshed 表示是否自动更新。
@NacosValue(value = "${info:Local Hello world}", autoRefreshed = true)
private String autoInfo;
autoRefreshed 为true,配置中心的值变化后,应用中的该值会实时相应跟着改变。
用法三:动态监听配置,触发监听回调函数。这种用法可以适用于一些实时开关,而开关的改变会联动一些应用行为变化的场景。
    @NacosConfigListener(dataId = "spring-cloud-nacos-config-example.yaml")
    public void configListener(String configInfo){

        log.info(configInfo);
    }
例子:以天气服务为例。天气服务对接了多个外部第三方天气接口,当然我们要认定他们的接口是不稳定的,哪怕是跟他们合作也不能信任他们的接口足够稳定。一般这个时候我们会用服务熔断或者降级措施来保证我们的天气服务稳定运行。但是会有一种场景,某个第三方天气接口不想用了(合作终止),但是我不想改代码或者重启应用,这时候怎么办?这时候就可以用用法三了。每个三方天气接口对接一般都会有一个类来处理封装,这些类都可以注册为spring的bean。因此可以把启用哪个默认的三方服务作为开关。监听配置开关,回调函数里动态注册bean与删除bean,刷新spring IoC容器。
接下来我们从源码的角度来一步一步分析它们的实现原理。笔者划分为两部分:
1:应用系统如何拉取外部化配置。
2:配置动态刷新与监听是怎么实现的。
拉取外部化配置
首先我们要先来理解一个概念:什么叫外部化配置?在笔者认识里,除了不在应用系统里的配置都可以叫外部化配置。比如配置放在一个网络资源里(URL)、放在系统某个文件路径下(FileSystem)或者就是放在配置中心。
看到这个场景,有没有觉得特别像spring的配置文件(XML)的加载。是的,在没有注解时(spring老版本用法时) spring加载配置文件可以从网络资源里(URL)、放在系统某个文件路径下(FileSystem)或者类路径(ClassPath)来加载定位资源。
接下来源码分析。首先我们从启动类入手
@SpringBootApplication
public class NacosDiscoveryApplication {

    public static void main(String[] args) {

        SpringApplication.run(NacosDiscoveryApplication.class, args);
    }
}
run方法一直跟进去,来到ConfigurableApplicationContext 的run方法。先重点关注prepareEnvironment()与listeners.running().
public ConfigurableApplicationContext run(String... args) {

	// 省略部分代码
	// 预备环境
	ConfigurableEnvironment environment = prepareEnvironment(listeners, applicationArguments);
	// 上下文准备期
	prepareContext(context, environment, listeners, applicationArguments, printedBanner);
    // 省略部分代码
    try {

    		// 监听器启动
			listeners.running(context);
		}
		catch (Throwable ex) {

			handleRunFailure(context, ex, exceptionReporters, null);
			throw new IllegalStateException(ex);
		}
	return context;
}
我们看看prepareEnvironment方法做些什么事,源码跟进去。
private ConfigurableEnvironment prepareEnvironment(SpringApplicationRunListeners listeners,
			ApplicationArguments applicationArguments) {

		// 省略部分代码
		// 发布一个ApplicationEnvironmentPreparedEvent事件
		listeners.environmentPrepared(environment);
	    // 省略部分代码
		return environment;
	}
listeners.environmentPrepared(environment)源码跟进去走的是EventPublishingRunListener的实现。environmentPrepared里广播ApplicationEnvironmentPreparedEvent事件。

@Override
	public void environmentPrepared(ConfigurableEnvironment environment) {

	    // 广播ApplicationEnvironmentPreparedEvent事件
		this.initialMulticaster
				.multicastEvent(new ApplicationEnvironmentPreparedEvent(this.application, this.args, environment));
	}
既然有事件发布,就会有对改事件感兴趣并监听它的。BootstrapApplicationListener监听ApplicationEnvironmentPreparedEvent。我们看看它的监听实现里做了什么。
public class BootstrapApplicationListener
		implements ApplicationListener<ApplicationEnvironmentPreparedEvent>, Ordered {

	@Override
	public void onApplicationEvent(ApplicationEnvironmentPreparedEvent event) {

		// 省略部分代码
		if (context == null) {

			context = bootstrapServiceContext(environment, event.getSpringApplication(),
					configName);
			event.getSpringApplication()
					.addListeners(new CloseContextOnFailureApplicationListener(context));
		}
	}
	private ConfigurableApplicationContext bootstrapServiceContext(
			ConfigurableEnvironment environment, final SpringApplication application,
			String configName) {

			// 省略部分代码
			builder.sources(BootstrapImportSelectorConfiguration.class);
	}
}
onApplicationEvent监听实现里有这么一个至关重要的操作builder.sources(BootstrapImportSelectorConfiguration.class)。而BootstrapImportSelectorConfiguration里@import 了BootstrapImportSelector类
@Configuration(proxyBeanMethods = false)
@Import(BootstrapImportSelector.class)
public class BootstrapImportSelectorConfiguration {


}
@Import自动装配时,可以import@Configuration的类也可以import 实现ImportSelector接口的实现类。这是springboot的自动装配原理的一个细节之一
public class BootstrapImportSelector implements EnvironmentAware, DeferredImportSelector {

// 省略部分代码
// 利用spring的SPI扩展机制加载BootstrapConfiguration
List<String> names = new ArrayList<>(SpringFactoriesLoader
				.loadFactoryNames(BootstrapConfiguration.class, classLoader));
}
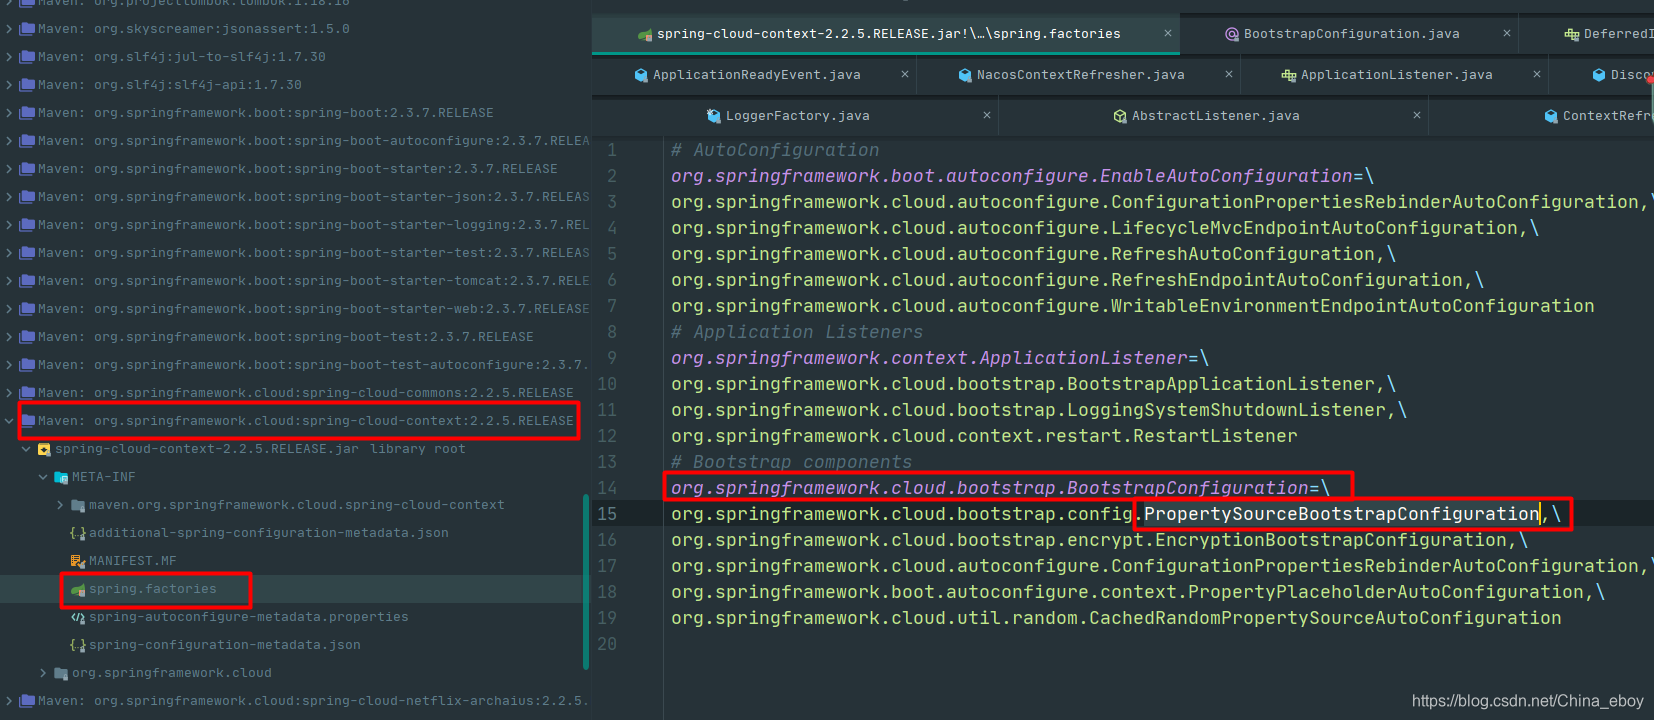
利用spring的SPI扩展机制加载BootstrapConfiguration类。那么是谁在暴露呢来达到让spring利用SPI加载到它们。找了一下,它们就是spring-cloud-alibaba-nacos-config.jar与spring-cloud-contex.jar的spring.factories下配置中。其中有两个配置类com.alibaba.cloud.nacos.NacosConfigBootstrapConfiguration和org.springframework.cloud.bootstrap.config.PropertySourceBootstrapConfiguration
SPI机制非常灵活,有原生的Java SPI机制,也有Dubbo的SPI、Spring的SPI等。当然它们的思想都是一致的,遵循一定契约精神。

疑问:到目前为止,加载它们有什么用呢?
带着疑问,我们回推。一开始的run方法有个prepareContext()上下文准备期。
private void prepareContext(ConfigurableApplicationContext context, ConfigurableEnvironment environment,
			SpringApplicationRunListeners listeners, ApplicationArguments applicationArguments, Banner printedBanner) {

   // 省略部分代码
   // 这个方法会执行容器中的ApplicationContextInitializer,让应用程序上下文初始化的时候做一些额外的操作。
   applyInitializers(context);
   // 省略部分代码

   protected void applyInitializers(ConfigurableApplicationContext context) {

		for (ApplicationContextInitializer initializer : getInitializers()) {

			Class<?> requiredType = GenericTypeResolver.resolveTypeArgument(initializer.getClass(),
					ApplicationContextInitializer.class);
			Assert.isInstanceOf(requiredType, context, "Unable to call initializer.");
			initializer.initialize(context);
		}
	}
}
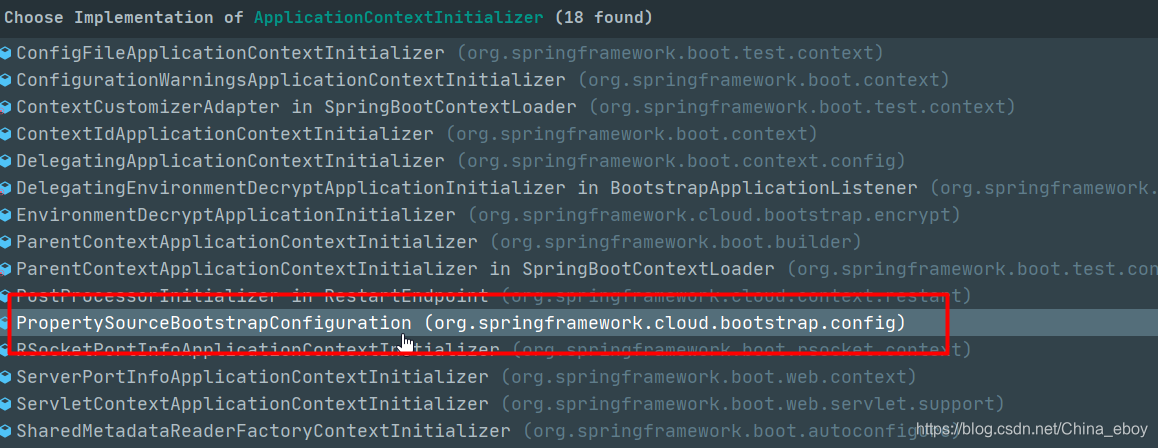
ApplicationContextInitializer是一个接口,那必然有它的实现类来实现执行。其中有一个实现类,那就是上文我们分析的SPI机制加载的PropertySourceBootstrapConfiguration。
我们来看看PropertySourceBootstrapConfiguration的initialize重写的逻辑是怎样的。
@Override
	public void initialize(ConfigurableApplicationContext applicationContext) {

		// 省略部分代码
		ConfigurableEnvironment environment = applicationContext.getEnvironment();
		for (PropertySourceLocator locator : this.propertySourceLocators) {

			// 根据当前环境定位配置
			Collection<PropertySource<?>> source = locator.locateCollection(environment);
			// 省略部分代码
			}
	}
PropertySourceLocator 是spring-cloud提供的一个配置属性定位规范。有一个默认实现方法locateCollection。
static Collection<PropertySource<?>> locateCollection(PropertySourceLocator locator,
			Environment environment) {

		// 定位配置
		PropertySource<?> propertySource = locator.locate(environment);
		// 省略部分代码
那么是必有个PropertySourceLocator 的实现类来真正执行locate方法。猜到了没?那必然是与Nacos有关,而且的里面逻辑必然是去Nacos的配置中心拉取配置。它就是NacosPropertySourceLocator。NacosPropertySourceLocator的locate方法主要做了两步
- 初始化一个ConfigService对象,这是Nacos客户端提供的用于访问实现配置中心基本操作的类。
- 按顺序分别加载共享配置、扩展配置、应用名称对应的配置。
public class NacosPropertySourceLocator implements PropertySourceLocator {

	@Override
	public PropertySource<?> locate(Environment env) {

		// 设置所处环境
		nacosConfigProperties.setEnvironment(env);
		// 获取ConfigService
		ConfigService configService = nacosConfigManager.getConfigService();

		if (null == configService) {

			log.warn("no instance of config service found, can't load config from nacos");
			return null;
		}
		long timeout = nacosConfigProperties.getTimeout();
		nacosPropertySourceBuilder = new NacosPropertySourceBuilder(configService,
				timeout);
		String name = nacosConfigProperties.getName();
		String dataIdPrefix = nacosConfigProperties.getPrefix();
		if (StringUtils.isEmpty(dataIdPrefix)) {

			dataIdPrefix = name;
		}
		if (StringUtils.isEmpty(dataIdPrefix)) {

			dataIdPrefix = env.getProperty("spring.application.name");
		}
		// 实例化一个可混合集成的PropertySource实例,用于保存从配置中心拉取的配置
		CompositePropertySource composite = new CompositePropertySource(
				NACOS_PROPERTY_SOURCE_NAME);
		// 拉取共享配置信息
		loadSharedConfiguration(composite);
		// 拉取扩展配置信息
		loadExtConfiguration(composite);
		// 拉取当前应用配置信息
		loadApplicationConfiguration(composite, dataIdPrefix, nacosConfigProperties, env);
		return composite;
	}
}
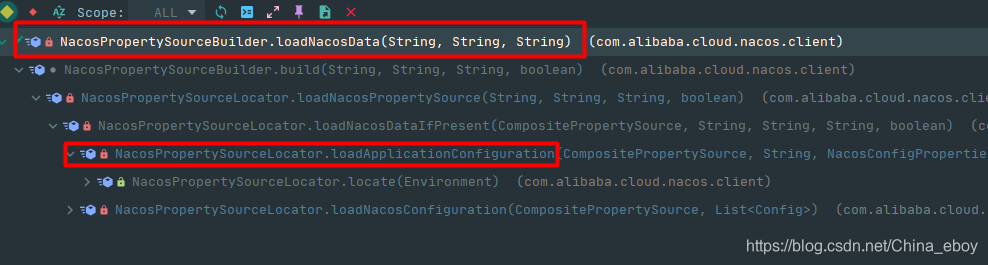
我们最关心的是应用配置信息,来看看loadApplicationConfiguration方法。此方法按照图中自下向上的调用链路跟进去,来到核心方法loadNacosData
private Map<String, Object> loadNacosData(String dataId, String group,
			String fileExtension) {

			// 用configService从配置中心拉取配置
			data = configService.getConfig(dataId, group, timeout);

			Map<String, Object> dataMap = NacosDataParserHandler.getInstance()
					.parseNacosData(data, fileExtension);
			return dataMap == null ? EMPTY_MAP : dataMap;
		return EMPTY_MAP;
	}
至此,我们就从宏观上理解了应用是如何一步一步拉取配置的原理。所以如果让我们自己实现拉取其他外部化配置,现在应该也会了吧。接下来我们来分析配置动态刷新与监听的原理。
配置动态刷新与监听的原理
我们来举个例子,我们去买奶茶,下单后,要想知道是否下单成功,有两种方式:主动与被动。主动就是主动询问是否下单成功;被动就是被动通知下单是否成功。换回配置也是这么个道理。
在实现上,主动模式我们可以轮询配置中心来感知值是否变化。但这里长轮询有个致命的性能浪费问题,不用担心,Nacos有个很优雅的设计来最大化解决这个问题。非常值得我们学习,笔者也会着重分析。而被动模式,则可以利用监听器来实现。但是要有个事件通知者才行。那么谁来充当这个角色呢,实时感知配置的变化,并发起通知事件,让对应的监听器动态刷新整个应用上下文的配置。带着这些疑问我们深入分析,一层层解开困惑。
应用前期的环境与上下文已经准备好之后,run方法继续陆续流程。来到启动监听器步骤listeners.running(context);
	@Override
	public void running(ConfigurableApplicationContext context) {

		// 发布ApplicationReadyEvent事件,表示上下文已经准备完毕
		context.publishEvent(new ApplicationReadyEvent(this.application, this.args, context));
		AvailabilityChangeEvent.publish(context, ReadinessState.ACCEPTING_TRAFFIC);
	}
在Nacos中,NacosContextRefresher监听了该事件,实现了Nacos的事件监听的注册。
注意:注册的监听器是nacos抽象的监听器,要注意区分。因为我们动态监听,注册的监听器接口就是nacos抽象的com.alibaba.nacos.api.config.listener.Listener
public class NacosContextRefresher
		implements ApplicationListener<ApplicationReadyEvent>, ApplicationContextAware {

		@Override
		public void onApplicationEvent(ApplicationReadyEvent event) {

		// many Spring context
		if (this.ready.compareAndSet(false, true)) {

			this.registerNacosListenersForApplications();
		}
	}
}
registerNacosListenersForApplications源码跟进去,来到核心registerNacosListener方法。
private void registerNacosListener(final String groupKey, final String dataKey) {

		String key = NacosPropertySourceRepository.getMapKey(dataKey, groupKey);
		// private Map<String, Listener> listenerMap = new ConcurrentHashMap<>(16);
		// 根据key去listenerMap取listenerMap,如果取不到,则新建一个。
		// 监听器有一个innerReceive(Nacos内部接收)方法,会发布RefreshEvent事件
		// 而RefreshEvent就是刷新Nacos配置事件,动态刷新的原理在这里揭露到底
		Listener listener = listenerMap.computeIfAbsent(key,
				lst -> new AbstractSharedListener() {

					@Override
					public void innerReceive(String dataId, String group,
							String configInfo) {

						refreshCountIncrement();
						nacosRefreshHistory.addRefreshRecord(dataId, group, configInfo);
						applicationContext.publishEvent(
								new RefreshEvent(this, null, "Refresh Nacos config"));
					}
				});
		try {

			// 向ConfigService注册监听器
			configService.addListener(dataKey, groupKey, listener);
		}
		catch (NacosException e) {

			log.warn(String.format(
					"register fail for nacos listener ,dataId=[%s],group=[%s]", dataKey,
					groupKey), e);
		}
	}
分析到这里,我们当然迫切想知道,谁来刷新,怎么刷新。
RefreshEventListener 就是执行者,目光放到handle((RefreshEvent) event),看看是怎么刷新。
public class RefreshEventListener implements SmartApplicationListener {

	@Override
	public void onApplicationEvent(ApplicationEvent event) {

		if (event instanceof ApplicationReadyEvent) {

			handle((ApplicationReadyEvent) event);
		}

		else if (event instanceof RefreshEvent) {

			handle((RefreshEvent) event);
		}
	}
public void handle(RefreshEvent event) {

		// don't handle events before app is ready
		if (this.ready.get()) {

			log.debug("Event received " + event.getEventDesc());
			// 调用ContextRefresher执行刷新
			Set<String> keys = this.refresh.refresh();
			log.info("Refresh keys changed: " + keys);
		}
	}
}
	public synchronized Set<String> refresh() {

		// 刷新环境
		Set<String> keys = refreshEnvironment();
		// 刷新作用域
		this.scope.refreshAll();
		return keys;
	}
其实这些都是spring-cloud提供的规范,用于刷新上下文。Nacos遵守并利用了。
分析到这里,不知道读者是否有这么一个疑问,整条链路这么串起来基本上通的,但是有一步就是由谁来触发向ConfigService注册的监听器执行。这一步打通,那整个链路就是全部打通,整个配置的动态刷新与监听的原理就可以拿下了。
回顾我们买奶茶例子引导的配置的场景,里面有两个线索,一个是谁来充当事件通知者的角色,这个问题其实就是由谁来触发向ConfigService注册的监听器执行;另一个就是Nacos如何优雅得设计长轮询机制。
其实可以大胆猜测:就是在长轮询机制中,触发了ConfigService注册的监听器执行。那么谁触发长轮询执行,我们可以猜测是用定时任务轮询执行。
带着猜测,我们从源码角度去分析是不是如猜测的一样。从哪里作为入口呢?长轮询是客户端向服务端发起,那么Nacos的ConfigService(ConfigService是Nacos客户端用于访问服务端基本操作的类)就是首个分析目标。
public class NacosFactory {

	// 构建ConfigService
    public static ConfigService createConfigService(Properties properties) throws NacosException {

        return ConfigFactory.createConfigService(properties);
    }
    // 利用反射创建ConfigService实例
     public static ConfigService createConfigService(Properties properties) throws NacosException {

        try {

            Class<?> driverImplClass = Class.forName("com.alibaba.nacos.client.config.NacosConfigService");
            Constructor constructor = driverImplClass.getConstructor(Properties.class);
            ConfigService vendorImpl = (ConfigService) constructor.newInstance(properties);
            return vendorImpl;
        } catch (Throwable e) {

            throw new NacosException(NacosException.CLIENT_INVALID_PARAM, e);
        }
    }
}
在实例化NacosConfigService时,执行的构造函数
public NacosConfigService(Properties properties) throws NacosException {

        ValidatorUtils.checkInitParam(properties);
        String encodeTmp = properties.getProperty(PropertyKeyConst.ENCODE);
        if (StringUtils.isBlank(encodeTmp)) {

            this.encode = Constants.ENCODE;
        } else {

            this.encode = encodeTmp.trim();
        }
        initNamespace(properties);
        // 初始化一个HttpAgent,实际工作的类时ServerHttpAgent.用的装饰者设计模式
        // MetricsHttpAgent内部也调用了ServerHttpAgent的方法,增加了监控统计信息。
        this.agent = new MetricsHttpAgent(new ServerHttpAgent(properties));
        this.agent.start();
        // 初始化一个客户端工作类ClientWorker。入参有agent,可以猜测会用agent做一些远程调用相关的操作
        this.worker = new ClientWorker(this.agent, this.configFilterChainManager, properties);
    }
我们分析一下ClientWorker这个类,看一下构造函数。构建两个定时任务调度的线程池,并启动一个定时任务。
 public ClientWorker(final HttpAgent agent, final ConfigFilterChainManager configFilterChainManager,
            final Properties properties) {

        this.agent = agent;
        this.configFilterChainManager = configFilterChainManager;

        // Initialize the timeout parameter

        init(properties);
        // 创建拥有一个核心线程数的任务调度线程池,用于执行checkConfigInfo
        this.executor = Executors.newScheduledThreadPool(1, new ThreadFactory() {

            @Override
            public Thread newThread(Runnable r) {

                Thread t = new Thread(r);
                t.setName("com.alibaba.nacos.client.Worker." + agent.getName());
                t.setDaemon(true);
                return t;
            }
        });
        // 创建一个当前系统可利用的线程数的线程池,后续用于实现客户端的定时长轮询功能
        this.executorService = Executors
                .newScheduledThreadPool(Runtime.getRuntime().availableProcessors(), new ThreadFactory() {

                    @Override
                    public Thread newThread(Runnable r) {

                        Thread t = new Thread(r);
                        t.setName("com.alibaba.nacos.client.Worker.longPolling." + agent.getName());
                        t.setDaemon(true);
                        return t;
                    }
                });
        // 每隔10ms执行一次checkConfigInfo,检查配置信息
        this.executor.scheduleWithFixedDelay(new Runnable() {

            @Override
            public void run() {

                try {

                    checkConfigInfo();
                } catch (Throwable e) {

                    LOGGER.error("[" + agent.getName() + "] [sub-check] rotate check error", e);
                }
            }
        }, 1L, 10L, TimeUnit.MILLISECONDS);
    }
我们来看看checkConfigInfo方法具体干些什么
    public void checkConfigInfo() {

        // 切分任务
        int listenerSize = cacheMap.get().size();
        // 向上取整为批数
        int longingTaskCount = (int) Math.ceil(listenerSize / ParamUtil.getPerTaskConfigSize());
        if (longingTaskCount > currentLongingTaskCount) {

            for (int i = (int) currentLongingTaskCount; i < longingTaskCount; i++) {

            	// 线程池执行LongPollingRunnable长轮询任务
                executorService.execute(new LongPollingRunnable(i));
            }
            currentLongingTaskCount = longingTaskCount;
        }
    }
- cacheMap:AtomicReference<Map<String, CacheData>> cacheMap 用来存储监听变更的缓存集合。key是根据dataId/group/tenant(租户)拼接的值。value是对应的存储在Nacos服务端的配置文件内容
- 长轮询任务拆分: 默认情况下,每个长轮询LongPollingRunnable任务处理3000个监听配置集。如果超过3000个,则需要启动多个LongPollingRunnable去执行。
看看LongPollingRunnable具体干些什么。第一个疑问谁来充当事件通知者的角色将在这里揭开。
- 通过checkLocalConfig方法检查本地配置
- 执行checkUpdateDataIds方法与服务端建立长轮询机制,从服务端获取发生变更的数据。
- 遍历变更集合changedGroupKeys,调用getServerConfig方法,根据dataID、group、tenant去服务端读取对应的配置信息并保存在本地文件中。
class LongPollingRunnable implements Runnable {


        @Override
        public void run() {

            List<CacheData> cacheDatas = new ArrayList<CacheData>();
            List<String> inInitializingCacheList = new ArrayList<String>();
            try {

                for (CacheData cacheData : cacheMap.get().values()) {

                    if (cacheData.getTaskId() == taskId) {

                        cacheDatas.add(cacheData);
                        try {

                        	// 检查本地配置
                            checkLocalConfig(cacheData);
                            if (cacheData.isUseLocalConfigInfo()) {

                                cacheData.checkListenerMd5();
                            }
                        } catch (Exception e) {

                            LOGGER.error("get local config info error", e);
                        }
                    }
                }
                // 通过长轮询请求检查服务端对应的配置是否发生了改变。
                List<String> changedGroupKeys = checkUpdateDataIds(cacheDatas, inInitializingCacheList);
                if (!CollectionUtils.isEmpty(changedGroupKeys)) {

                    LOGGER.info("get changedGroupKeys:" + changedGroupKeys);
                }
                // 遍历存在变更的groupKey ,重新加载最新数据
                for (String groupKey : changedGroupKeys) {

                    String[] key = GroupKey.parseKey(groupKey);
                    String dataId = key[0];
                    String group = key[1];
                    String tenant = null;
                    if (key.length == 3) {

                        tenant = key[2];
                    }
                    try {

                    	// 去服务端读取对应的配置信息并保存在本地文件中。默认的超时时间是30s
                        String[] ct = getServerConfig(dataId, group, tenant, 3000L);
                        CacheData cache = cacheMap.get().get(GroupKey.getKeyTenant(dataId, group, tenant));
                        cache.setContent(ct[0]);
                        if (null != ct[1]) {

                            cache.setType(ct[1]);
                        }
                        LOGGER.info("[{}] [data-received] dataId={}, group={}, tenant={}, md5={}, content={}, type={}",
                                agent.getName(), dataId, group, tenant, cache.getMd5(),
                                ContentUtils.truncateContent(ct[0]), ct[1]);
                    } catch (NacosException ioe) {

                        String message = String
                                .format("[%s] [get-update] get changed config exception. dataId=%s, group=%s, tenant=%s",
                                        agent.getName(), dataId, group, tenant);
                        LOGGER.error(message, ioe);
                    }
                }
                // 触发事件通知
                // 谁来充当事件通知者的角色就是在这里
                for (CacheData cacheData : cacheDatas) {

                    if (!cacheData.isInitializing() || inInitializingCacheList
                            .contains(GroupKey.getKeyTenant(cacheData.dataId, cacheData.group, cacheData.tenant))) {

                        cacheData.checkListenerMd5();
                        cacheData.setInitializing(false);
                    }
                }
                inInitializingCacheList.clear();
                // 继续定时执行当前线程
                // 用的是另一个初始化的线程池
                executorService.execute(this);
            } catch (Throwable e) {

                LOGGER.error("longPolling error : ", e);
                executorService.schedule(this, taskPenaltyTime, TimeUnit.MILLISECONDS);
            }
        }
    }
一个好的配置中心,会在应用端的本地也保存一份,可在网路无法链接时,可以降级从本地读取配置。Nacos也有这样的实现。在${user}\nacos\config\目录下会缓存一份服务端的配置信息。
checkLocalConfig会和本地磁盘中的文件内容进行比较,如果内存中的数据和磁盘中的数据不一致,说明数据发生了变更,需要触发事件通知。
checkUpdateDataIds基于长连接方式来监听服务端配置的变化,最后根据变化数据的key去服务端拉取最新数据。checkUpdateDataIds最终调用checkUpdateConfigStr方法。
List<String> checkUpdateConfigStr(String probeUpdateString, boolean isInitializingCacheList) throws Exception {


        Map<String, String> params = new HashMap<String, String>(2);
        params.put(Constants.PROBE_MODIFY_REQUEST, probeUpdateString);
        Map<String, String> headers = new HashMap<String, String>(2);
        headers.put("Long-Pulling-Timeout", "" + timeout);
        if (isInitializingCacheList) {

            headers.put("Long-Pulling-Timeout-No-Hangup", "true");
        }

        if (StringUtils.isBlank(probeUpdateString)) {

            return Collections.emptyList();
        }

        try {


            long readTimeoutMs = timeout + (long) Math.round(timeout >> 1);
            HttpRestResult<String> result = agent
                    .httpPost(Constants.CONFIG_CONTROLLER_PATH + "/listener", headers, params, agent.getEncode(),
                            readTimeoutMs);

            if (result.ok()) {

                setHealthServer(true);
                return parseUpdateDataIdResponse(result.getData());
            } else {

                setHealthServer(false);
                LOGGER.error("[{}] [check-update] get changed dataId error, code: {}", agent.getName(),
                        result.getCode());
            }
        } catch (Exception e) {

            setHealthServer(false);
            LOGGER.error("[" + agent.getName() + "] [check-update] get changed dataId exception", e);
            throw e;
        }
        return Collections.emptyList();
    }
checkUpdateConfigStr方法实际上就是通过agent .httpPost调用/v1/cs/configs/listener接口实现长轮询请求。长轮询请求在实现层面只是设置了一个比较长的时间,默认是30s。如果服务端的数据发生了变更,客户端会收到一个HttpRestResult,服务端返回的是存在数据变更的dataID、group、tenant。获得这些信息之后,在LongPollingRunnable#run方法中调用getServerConfig去Nacos服务端上读取具体的配置内容。
至此客户端与服务端建立了长轮询机制,获取变更的值,并触发事件通知,结合上文分析的整个链路,已然串联完毕,原理清晰。那么服务端是怎么处理与客户端建立的长轮询吗,这就是最后一个“线索”–Nacos是如何优雅设计长轮询。带着最后一步,我们来分析服务端长轮询处理机制
服务端长轮询处理机制
在Nacos的config模块中找到controller包下的ConfigController类。Constants.CONFIG_CONTROLLER_PATH就是/v1/cs/configs。
@RestController
@RequestMapping(Constants.CONFIG_CONTROLLER_PATH)
public class ConfigController {

	@PostMapping("/listener")
    @Secured(action = ActionTypes.READ, parser = ConfigResourceParser.class)
    public void listener(HttpServletRequest request, HttpServletResponse response)
            throws ServletException, IOException {

        request.setAttribute("org.apache.catalina.ASYNC_SUPPORTED", true);
        String probeModify = request.getParameter("Listening-Configs");
        if (StringUtils.isBlank(probeModify)) {

            throw new IllegalArgumentException("invalid probeModify");
        }

        probeModify = URLDecoder.decode(probeModify, Constants.ENCODE);

        Map<String, String> clientMd5Map;
        try {

            clientMd5Map = MD5Util.getClientMd5Map(probeModify);
        } catch (Throwable e) {

            throw new IllegalArgumentException("invalid probeModify");
        }
        // do long-polling
        inner.doPollingConfig(request, response, clientMd5Map, probeModify.length());
    }
  }
核心是inner.doPollingConfig方法。doPollingConfig是一个长轮询的处理接口
 	/**
     * 轮询接口.
     */
    public String doPollingConfig(HttpServletRequest request, HttpServletResponse response,
            Map<String, String> clientMd5Map, int probeRequestSize) throws IOException {


        // 长轮询.
        if (LongPollingService.isSupportLongPolling(request)) {

            longPollingService.addLongPollingClient(request, response, clientMd5Map, probeRequestSize);
            return HttpServletResponse.SC_OK + "";
        }

        // 不然就兼容短轮询逻辑.
        List<String> changedGroups = MD5Util.compareMd5(request, response, clientMd5Map);

        // 兼容短轮询result.
        String oldResult = MD5Util.compareMd5OldResult(changedGroups);
        String newResult = MD5Util.compareMd5ResultString(changedGroups);
        // 版本兼容
        String version = request.getHeader(Constants.CLIENT_VERSION_HEADER);
        if (version == null) {

            version = "2.0.0";
        }
        int versionNum = Protocol.getVersionNumber(version);

        // 2.0.4 版本前, 返回值设置在header中.
        if (versionNum < START_LONG_POLLING_VERSION_NUM) {

            response.addHeader(Constants.PROBE_MODIFY_RESPONSE, oldResult);
            response.addHeader(Constants.PROBE_MODIFY_RESPONSE_NEW, newResult);
        } else {

            request.setAttribute("content", newResult);
        }

        Loggers.AUTH.info("new content:" + newResult);

        // 清除缓存.
        response.setHeader("Pragma", "no-cache");
        response.setDateHeader("Expires", 0);
        response.setHeader("Cache-Control", "no-cache,no-store");
        response.setStatus(HttpServletResponse.SC_OK);
        return HttpServletResponse.SC_OK + "";
    }
如果当前请求判断为长轮询,会调用longPollingService.addLongPollingClient方法。源码跟进去具体看看
public void addLongPollingClient(HttpServletRequest req, HttpServletResponse rsp, Map<String, String> clientMd5Map,
            int probeRequestSize) {

        // 设置客户端的超时时间
        String str = req.getHeader(LongPollingService.LONG_POLLING_HEADER);
        String noHangUpFlag = req.getHeader(LongPollingService.LONG_POLLING_NO_HANG_UP_HEADER);
        String appName = req.getHeader(RequestUtil.CLIENT_APPNAME_HEADER);
        String tag = req.getHeader("Vipserver-Tag");
        int delayTime = SwitchService.getSwitchInteger(SwitchService.FIXED_DELAY_TIME, 500);
        // 提前500ms返回响应,为避免客户端超时.
        long timeout = Math.max(10000, Long.parseLong(str) - delayTime);
        if (isFixedPolling()) {

            timeout = Math.max(10000, getFixedPollingInterval());
        } else {

        	// 和服务端的数据进行MD5对比,如果发生过变化则直接返回
            long start = System.currentTimeMillis();
            List<String> changedGroups = MD5Util.compareMd5(req, rsp, clientMd5Map);
            if (changedGroups.size() > 0) {

                generateResponse(req, rsp, changedGroups);
                LogUtil.CLIENT_LOG.info("{}|{}|{}|{}|{}|{}|{}", System.currentTimeMillis() - start, "instant",
                        RequestUtil.getRemoteIp(req), "polling", clientMd5Map.size(), probeRequestSize,
                        changedGroups.size());
                return;
            } else if (noHangUpFlag != null && noHangUpFlag.equalsIgnoreCase(TRUE_STR)) {

                LogUtil.CLIENT_LOG.info("{}|{}|{}|{}|{}|{}|{}", System.currentTimeMillis() - start, "nohangup",
                        RequestUtil.getRemoteIp(req), "polling", clientMd5Map.size(), probeRequestSize,
                        changedGroups.size());
                return;
            }
        }
        String ip = RequestUtil.getRemoteIp(req);
        // 必须要由HTTP线程调用,否则离开后容器会立即发送响应.
        final AsyncContext asyncContext = req.startAsync();
        // AsyncContext.setTimeout()超时时间不准确,所以只能自己控制.
        asyncContext.setTimeout(0L);
        // 把客户端的长轮询请求封装成ClientLongPolling交给ConfigExecutor执行。
        ConfigExecutor.executeLongPolling(
                new ClientLongPolling(asyncContext, clientMd5Map, ip, probeRequestSize, timeout, appName, tag));
    }
总结一下这个方法
- 获取客户端的超时时间(前文分析过,默认设置的是30s),减去500ms后赋值给timeout
- 判断 isFixedPolling ,如果为true,定时任务将会在30s后开始执行,否则在29.5s后开始执行
- 和服务端的数据进行MD5对比,如果发生变化直接返回
- ConfigExecutor.executeLongPolling 执行ClientLongPolling任务线程
我们继续看看ClientLongPolling这个任务线程
class ClientLongPolling implements Runnable {


        @Override
        public void run() {

        	// 启动定时任务
            asyncTimeoutFuture = ConfigExecutor.scheduleLongPolling(new Runnable() {

                @Override
                public void run() {

                    try {

                        getRetainIps().put(ClientLongPolling.this.ip, System.currentTimeMillis());

                        // 删除订阅关系.
                        allSubs.remove(ClientLongPolling.this);

                        if (isFixedPolling()) {

                            LogUtil.CLIENT_LOG
                                    .info("{}|{}|{}|{}|{}|{}", (System.currentTimeMillis() - createTime), "fix",
                                            RequestUtil.getRemoteIp((HttpServletRequest) asyncContext.getRequest()),
                                            "polling", clientMd5Map.size(), probeRequestSize);
                            // 比较数据的MD5值是否发生了变更
                            List<String> changedGroups = MD5Util
                                    .compareMd5((HttpServletRequest) asyncContext.getRequest(),
                                            (HttpServletResponse) asyncContext.getResponse(), clientMd5Map);
                            if (changedGroups.size() > 0) {

                                sendResponse(changedGroups);
                            } else {

                                sendResponse(null);
                            }
                        } else {

                            LogUtil.CLIENT_LOG
                                    .info("{}|{}|{}|{}|{}|{}", (System.currentTimeMillis() - createTime), "timeout",
                                            RequestUtil.getRemoteIp((HttpServletRequest) asyncContext.getRequest()),
                                            "polling", clientMd5Map.size(), probeRequestSize);
                            sendResponse(null);
                        }
                    } catch (Throwable t) {

                        LogUtil.DEFAULT_LOG.error("long polling error:" + t.getMessage(), t.getCause());
                    }

                }

            }, timeoutTime, TimeUnit.MILLISECONDS);

            allSubs.add(this);
        }
- ConfigExecutor.scheduleLongPolling启动一个定时任务,并且延时时间为29.5s
- 将ClientLongPolling 实例本身添加到allSub队列中,它主要维护一个长轮询的订阅关系
- 定时任务执行后,先把ClientLongPolling 实例本身从allSub队列中移除
- 通过MD5比较客户端请求的groupKeys是否发生了变更,并将变更的结果通过response返回给客户端
所谓的长轮询就是服务端收到请求后,不立即返回,而是在延后(30-0.5)s才把请求结果返回给客户端,这就使得客户端和服务daunt之间在30s之内数据没有发生变化情况下一直处于连接状态。
那么问题来了,定时任务是延时执行,不具备实时性,我们在Nacos Dashborad或者API 修改配置之后,如何实时通知的呢?
仔细发现ClientLongPolling 的构造函数里会注册一个订阅者。这个订阅者有个监听行为–监听LocalDataChangeEvent事件,通过线程池执行一个DataChangeTask任务。所以关键在这个DataChangeTask任务干些什么。
public LongPollingService() {

// Register A Subscriber to subscribe LocalDataChangeEvent.
        NotifyCenter.registerSubscriber(new Subscriber() {


            @Override
            public void onEvent(Event event) {

                if (isFixedPolling()) {

                    // Ignore.
                } else {

                    if (event instanceof LocalDataChangeEvent) {

                        LocalDataChangeEvent evt = (LocalDataChangeEvent) event;
                        ConfigExecutor.executeLongPolling(new DataChangeTask(evt.groupKey, evt.isBeta, evt.betaIps));
                    }
                }
            }

            @Override
            public Class<? extends Event> subscribeType() {

                return LocalDataChangeEvent.class;
            }
        });
}
DataChangeTask 的run里
- 遍历allSubs队列中客户端长轮询请求
- 比较每一个客户端长轮询请求携带的groupKey,如果服务端变更的配置和客户端请求关注的配置一致,则直接返回
class DataChangeTask implements Runnable {


        @Override
        public void run() {

            try {

                ConfigCacheService.getContentBetaMd5(groupKey);
                // 遍历allSubs队列
                for (Iterator<ClientLongPolling> iter = allSubs.iterator(); iter.hasNext(); ) {

                    ClientLongPolling clientSub = iter.next();
                    if (clientSub.clientMd5Map.containsKey(groupKey)) {

                        // 如果beta发布且不在beta列表,则直接跳过.
                        if (isBeta && !CollectionUtils.contains(betaIps, clientSub.ip)) {

                            continue;
                        }

                        // 如果tag发布且不在tag列表,则直接跳过.
                        if (StringUtils.isNotBlank(tag) && !tag.equals(clientSub.tag)) {

                            continue;
                        }

                        getRetainIps().put(clientSub.ip, System.currentTimeMillis());
                        iter.remove(); // Delete subscribers' relationships.
                        LogUtil.CLIENT_LOG
                                .info("{}|{}|{}|{}|{}|{}|{}", (System.currentTimeMillis() - changeTime), "in-advance",
                                        RequestUtil
                                                .getRemoteIp((HttpServletRequest) clientSub.asyncContext.getRequest()),
                                        "polling", clientSub.clientMd5Map.size(), clientSub.probeRequestSize, groupKey);
                        clientSub.sendResponse(Arrays.asList(groupKey));
                    }
                }
            } catch (Throwable t) {

                LogUtil.DEFAULT_LOG.error("data change error: {}", ExceptionUtil.getStackTrace(t));
            }
        }
那么又引发一个疑问,那就是谁来发布LocalDataChangeEvent事件呢?我们不难猜出,那就是控制台或者API操作时触发的。我们来找这个链路ConfigOpsController–> DumpService–>DumpChangeProcessor–>ConfigCacheService
在 ConfigCacheService类里我们可以看到很多操作都有这么一句NotifyCenter.publishEvent(new LocalDataChangeEvent(groupKey));
最后,我们来画个图理清一下
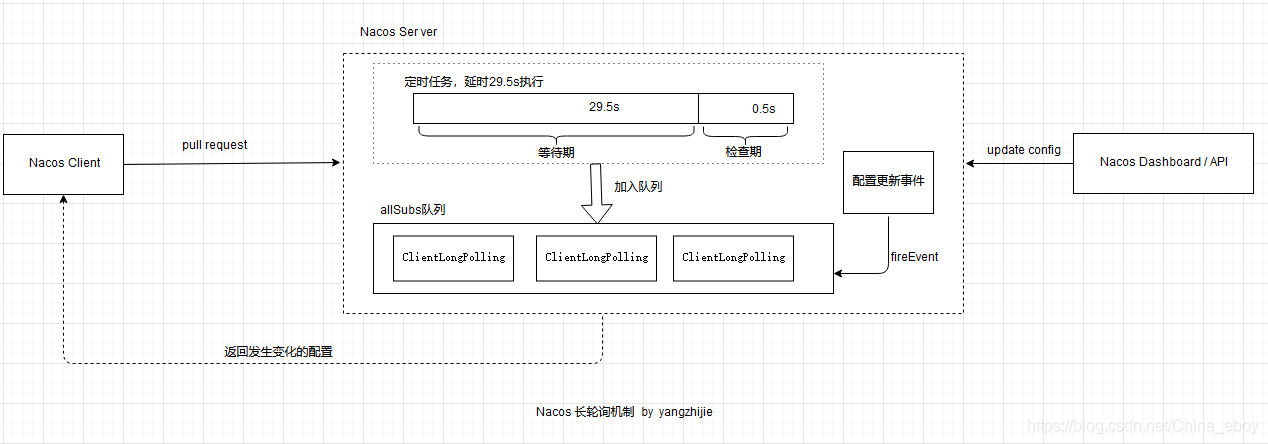
如果客户端发起pull请求后,发现服务端的配置和客户端的配置是保持一致的,那么服务端会先Hold住这个请求,也就是服务端拿到这个链接之后在指定时间段内一直不返回结果,直到这段时间内配置发生变化,服务端才会把原来的Hold住的请求返回。如笔者所画的上图所示,服务端收到客户端请求后,先检查配置是否发生了变更,如果没有,则设置一个定时任务,延期29.5s执行,并且把当前的客户端长轮询连接加入allSubs队列。这时候有两种方式触发该连接结果的返回
- 第一种是等待时间到了,不管配置是否发生了改变,都会把结果返回给客户端
- 第二种是在29.5s内任意一个时刻,通过Nacos Dashboard或者API 方式对配置进行了修改,这会触发一个事件机制,监听到该事件的任务会遍历allSubs队列,找到发生了变更的配置项对应的ClientLongPolling任务,将变更的数据通过任务中的连接进行返回。
最后,整个Nacos的配置拉取与动态刷新、监听原理,已经分析完毕,整条链路完整串下来,相信读者能很好掌握的。
- 本文就到此结束了,我们下文见,谢谢
- github: honey开源系列组件作者
智能推荐
源代码图纸文档防泄密场景方案分析-程序员宅基地
文章浏览阅读161次,点赞5次,收藏3次。财务数据、员工信息、工资信息、客户和业务数据等被员工非法获取、外泄
React学习记录-程序员宅基地
文章浏览阅读936次,点赞22次,收藏26次。React核心基础
Linux查磁盘大小命令,linux系统查看磁盘空间的命令是什么-程序员宅基地
文章浏览阅读2k次。linux系统查看磁盘空间的命令是【df -hl】,该命令可以查看磁盘剩余空间大小。如果要查看每个根路径的分区大小,可以使用【df -h】命令。df命令以磁盘分区为单位查看文件系统。本文操作环境:red hat enterprise linux 6.1系统、thinkpad t480电脑。(学习视频分享:linux视频教程)Linux 查看磁盘空间可以使用 df 和 du 命令。df命令df 以磁..._df -hl
Office & delphi_range[char(96 + acolumn) + inttostr(65536)].end[xl-程序员宅基地
文章浏览阅读923次。uses ComObj;var ExcelApp: OleVariant;implementationprocedure TForm1.Button1Click(Sender: TObject);const // SheetType xlChart = -4109; xlWorksheet = -4167; // WBATemplate xlWBATWorksheet = -4167_range[char(96 + acolumn) + inttostr(65536)].end[xlup]
若依 quartz 定时任务中 service mapper无法注入解决办法_ruoyi-quartz无法引入ruoyi-admin的service-程序员宅基地
文章浏览阅读2.3k次。上图为任务代码,在任务具体执行的方法中使用,一定要写在方法内使用SpringContextUtil.getBean()方法实例化Spring service类下边是ruoyi-quartz模块中util/SpringContextUtil.java(已改写)import org.springframework.beans.BeansException;import org.springframework.context.ApplicationContext;import org.s..._ruoyi-quartz无法引入ruoyi-admin的service
CentOS7配置yum源-程序员宅基地
文章浏览阅读2w次,点赞10次,收藏77次。yum,全称“Yellow dog Updater, Modified”,是一个专门为了解决包的依赖关系而存在的软件包管理器。可以这么说,yum 是改进型的 RPM 软件管理器,它很好的解决了 RPM 所面临的软件包依赖问题。yum 在服务器端存有所有的 RPM 包,并将各个包之间的依赖关系记录在文件中,当管理员使用 yum 安装 RPM 包时,yum 会先从服务器端下载包的依赖性文件,通过分析此文件从服务器端一次性下载所有相关的 RPM 包并进行安装。_centos7配置yum源
随便推点
【方位估计】基于MUSIC算法、加权MUSIC算法和ROOT-MUSIC算法方位估计附Matlab代码-程序员宅基地
文章浏览阅读921次,点赞17次,收藏19次。方位估计是信号处理领域中一个重要的问题,它涉及到了信号的方向和角度的估计。在无线通信、雷达、声呐等领域,方位估计都有着重要的应用。本文将介绍三种常用的方位估计算法:MUSIC算法、加权MUSIC算法和ROOT-MUSIC算法。首先我们来介绍MUSIC算法。MUSIC算法是一种基于信号子空间的方法,它利用信号子空间的特性来实现方位估计。
DZMFullPage - 前端分页动画插件,兼容IE9+,支持Vue-程序员宅基地
文章浏览阅读73次。分页指定DOM页页页页页页导入插件。
【图像分割】基于Crow搜索优化模糊聚类算法的医学图像分割研究附matlab代码-程序员宅基地
文章浏览阅读1.1k次,点赞30次,收藏24次。图像分割是医学图像分析中的关键步骤,它可以将图像中的不同组织或结构区分开来。模糊聚类算法是一种常用的图像分割方法,但其聚类中心的选择对分割结果有很大的影响。本文提出了一种基于 Crow 搜索优化(CSO)算法的模糊聚类算法,用于医学图像分割。CSO 是一种新型的群智能优化算法,具有收敛速度快、鲁棒性强等优点。本文将 CSO 应用于模糊聚类算法的聚类中心优化,以提高分割精度。
Android开发-Android常用组件-TextView文本框-程序员宅基地
文章浏览阅读1k次。04 常用组件4.1 TextViewTextView (文本框),用于显示文本的一个控件。文本的字体尺寸单位为sp :sp: scaled pixels(放大像素). 主要用于字体显示。文本常用属性:属性名作用id为TextView设置一个组件id,根据id,我们可以在Java代码中通过findViewById()的方法获取到该..._
STM32单片机示例:多个定时器同步触发启动_stm32 定时器同步-程序员宅基地
文章浏览阅读3.7k次,点赞3次,收藏14次。多个定时器同步触发启动是一种比较实用的功能,这里将对此做个示例说明。_stm32 定时器同步
android launcher分析和修改10,Android Launcher分析和修改9——Launcher启动APP流程(转载)...-程序员宅基地
文章浏览阅读348次。出处 : http://www.cnblogs.com/mythou/p/3187881.html本来想分析AppsCustomizePagedView类,不过今天突然接到一个临时任务。客户反馈说机器界面的图标很难点击启动程序,经常点击了没有反应,Boss说要优先解决这问题。没办法,只能看看是怎么回事。今天分析一下Launcher启动APP的过程。从用户点击到程序启动的流程,下面针对WorkSpa..._回调bubbletextview