Android 约束布局(ConstraintLayout)_layout_constraintdimensionratio-程序员宅基地
技术标签: ubuntu 开发工具 android 调试器 android studio android APP开发
0、ContraintLayout(约束布局)
(约束布局)ConstraintLayout 类似于 (相对布局)RelativeLayout,但约束布局比相对布局更灵活,性能更出色。而且ContraintLayout可以按照比例约束控件位置和尺寸,能够更好地适配屏幕不同的机型。
1、添加依赖
需要在app/build.gradle文件中添加ContraintLayout的依赖
implementation ‘com.android.support.constraint:constraint-layout:1.1.3’
2、相对定位
常用属性
左右
layout_constraintLeft_toLeftOf 控件的左边和指定控件的左边对齐
layout_constraintLeft_toRightOf 控件的左边和指定控件的右边对齐(在控件右边)
layout_constraintRight_toLeftOf 控件的右边和指定控件的左边对齐(在控件左边)
layout_constraintRight_toRightOf 控件的右边和指定控件的右边对齐
上下
layout_constraintTop_toTopOf 控件的上边和指定控件的上边对齐
layout_constraintTop_toBottomOf 控件的上边和指定控件的下边对齐(在控件下边)
layout_constraintBottom_toTopOf 控件的下边和指定控件的上边对齐(在控件上边)
layout_constraintBottom_toBottomOf 控件的下边和指定控件的下边对齐
开始结束
layout_constraintStart_toStartOf 控件的开始位置(左)和指定控件的开始位置处于同一垂直线(即左边对其),同 left_toLeftOf
layout_constraintStart_toEndOf 控件的开始位置(左)和指定控件的结束为止(右)处于同一垂直线(即指定控件的右边),同 left_toRightOf
layout_constraintEnd_toStartOf 控件的结束为止(右)和指定控件的开始位置(左)处于同一垂直线(即指定控件的左边),同right_toLeftOf
layout_constraintEnd_toEndOf 控件的结束为止(右)和指定控件的结束为止(右)处于同一垂直线(即右边对其),同 right_toRightOf
举例: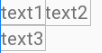
texy1在左上角,text2在text1的右边,text3在text1的下边
<TextView
        app:layout_constraintStart_toStartOf="parent" //靠左
        app:layout_constraintTop_toTopOf="parent" //考上
        android:id="@+id/text1"
        android:layout_width="wrap_content"
        android:layout_height="wrap_content"
        android:text="text1" />
<TextView
        android:id="@id/text2"
        android:layout_width="wrap_content"
        android:layout_height="wrap_content"
        android:text="text2"
        app:layout_constraintTop_toTopOf="@id/text1" //和text1顶部对齐
        app:layout_constraintLeft_toRightOf="@+id/text1" /> //处于text1的右边
<TextView
        android:id="@+id/text3"
        android:layout_width="wrap_content"
        android:layout_height="wrap_content"
        android:text="text3"
        app:layout_constraintStart_toStartOf="@+id/text1" //和text1的左边对齐
        app:layout_constraintTop_toBottomOf="@+id/text1" /> //在text的下边
特殊属性
layout_constraintBaseline_toBaselineOf 文字底部对齐
如图,text1和text2的文字不对齐,可以通过该属性将文字对齐
举例
<TextView
        android:textSize="20sp"
        android:background="@color/grey"
        app:layout_constraintStart_toStartOf="parent"
        app:layout_constraintTop_toTopOf="parent"
        android:id="@+id/text1"
        android:layout_width="wrap_content"
        android:layout_height="wrap_content"
        android:text="text1" />

    <TextView
        app:layout_constraintBaseline_toBaselineOf="@id/text1" //text2的文字底部与text1的文字底部对齐
        android:textColor="@color/colorPrimaryDark"
        android:id="@id/text2"
        android:layout_width="wrap_content"
        android:layout_height="wrap_content"
        android:text="text2"
        app:layout_constraintTop_toTopOf="@id/text1"
        app:layout_constraintLeft_toRightOf="@+id/text1" />
效果如下: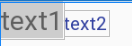
3、角度定位
角度定位是指 用一个角度和一个距离来约束两个空间的中心,举例:
<TextView
        app:layout_constraintStart_toStartOf="parent"
        app:layout_constraintTop_toTopOf="parent"
        android:id="@+id/text1"
        android:layout_width="wrap_content"
        android:layout_height="wrap_content"
        android:text="text1" />

    <TextView
        app:layout_constraintCircle="@id/text1"
        app:layout_constraintCircleAngle="120" //角度
        app:layout_constraintCircleRadius="150dp"//距离
        android:id="@id/text2"
        android:layout_width="wrap_content"
        android:layout_height="wrap_content"
        android:text="text2" />
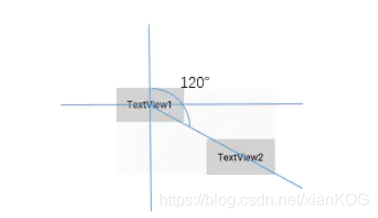
是指 text2的中心在text1的中心的120度,距离150dp的位置
4、边距
android:layout_marginStart
android:layout_marginEnd
android:layout_marginLeft
android:layout_marginTop
android:layout_marginRight
android:layout_marginBottom
以上属性必须在控件被约束(确定相对位置)的情况下才能生效,且margin只能大于等于0.
goneMargin 用于约束的控件可见性被设置为gone的时候使用的margin值,属性如下:
layout_goneMarginStart
layout_goneMarginEnd
layout_goneMarginLeft
layout_goneMarginTop
layout_goneMarginRight
layout_goneMarginBottom
举例:假设text2约束到text的右边,并给text2设一个‘layout_goneMarginLeft="10dp’
<TextView
        android:id="@+id/TextView1"
        .../>

    <TextView
        android:id="@+id/TextView2"
        ...
        app:layout_constraintLeft_toRightOf="@+id/TextView1"
        app:layout_goneMarginLeft="10dp"
        />
效果如下,TextView2在TextView1的右边,且没有边距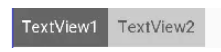
如果把TextView1的可见性设置为gone,效果如下: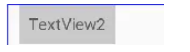
TextView1消失后,TextView2有一个距离左右10dp的边距。
5、居中和偏移
在RelativeLayout中,把控件放在布局中间,可以设置layout_centerInParent 为true,而在ConstraintLayout中的写法是:
app:layout_constraintBottom_toBottomOf="parent"
app:layout_constraintLeft_toLeftOf="parent"
app:layout_constraintRight_toRightOf="parent"
app:layout_constraintTop_toTopOf="parent"
意思是将控件的上下左右约束在布局的上下左右,就相当于放在中央了。
由于ConstraintLayout中的局中已经为控件约束了一个相对位置,所以可以使用margin,如下:
<TextView
        android:id="@+id/TextView1"
        ...
        android:layout_marginLeft="100dp"
        app:layout_constraintLeft_toLeftOf="parent"
        app:layout_constraintRight_toRightOf="parent" />

除了这种偏移外,ConstraintLayout还提供了另外一种偏移的属性:
layout_constraintHorizontal_bias 水平偏移
layout_constraintVertical_bias 垂直偏移
举例:
<TextView
        android:id="@+id/TextView1"
        ...
        app:layout_constraintHorizontal_bias="0.3"
        app:layout_constraintLeft_toLeftOf="parent"
        app:layout_constraintRight_toRightOf="parent" />

水平和垂直偏移是给属性赋值一个范围 0-1的值,假如赋值为0,则extView1在最左侧,假如赋值为1,则TextView1在布局的最右侧。
6、尺寸约束
控件的尺寸可以通过四种不同的方式制指定:
- 使用指定的尺寸
- 使用wrap_content ,让控件自己计算大小
当控件的高度或者宽度为wrap_content 时,可以使用下列属性来控制最大、最小值:
android:minWidth 最小的宽度
android:minHeight 最小的高度
android:maxWidth 最大的宽度
android:maxHeight 最大的高度 - 使用0dp(match_constraint)
官方不推荐在ContraintLayout中使用match_parent,可以设置0dp(match_constraint)配合约束代替match_patent,举例:
宽度约束为0dp,左右两边约束parent的左右两边,并设置左边边距50dp,效果:<TextView android:id="@+id/TextView1" android:layout_width="0dp" android:layout_height="wrap_content" android:layout_marginLeft="50dp" app:layout_constraintLeft_toLeftOf="parent" app:layout_constraintRight_toRightOf="parent" android:visibility="visible" />
- 宽度比
当宽或高至少有一个尺寸被设置为0dp时,可以通过layout_constraintDimensionRadio 设置宽高比,举例:
宽设置为0dp,宽高比设置为1:1,这个时候textview1是一个正方形,效果如下:<TextView android:id="@+id/TextView1" android:layout_width="0dp" android:layout_height="wrap_content" app:layout_constraintDimensionRatio="1:1" app:layout_constraintLeft_toLeftOf="parent" app:layout_constraintRight_toRightOf="parent" />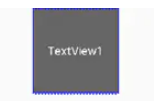
除此之外,在设置宽高比的值的时候,还可以在前面加W或H,分别指定宽度或高度限制。例如:
layout_constraintDimensionRatio="H,2;3 指的是 高度被约束
layout_constraintDimensionRatio="W,2:3 指的是 宽度被约束
7、链
如果两个或以上控件通过下图的方式约束在一起,就可以认为他们是一条链(横纵同理)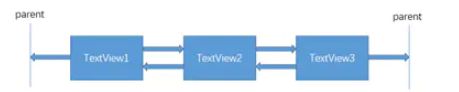
代码如下:
 <TextView
        android:id="@+id/TextView1"
        android:layout_width="wrap_content"
        android:layout_height="wrap_content"
        app:layout_constraintLeft_toLeftOf="parent"
        app:layout_constraintRight_toLeftOf="@+id/TextView2" />

    <TextView
        android:id="@+id/TextView2"
        android:layout_width="wrap_content"
        android:layout_height="wrap_content"
        app:layout_constraintLeft_toRightOf="@+id/TextView1"
        app:layout_constraintRight_toLeftOf="@+id/TextView3"
        app:layout_constraintRight_toRightOf="parent" />

    <TextView
        android:id="@+id/TextView3"
        android:layout_width="wrap_content"
        android:layout_height="wrap_content"
        app:layout_constraintLeft_toRightOf="@+id/TextView2"
        app:layout_constraintRight_toRightOf="parent" />
三个TextView相互约束,两端两个TextView分别与parent约束,称为一条链,效果如下:
一条链的第一个控件是这条链的链头,我们可以在链头中设置layout_contraintHorizontal_chainStyle 来改变整条链的样式.chains提供了3中样式,分别是:
chains_spread --展开元素(默认)
chains_spread_inside–展开元素,但链的两端贴近parent
chains_packed–链的元素被打包在一起
效果如下:
上面的例子创建了样式链,除了样式链外,还可以创建一个权重链。
上面的链的控件宽度都是warp_content,如果我们把宽度都设为0,这个时候可以在每个控件中设置横向权重
layout_constraintHorizontal_weight 来创建一个权重链,如下所示:
 <TextView
        android:id="@+id/TextView1"
        android:layout_width="0dp"
        android:layout_height="wrap_content"
        app:layout_constraintLeft_toLeftOf="parent"
        app:layout_constraintRight_toLeftOf="@+id/TextView2"
        app:layout_constraintHorizontal_weight="2" />

    <TextView
        android:id="@+id/TextView2"
        android:layout_width="0dp"
        android:layout_height="wrap_content"
        app:layout_constraintLeft_toRightOf="@+id/TextView1"
        app:layout_constraintRight_toLeftOf="@+id/TextView3"
        app:layout_constraintRight_toRightOf="parent"
        app:layout_constraintHorizontal_weight="3" />

    <TextView
        android:id="@+id/TextView3"
        android:layout_width="0dp"
        android:layout_height="wrap_content"
        app:layout_constraintLeft_toRightOf="@+id/TextView2"
        app:layout_constraintRight_toRightOf="parent"
        app:layout_constraintHorizontal_weight="4" />

8、辅助工具
Guideline像辅助线一样,在预览的时候帮助你完成布局(不会显示在界面上)
Guideline的主要属性:
android:orientation 垂直vertical,水平horizontal
layout_constraintGuide_begin开始位置
layout_contraintGuide_end结束位置
layout_constraintGuide_percent 距离顶部的百分比(orientation=horizontal时为距离左边)
举例:
  <android.support.constraint.Guideline
        android:id="@+id/guideline1"
        android:layout_width="wrap_content"
        android:layout_height="wrap_content"
        android:orientation="horizontal"
        app:layout_constraintGuide_begin="50dp" />

    <android.support.constraint.Guideline
        android:id="@+id/guideline2"
        android:layout_width="wrap_content"
        android:layout_height="wrap_content"
        android:orientation="vertical"
        app:layout_constraintGuide_percent="0.5" />
guideline1 为水平辅助线,开始位置是距离顶部50dp的位置,guideline2垂直辅助线,开始位置为屏幕宽的0.5(中间位置),效果如下: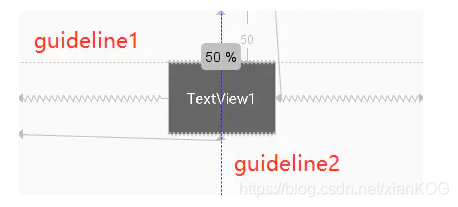
Placeholder指的是占位符。在Placeholder中可以使用setContent()设置另一个控件的id,使这个控件移动到占位符的位置,举例:
<android.support.constraint.Placeholder
        android:id="@+id/placeholder"
        android:layout_width="wrap_content"
        android:layout_height="wrap_content"
        app:content="@+id/textview"
        app:layout_constraintLeft_toLeftOf="parent"
        app:layout_constraintTop_toTopOf="parent" />

    <TextView
        android:id="@+id/textview"
        android:layout_width="wrap_content"
        android:layout_height="wrap_content"
        android:background="#cccccc"
        android:padding="16dp"
        android:text="TextView"
        android:textColor="#000000"
        app:layout_constraintRight_toRightOf="parent"
        app:layout_constraintTop_toTopOf="parent" />
先创建一个Placeholder约束在屏幕的左上角,新建一个TextView约束在屏幕的右上角,在Placeholder中设置app:content="@+id/textview,这时textiew会跑到屏幕的左上角,效果:
Group可以把多个控件归为一组,方便隐藏或者显示一组控件,举例:
    <TextView
        android:id="@+id/TextView1"
        android:layout_width="wrap_content"
        android:layout_height="wrap_content" />

    <TextView
        android:id="@+id/TextView2"
        android:layout_width="wrap_content"
        android:layout_height="wrap_content"
        app:layout_constraintLeft_toRightOf="@+id/TextView1" />

    <TextView
        android:id="@+id/TextView3"
        android:layout_width="wrap_content"
        android:layout_height="wrap_content"
        app:layout_constraintLeft_toRightOf="@id/TextView2" />

现在有三个并排的控件,用Group控件把TextView1和TextView3归为一组,再设置Group控件的可见性,如下:
   <android.support.constraint.Group
        android:id="@+id/group"
        android:layout_width="wrap_content"
        android:layout_height="wrap_content"
        android:visibility="invisible"
        app:constraint_referenced_ids="TextView1,TextView3" />
这样TextView1和TextView3 同时不可见,效果如下:

假设有三个控件ABC,C在AB的右边,但是AB的宽度是不固定的,这个时候C无论约束在A的右边还是B得右边都不对。当出现这种情况时,可以用Barrier来解决。Barrier可以在多个控件的一侧建立一个屏障,如下: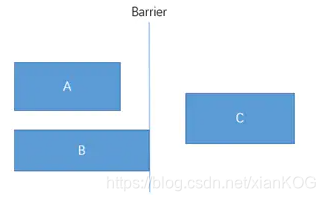
这个时候C只要约束在Barrier的右边就可以了,代码如下:
<TextView
        android:id="@+id/TextView1"
        android:layout_width="wrap_content"
        android:layout_height="wrap_content" />

    <TextView
        android:id="@+id/TextView2"
        android:layout_width="wrap_content"
        android:layout_height="wrap_content"
        app:layout_constraintTop_toBottomOf="@+id/TextView1" />

    <android.support.constraint.Barrier
        android:id="@+id/barrier"
        android:layout_width="wrap_content"
        android:layout_height="wrap_content"
        app:barrierDirection="right"
        app:constraint_referenced_ids="TextView1,TextView2" />

    <TextView
        android:id="@+id/TextView3"
        android:layout_width="wrap_content"
        android:layout_height="wrap_content"
app:barrierDirection为屏障所在的位置,可设置的值有:bottom、end、left、right、start、top
app:contraint_referenced_ids为屏障引用的控件,可设置多个(用“,”隔开)
智能推荐
Win10应用商店、应用打不开或闪退的解决方法_$manifest = (get-appxpackage microsoft.windowsstor-程序员宅基地
文章浏览阅读2w次。 越来越多小伙伴都将系统升级成Win10正式版了,win10功能强大令不少朋友感到非常满意,但也有一些朋友升级后却遇到了一些问题,比如应用商店、应用打不开或闪退的问题,今天快启动小编就跟大家介绍Win10应用商店、应用打不开或闪退的解决方法。 1、点击任务栏的搜索(Cortana小娜)图标,输入Powershell,在搜索结果中右键单击Powershell,选择“以管理员身份运行”。 2..._$manifest = (get-appxpackage microsoft.windowsstore).installlocation + 鈥榎ap
mysql无法成功启动服务的解决办法【通俗易懂】_mysql服务无法启动-程序员宅基地
文章浏览阅读5.3w次,点赞88次,收藏451次。第一次执行的话,时间会久一些,执行结束后没有输出信息,查看bin的同级目录下会多出一个data文件夹,里面一堆文件。,本人尝试手动创建会有问题,如果自己创建了可以删除掉,再执行后面的操作。则自己手动创建一个,一定不要自己手动创建。_mysql服务无法启动
安装配置Ubuntu-22.04于WSL2的图形化界面_ubuntu22.04安装图形界面-程序员宅基地
文章浏览阅读4.3k次,点赞8次,收藏21次。记录一次安装配置Ubuntu-22.04于WSL2的图形化界面。_ubuntu22.04安装图形界面
#include<> 和 #include""的区别-程序员宅基地
文章浏览阅读6.1w次,点赞30次,收藏82次。#include< file >编译程序会先到标准函数库中找文件 #include”file” 编译程序会先从当前目录中找文件参考原文 转: 在C程序中包含文件有以下两种方法: (1)用符号“<”和“>”将要包含的文件的文件名括起来。这种方法指示预处理程序到预定义的缺省路径下寻找文件。预定义的缺省路径通常是在INCLUDE环境变量中指定的,请看下例: INCLUDE=C:\C_#include
怎么用python画天气图_用Python绘制天气图-程序员宅基地
文章浏览阅读2.3k次。#!/bin/env python#coding=utf-8import codecsimport numpy as npimport datetimeimport reimport pandas as pdimport cartopy.crs as ccrsimport cartopy.feature as cfeaturefrom metpy.calc import wind_componen..._python绘制天气图
最新版YOLOv6训练自己的数据集(超详细完整版!)-程序员宅基地
文章浏览阅读2.1w次,点赞43次,收藏188次。接着上篇文章继续写,本篇文章讲如何训练自己的数据集。从官网下载YOLOv6源码:meituan/YOLOv6: YOLOv6: a single-stage object detection framework dedicated to industrial applications. (github.com)https://github.com/meituan/YOLOv6权重根据自己需求下载,我下的是yolov6s.pt将tools文件夹中的train.py放主目录下,再创一个myself.yaml文件_yolov6训练自己的数据集
随便推点
基于 Matlab 的数字水印技术_matlab 图像水印嵌入与检测-程序员宅基地
文章浏览阅读889次,点赞15次,收藏23次。对一幅未知的图片,我们要对其进行判断是否含有水印,则需要先从该图像中提取 水印,若存在水印,则提取的水印是基于混沌序列加密过的,用该提取的水印与生成的。[10]李振,基于混沌序列算法的计算机图像加密技术的研究[D],沈阳:沈阳工业大学,20。[9]文志强,李陶深,张增芳.一种新的基于混沌序列的图像加密技术.计算机工程,20。于多媒体信息的传播,另一方面是攻击者容易注意到被加密过的多媒体信息,并进一步。去破解加密过的多媒体信息。志信息,或购买者的序列号,这样有利于解决版权纠纷,保护数字产权合法拥有者的利。_matlab 图像水印嵌入与检测
C++ 虚方法_c++虚方法-程序员宅基地
文章浏览阅读1k次。学习笔记:C++ 虚方法/虚函数_c++虚方法
云计算的基础知识_云计算基础知识-程序员宅基地
文章浏览阅读1.6k次。本文主要介绍了传统架构的痛点,云计算的概念,云服务的概念,云计算的特点等。_云计算基础知识
基于cifar10数据集CNN卷积网络的实现_cifar-10 cnn-程序员宅基地
文章浏览阅读4.8k次。Cifar-10数据集是深度学习领域一个常见的数据集。Cifar-10由60000张32*32的RGB彩色图片构成,一共包含有飞机、汽车、鸟、毛、鹿、狗、青蛙、马、船、卡车这10个类别。50000张训练,10000张测试。常被用来作为分类任务来评价深度学习框架和模型的优劣。本教程采用CNN16层神经网络训练_cifar-10 cnn
12星座的出生年月日性格_十二星座出生日期-程序员宅基地
文章浏览阅读577次。展开全部十二星座的出生日e69da5e6ba903231313335323631343130323136353331333363366161期准确来说是根据中国传统的二十四节气的中气时间来划分的。星座是西方人所发明的一种占星术,它的原理是把地球(人)作为参照物,根据太阳系内各星体(太阳、月亮、土星、木星、海王星、水星、冥王星、火星、金星、天王星等行星)的相对位置和相对运动的规律,研究分析这些运动规..._1996年星座时刻
Iterator.next() 和 Iterator.remove()的联合使用_iterator.next remove-程序员宅基地
文章浏览阅读912次,点赞2次,收藏2次。今天学习Iterator进行流操作,删除集合的元素我自己写的代码是这样的 public static void main(String[] args) { ArrayList<String> list = new ArrayList<>(); list.add("A"); list.add("B"); list.add("C"); Iterator<String> iterator =_iterator.next remove