【Earth Engine】基于GEE合成Landsat4/5/7/8/9影像并进行NDVI、NDWI和MNDWI等指数计算_landsat4—5tm影像波段组合-程序员宅基地
技术标签: Earth Engine GEE Landsat 遥感 NDVI
1 简介与摘要
最近在做一个课题,需要逐月还有逐年的NDVI还有一系列衍生数据。
但是逐月的使用Sentinel影像会出现有云,并且掩膜掉容易出现空洞,所以我就想着可以拿Landsat来补充。
同样的思想,在逐年数据上也可以应用于不同的Landsat影像,这样可以丰富影像数量,提升计算质量。比如前一段时间刚上去的Landsat9,就号称可以和Landsat8协同,降低重访周期。
考虑到使用同一系列卫星的场景比较多,所以这篇博文就使用Landsat系列卫星的影像合成。
因此,结合实际应用场景,在这里需要做的工作是:
- 输入某一个时间(或时间段),得到ImageCollection,并且(以地图和数字的形式)显示兴趣区里的影像数量;
- 通过ImageCollection数据合成,并且计算一些基础的指数。
2 思路
首先,要获取一个包含我需要的时间段/影像质量/区域范围的Landsat系列影像,也就是一个Landsat的ImageCollection。
在得到ImageCollection之前,需要考虑一个问题——这些影像的相同的波段名可能对应不同的频率,比如说Landsat4/5/7的第四波段是近红外(NIR),而Landsat8/9的第四波段是红光(red),所以需要在这些波段重命名一下,这样合成才不会合错。
然后,就可以通过一个mean()(当然也可以其他的函数),将一个ImageCollection合成一个Image,以方便计算各种指数。
最后,通过预设的指数计算公式,计算指数即可。
总的来说,比较麻烦的是前半部分。后半部分的工作直接套用一些常规的做法就行了。
3 效果预览
惯例,在代码前面先放效果预览。
我在控制台展示了各个卫星匹配到的影像数量,还有合成后总的ImageCollection的影像数量。
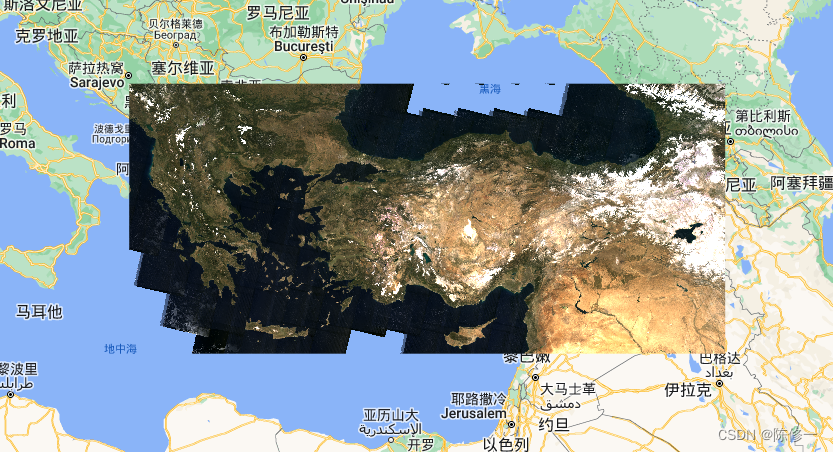
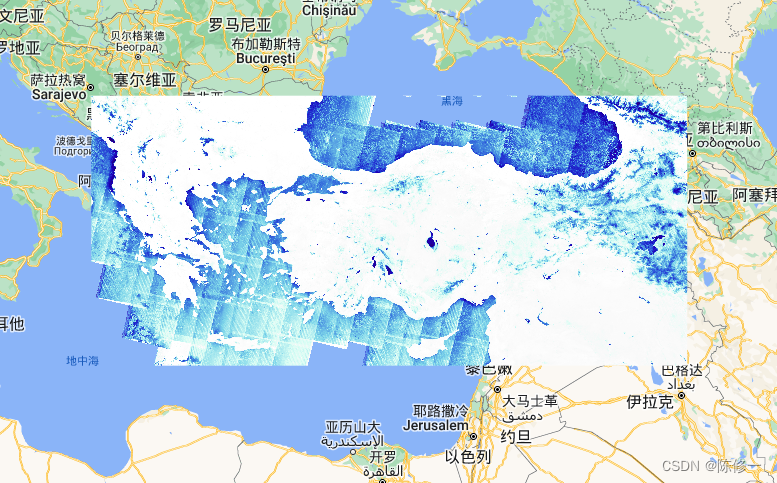
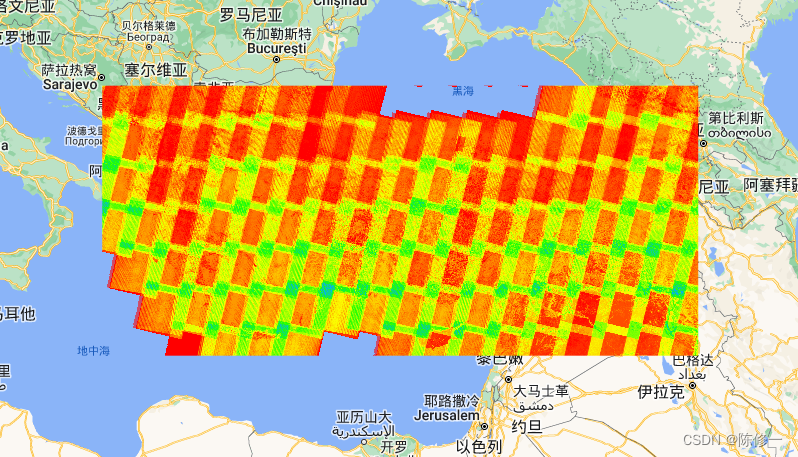
在地图中显示合成后的真彩色和假彩色影像,还有计算后的NDVI、NDWI、MNDWI,最后还有各个区域影像数量的可视化。
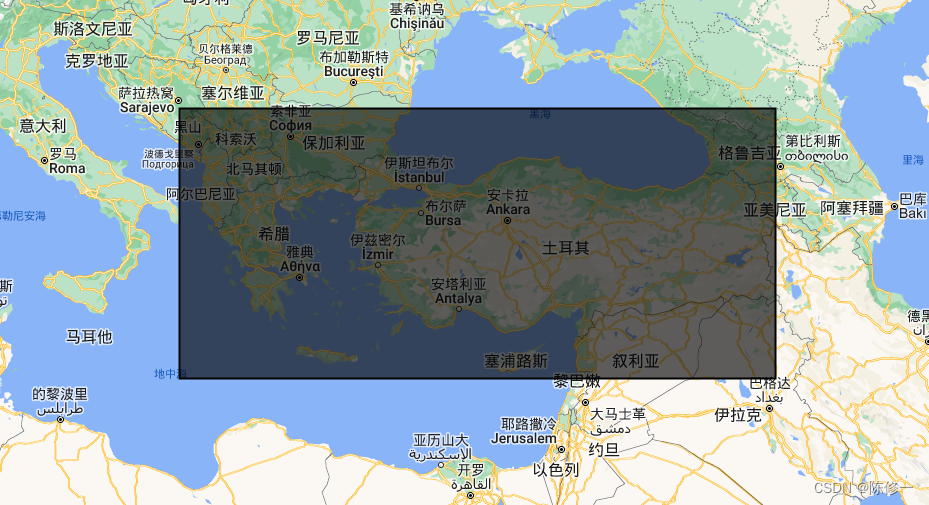
在接下来的示例里,我时间段选取20200101——20210101,云量低于20%,兴趣区随手勾了一个大概希腊+土耳其(老精罗了)。
我的兴趣区(roi):
控制台:
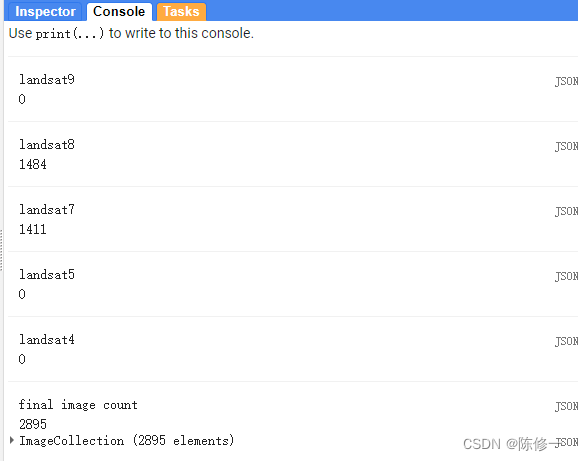
上图的意思是Landsat8得到1484幅影像,Landsat7得到1411幅影像,合成后的ImageCollection有2895幅(1484+1411)影像。
合成后的真彩色影像:
合成后的假彩色影像:
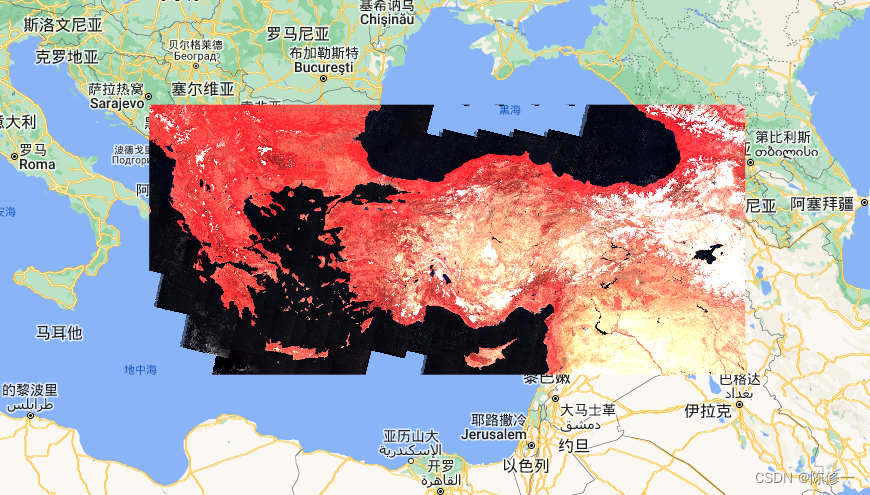
NDVI(绿色是高值,红色是低值):

NDWI(蓝色是高值,白色是低值):
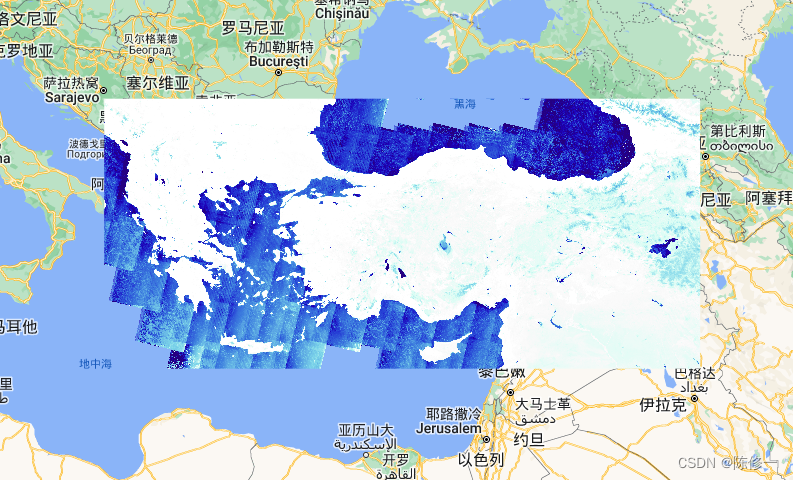
MNDWI(蓝色是高值,白色是低值):
影像数量(以像元为基本计算单位,红色是低值,绿色是中值,蓝色是高值):
4 代码思路
考虑到要调用Landsat4/5/7/8/9,所以先写上这些卫星的预处理函数,包括大气校正和云掩膜;其中4/5/7的函数通用,8/9的函数通用。如下:
function applyScaleFactorsL89(image) {

  var opticalBands = image.select('SR_B.').multiply(0.0000275).add(-0.2);
  var thermalBands = image.select('ST_B.*').multiply(0.00341802).add(149.0);
  return image.addBands(opticalBands, null, true)
              .addBands(thermalBands, null, true);
}

function applyScaleFactorsL457(image) {

  var opticalBands = image.select('SR_B.').multiply(0.0000275).add(-0.2);
  var thermalBand = image.select('ST_B6').multiply(0.00341802).add(149.0);
  return image.addBands(opticalBands, null, true)
              .addBands(thermalBand, null, true);
}

function cloudmaskL89(image) {

  // Bits 3 and 5 are cloud shadow and cloud, respectively.
  var cloudShadowBitMask = (1 << 4);
  var cloudsBitMask = (1 << 3);
  // Get the pixel QA band.
  var qa = image.select('QA_PIXEL');
  // Both flags should be set to zero, indicating clear conditions.
  var mask = qa.bitwiseAnd(cloudShadowBitMask).eq(0)
                 .and(qa.bitwiseAnd(cloudsBitMask).eq(0));
  return image.updateMask(mask);
}

function cloudMaskL457(image) {

  var qa = image.select('QA_PIXEL');
  // If the cloud bit (5) is set and the cloud confidence (7) is high
  // or the cloud shadow bit is set (3), then it's a bad pixel.
  var cloud = qa.bitwiseAnd(1 << 3)
                  .and(qa.bitwiseAnd(1 << 9))
                  .or(qa.bitwiseAnd(1 << 4));
  // Remove edge pixels that don't occur in all bands
  var mask2 = image.mask().reduce(ee.Reducer.min());
  return image.updateMask(cloud.not()).updateMask(mask2);
}
写完预处理的函数,就需要改波段名称,以便放在同一个ImageCollection里能自动合成。因此,需要写将波段重命名的函数,如下:
function bandRenameL89(image) {

  var blue = image.select(['SR_B2']).rename('blue');
  var green = image.select(['SR_B3']).rename('green');
  var red = image.select(['SR_B4']).rename('red');
  var nir = image.select(['SR_B5']).rename('nir');
  var swir1 = image.select(['SR_B6']).rename('swir1');
  var swir2 = image.select(['SR_B7']).rename('swir2');
  var new_image = blue.addBands([green, red, nir, swir1, swir2]);
  return new_image;
}

function bandRenameL457(image) {

  var blue = image.select(['SR_B1']).rename('blue');
  var green = image.select(['SR_B2']).rename('green');
  var red = image.select(['SR_B3']).rename('red');
  var nir = image.select(['SR_B4']).rename('nir');
  var swir1 = image.select(['SR_B5']).rename('swir1');
  var swir2 = image.select(['SR_B7']).rename('swir2');
  var new_image = blue.addBands([green, red, nir, swir1, swir2]);
  return new_image;
}
在这里,选取常用的光学波段,将波段重命名为blue、green、red、nir、swir1、swir2。
最后,根据波段名称,写指数计算的函数。和其他人的文章不同,这里的输入的波段名称是我们重命名后的(见上面的代码)。这里以NDVI、NDWI和MNDWI为例,如下:
function NDVI(img) {

 var nir = img.select("nir");
 var red = img.select("red");
 var ndvi = img.expression(
   "(nir - red)/(nir + red)",
   {

     "nir": nir,
     "red": red
   }
 );
 return ndvi;
}

function NDWI(img) {

 var green = img.select("green");
 var nir = img.select("nir");
 var ndwi = img.expression(
   "(green - nir)/(green + nir)",
   {

     "green": green,
     "nir": nir
   }
 );
 return ndwi;
}

function MNDWI(img) {

 var green = img.select("green");
 var swir1 = img.select("swir1");
 var mndwi = img.expression(
   "(green - swir1)/(green + swir1)",
   {

     "green": green,
     "swir1": swir1
   }
 );
 return mndwi;
}
好了,到这里,所有预置的函数都写完了。
接下来就是对各个卫星的影像预处理,然后放进同一个ImageCollection里。下面是利用上述的函数进行预处理,可以根据需要自行调整。如下:
// landsat 9
var l9_col = ee.ImageCollection('LANDSAT/LC09/C02/T1_L2')
                  .filterBounds(roi)
                  .filterDate(start_date, end_date)
                  .filter(ee.Filter.lt('CLOUD_COVER', cloudCover))
                  .map(applyScaleFactorsL89)
                  .map(cloudmaskL89)
                  .map(bandRenameL89)
                  ;
print('landsat9', l9_col.size())
// landsat 8
var l8_col = ee.ImageCollection("LANDSAT/LC08/C02/T1_L2")
                  .filterBounds(roi)
                  .filterDate(start_date, end_date)
                  .filter(ee.Filter.lt('CLOUD_COVER', cloudCover))
                  .map(applyScaleFactorsL89)
                  .map(cloudmaskL89)
                  .map(bandRenameL89)
                  ;
print('landsat8', l8_col.size())
// landsat 7
var l7_col = ee.ImageCollection('LANDSAT/LE07/C02/T1_L2')
                  .filterBounds(roi)
                  .filterDate(start_date, end_date)
                  .filter(ee.Filter.lt('CLOUD_COVER', cloudCover))
                  .map(applyScaleFactorsL457)
                  .map(cloudMaskL457)
                  .map(bandRenameL457)
                  ;
print('landsat7', l7_col.size())
// landsat 5
var l5_col = ee.ImageCollection('LANDSAT/LT05/C02/T1_L2')
                  .filterBounds(roi)
                  .filterDate(start_date, end_date)
                  .filter(ee.Filter.lt('CLOUD_COVER', cloudCover))
                  .map(applyScaleFactorsL457)
                  .map(cloudMaskL457)
                  .map(bandRenameL457)
                  ;
print('landsat5', l5_col.size())
// landsat 4
var l4_col = ee.ImageCollection('LANDSAT/LT04/C02/T1_L2')
                  .filterBounds(roi)
                  .filterDate(start_date, end_date)
                  .filter(ee.Filter.lt('CLOUD_COVER', cloudCover))
                  .map(applyScaleFactorsL457)
                  .map(cloudMaskL457)
                  .map(bandRenameL457)
                  ;
print('landsat4', l4_col.size())
需要注意的是,roi是我们划定的研究区,sart_date和end_date是我们需要的影像时间范围,cloudCover是我们预设的最大云量,为了方便修改参数,一些影像要求(日期和云量)在这里我使用变量代替。另外,在每个卫星预处理函数后面,用size()函数print出了匹配到的影像数量。效果图见前一章。
接下来的工作就是把这些影像,合成一个ImageCollection。这里需要用到的函数是merge(),具体如下:
var image = l9_col
            .merge(l8_col)
            .merge(l7_col)
            .merge(l5_col)
            .merge(l4_col)
            ;
print("final image count", image.size(), image)
最后,调用指数计算的函数对最终合成的ImageCollection进行计算,不过在此之前需要先mean合成一下,如下:
print("final image count", image.size(), image)
var final_image = image.mean().clip(roi);
var image_ndvi = NDVI(final_image)
var image_ndwi= NDWI(final_image)
var image_mndwi = MNDWI(final_image)
最后简单写个可视化,包括NDVI、NDWI、MNDWI:
Map.addLayer(final_image, {
    bands: ["red", "green", "blue"], min:0.0, max:0.25}, "image")
Map.addLayer(final_image, {
    bands: ["nir", "red", "green"], min:0.0, max:0.25}, "image2")
var ndvi_palettes = ["#e700d5", "#e60000", "#e69f00", "#dfe200", "#7ebe00", "#00a10c", "#008110"];
Map.addLayer(image_ndvi.clip(roi), {
    min:-0.5, max:0.7, palette:ndvi_palettes}, "ndvi");
var ndwi_palettes = ["ffffff","#f9f9f9","#d8fdf4","#7dd5e9","3d7ede","243ad4","#1c00b8", "#250081"];
Map.addLayer(image_ndwi.clip(roi), {
    min:-0.5, max:0.7, palette:ndwi_palettes}, "ndwi");
Map.addLayer(image_mndwi.clip(roi), {
    min:-0.5, max:0.9, palette:ndwi_palettes}, "mndwi");
然后,顺手把影像数量的可视化写了,这里用到count(),如下:
var images_count = image.select('red').count();
Map.addLayer(images_count.rename('count').clip(roi), {
    min:10, max:80, palette:["#ff0000", "#fbff00", "#1dff02", "#02adff"]}, "images count");
好了,完成了。最后导出就行。
// export to drive
Export.image.toDrive(
  {

    image: image_ndvi.clip(roi),
    folder: "ndvi",
    description: "ndvi" + year_name,
    scale: 30,
    region: roi,
    maxPixels: 1e13
  })
Export.image.toDrive(
  {

    image: image_ndwi.clip(roi),
    folder: "ndwi",
    description: "ndwi" + year_name,
    scale: 30,
    region: roi,
    maxPixels: 1e13
  })
Export.image.toDrive(
  {

    image: image_mndwi.clip(roi),
    folder: "mndwi",
    description: "mndwi" + year_name,
    scale: 30,
    region: roi,
    maxPixels: 1e13
  })
对了,要记得在最前面补上需要更改的参数。
var year_name = 2020;
var start_date = (year_name) + '-01-01';
var end_date   = (year_name + 1) + '-01-01';
var cloudCover = 20
5 完整代码
我的代码链接在这,可以直接使用。
完整代码如下(和链接中相同):
var year_name = 2020;
var start_date = (year_name) + '-01-01';
var end_date   = (year_name + 1) + '-01-01';
var cloudCover = 20

Map.addLayer(roi)

// indices
function NDVI(img) {

 var nir = img.select("nir");
 var red = img.select("red");
 var ndvi = img.expression(
   "(nir - red)/(nir + red)",
   {

     "nir": nir,
     "red": red
   }
 );
 return ndvi;
}

function NDWI(img) {

 var green = img.select("green");
 var nir = img.select("nir");
 var ndwi = img.expression(
   "(green - nir)/(green + nir)",
   {

     "green": green,
     "nir": nir
   }
 );
 return ndwi;
}

function MNDWI(img) {

 var green = img.select("green");
 var swir1 = img.select("swir1");
 var mndwi = img.expression(
   "(green - swir1)/(green + swir1)",
   {

     "green": green,
     "swir1": swir1
   }
 );
 return mndwi;
}


function bandRenameL89(image) {

  var blue = image.select(['SR_B2']).rename('blue');
  var green = image.select(['SR_B3']).rename('green');
  var red = image.select(['SR_B4']).rename('red');
  var nir = image.select(['SR_B5']).rename('nir');
  var swir1 = image.select(['SR_B6']).rename('swir1');
  var swir2 = image.select(['SR_B7']).rename('swir2');
  var new_image = blue.addBands([green, red, nir, swir1, swir2]);
  return new_image;
}

function bandRenameL457(image) {

  var blue = image.select(['SR_B1']).rename('blue');
  var green = image.select(['SR_B2']).rename('green');
  var red = image.select(['SR_B3']).rename('red');
  var nir = image.select(['SR_B4']).rename('nir');
  var swir1 = image.select(['SR_B5']).rename('swir1');
  var swir2 = image.select(['SR_B7']).rename('swir2');
  var new_image = blue.addBands([green, red, nir, swir1, swir2]);
  return new_image;
}

function applyScaleFactorsL89(image) {

  var opticalBands = image.select('SR_B.').multiply(0.0000275).add(-0.2);
  var thermalBands = image.select('ST_B.*').multiply(0.00341802).add(149.0);
  return image.addBands(opticalBands, null, true)
              .addBands(thermalBands, null, true);
}

function applyScaleFactorsL457(image) {

  var opticalBands = image.select('SR_B.').multiply(0.0000275).add(-0.2);
  var thermalBand = image.select('ST_B6').multiply(0.00341802).add(149.0);
  return image.addBands(opticalBands, null, true)
              .addBands(thermalBand, null, true);
}

function cloudmaskL89(image) {

  // Bits 3 and 5 are cloud shadow and cloud, respectively.
  var cloudShadowBitMask = (1 << 4);
  var cloudsBitMask = (1 << 3);
  // Get the pixel QA band.
  var qa = image.select('QA_PIXEL');
  // Both flags should be set to zero, indicating clear conditions.
  var mask = qa.bitwiseAnd(cloudShadowBitMask).eq(0)
                 .and(qa.bitwiseAnd(cloudsBitMask).eq(0));
  return image.updateMask(mask);
}

function cloudMaskL457(image) {

  var qa = image.select('QA_PIXEL');
  // If the cloud bit (5) is set and the cloud confidence (7) is high
  // or the cloud shadow bit is set (3), then it's a bad pixel.
  var cloud = qa.bitwiseAnd(1 << 3)
                  .and(qa.bitwiseAnd(1 << 9))
                  .or(qa.bitwiseAnd(1 << 4));
  // Remove edge pixels that don't occur in all bands
  var mask2 = image.mask().reduce(ee.Reducer.min());
  return image.updateMask(cloud.not()).updateMask(mask2);
}


// get image collection
// landsat 9
var l9_col = ee.ImageCollection('LANDSAT/LC09/C02/T1_L2')
                  .filterBounds(roi)
                  .filterDate(start_date, end_date)
                  .filter(ee.Filter.lt('CLOUD_COVER', cloudCover))
                  .map(applyScaleFactorsL89)
                  .map(cloudmaskL89)
                  .map(bandRenameL89)
                  ;
print('landsat9', l9_col.size())
// landsat 8
var l8_col = ee.ImageCollection("LANDSAT/LC08/C02/T1_L2")
                  .filterBounds(roi)
                  .filterDate(start_date, end_date)
                  .filter(ee.Filter.lt('CLOUD_COVER', cloudCover))
                  .map(applyScaleFactorsL89)
                  .map(cloudmaskL89)
                  .map(bandRenameL89)
                  ;
print('landsat8', l8_col.size())
// landsat 7
var l7_col = ee.ImageCollection('LANDSAT/LE07/C02/T1_L2')
                  .filterBounds(roi)
                  .filterDate(start_date, end_date)
                  .filter(ee.Filter.lt('CLOUD_COVER', cloudCover))
                  .map(applyScaleFactorsL457)
                  .map(cloudMaskL457)
                  .map(bandRenameL457)
                  ;
print('landsat7', l7_col.size())
// landsat 5
var l5_col = ee.ImageCollection('LANDSAT/LT05/C02/T1_L2')
                  .filterBounds(roi)
                  .filterDate(start_date, end_date)
                  .filter(ee.Filter.lt('CLOUD_COVER', cloudCover))
                  .map(applyScaleFactorsL457)
                  .map(cloudMaskL457)
                  .map(bandRenameL457)
                  ;
print('landsat5', l5_col.size())
// landsat 4
var l4_col = ee.ImageCollection('LANDSAT/LT04/C02/T1_L2')
                  .filterBounds(roi)
                  .filterDate(start_date, end_date)
                  .filter(ee.Filter.lt('CLOUD_COVER', cloudCover))
                  .map(applyScaleFactorsL457)
                  .map(cloudMaskL457)
                  .map(bandRenameL457)
                  ;
print('landsat4', l4_col.size())

// combine, mean and calculate
var image = l9_col
            .merge(l8_col)
            .merge(l7_col)
            .merge(l5_col)
            .merge(l4_col)
            ;
print("final image count", image.size(), image)
var final_image = image.mean().clip(roi);
var image_ndvi = NDVI(final_image)
var image_ndwi= NDWI(final_image)
var image_mndwi = MNDWI(final_image)

Map.addLayer(final_image, {
    bands: ["red", "green", "blue"], min:0.0, max:0.25}, "image")
Map.addLayer(final_image, {
    bands: ["nir", "red", "green"], min:0.0, max:0.25}, "image2")
var ndvi_palettes = ["#e700d5", "#e60000", "#e69f00", "#dfe200", "#7ebe00", "#00a10c", "#008110"];
Map.addLayer(image_ndvi.clip(roi), {
    min:-0.5, max:0.7, palette:ndvi_palettes}, "ndvi");
var ndwi_palettes = ["ffffff","#f9f9f9","#d8fdf4","#7dd5e9","3d7ede","243ad4","#1c00b8", "#250081"];
Map.addLayer(image_ndwi.clip(roi), {
    min:-0.5, max:0.7, palette:ndwi_palettes}, "ndwi");
Map.addLayer(image_mndwi.clip(roi), {
    min:-0.5, max:0.9, palette:ndwi_palettes}, "mndwi");


var images_count = image.select('red').count();
Map.addLayer(images_count.rename('count').clip(roi), {
    min:10, max:80, palette:["#ff0000", "#fbff00", "#1dff02", "#02adff"]}, "images count");


// export to drive
// export to drive
Export.image.toDrive(
  {

    image: image_ndvi.clip(roi),
    folder: "ndvi",
    description: "ndvi" + year_name,
    scale: 30,
    region: roi,
    maxPixels: 1e13
  })
Export.image.toDrive(
  {

    image: image_ndwi.clip(roi),
    folder: "ndwi",
    description: "ndwi" + year_name,
    scale: 30,
    region: roi,
    maxPixels: 1e13
  })
Export.image.toDrive(
  {

    image: image_mndwi.clip(roi),
    folder: "mndwi",
    description: "mndwi" + year_name,
    scale: 30,
    region: roi,
    maxPixels: 1e13
  })
6 后记
刚开始学习GEE,可能有些地方不太专业不太科学,希望诸位同行前辈不吝赐教或者有什么奇妙的想法可以和我共同探讨一下。可以在csdn私信我或者联系我邮箱([email protected]),不过还是希望大家邮箱联系我,csdn私信很糟糕而且我上csdn也很随缘。
如果对你有帮助,还望支持一下~点击此处施舍或扫下图的码。
-----------------------分割线(以下是乞讨内容)-----------------------

智能推荐
攻防世界_难度8_happy_puzzle_攻防世界困难模式攻略图文-程序员宅基地
文章浏览阅读645次。这个肯定是末尾的IDAT了,因为IDAT必须要满了才会开始一下个IDAT,这个明显就是末尾的IDAT了。,对应下面的create_head()代码。,对应下面的create_tail()代码。不要考虑爆破,我已经试了一下,太多情况了。题目来源:UNCTF。_攻防世界困难模式攻略图文
达梦数据库的导出(备份)、导入_达梦数据库导入导出-程序员宅基地
文章浏览阅读2.9k次,点赞3次,收藏10次。偶尔会用到,记录、分享。1. 数据库导出1.1 切换到dmdba用户su - dmdba1.2 进入达梦数据库安装路径的bin目录,执行导库操作 导出语句:./dexp cwy_init/[email protected]:5236 file=cwy_init.dmp log=cwy_init_exp.log 注释: cwy_init/init_123..._达梦数据库导入导出
js引入kindeditor富文本编辑器的使用_kindeditor.js-程序员宅基地
文章浏览阅读1.9k次。1. 在官网上下载KindEditor文件,可以删掉不需要要到的jsp,asp,asp.net和php文件夹。接着把文件夹放到项目文件目录下。2. 修改html文件,在页面引入js文件:<script type="text/javascript" src="./kindeditor/kindeditor-all.js"></script><script type="text/javascript" src="./kindeditor/lang/zh-CN.js"_kindeditor.js
STM32学习过程记录11——基于STM32G431CBU6硬件SPI+DMA的高效WS2812B控制方法-程序员宅基地
文章浏览阅读2.3k次,点赞6次,收藏14次。SPI的详情简介不必赘述。假设我们通过SPI发送0xAA,我们的数据线就会变为10101010,通过修改不同的内容,即可修改SPI中0和1的持续时间。比如0xF0即为前半周期为高电平,后半周期为低电平的状态。在SPI的通信模式中,CPHA配置会影响该实验,下图展示了不同采样位置的SPI时序图[1]。CPOL = 0,CPHA = 1:CLK空闲状态 = 低电平,数据在下降沿采样,并在上升沿移出CPOL = 0,CPHA = 0:CLK空闲状态 = 低电平,数据在上升沿采样,并在下降沿移出。_stm32g431cbu6
计算机网络-数据链路层_接收方收到链路层数据后,使用crc检验后,余数为0,说明链路层的传输时可靠传输-程序员宅基地
文章浏览阅读1.2k次,点赞2次,收藏8次。数据链路层习题自测问题1.数据链路(即逻辑链路)与链路(即物理链路)有何区别?“电路接通了”与”数据链路接通了”的区别何在?2.数据链路层中的链路控制包括哪些功能?试讨论数据链路层做成可靠的链路层有哪些优点和缺点。3.网络适配器的作用是什么?网络适配器工作在哪一层?4.数据链路层的三个基本问题(帧定界、透明传输和差错检测)为什么都必须加以解决?5.如果在数据链路层不进行帧定界,会发生什么问题?6.PPP协议的主要特点是什么?为什么PPP不使用帧的编号?PPP适用于什么情况?为什么PPP协议不_接收方收到链路层数据后,使用crc检验后,余数为0,说明链路层的传输时可靠传输
软件测试工程师移民加拿大_无证移民,未受过软件工程师的教育(第1部分)-程序员宅基地
文章浏览阅读587次。软件测试工程师移民加拿大 无证移民,未受过软件工程师的教育(第1部分) (Undocumented Immigrant With No Education to Software Engineer(Part 1))Before I start, I want you to please bear with me on the way I write, I have very little gen...
随便推点
Thinkpad X250 secure boot failed 启动失败问题解决_安装完系统提示secureboot failure-程序员宅基地
文章浏览阅读304次。Thinkpad X250笔记本电脑,装的是FreeBSD,进入BIOS修改虚拟化配置(其后可能是误设置了安全开机),保存退出后系统无法启动,显示:secure boot failed ,把自己惊出一身冷汗,因为这台笔记本刚好还没开始做备份.....根据错误提示,到bios里面去找相关配置,在Security里面找到了Secure Boot选项,发现果然被设置为Enabled,将其修改为Disabled ,再开机,终于正常启动了。_安装完系统提示secureboot failure
C++如何做字符串分割(5种方法)_c++ 字符串分割-程序员宅基地
文章浏览阅读10w+次,点赞93次,收藏352次。1、用strtok函数进行字符串分割原型: char *strtok(char *str, const char *delim);功能:分解字符串为一组字符串。参数说明:str为要分解的字符串,delim为分隔符字符串。返回值:从str开头开始的一个个被分割的串。当没有被分割的串时则返回NULL。其它:strtok函数线程不安全,可以使用strtok_r替代。示例://借助strtok实现split#include <string.h>#include <stdio.h&_c++ 字符串分割
2013第四届蓝桥杯 C/C++本科A组 真题答案解析_2013年第四届c a组蓝桥杯省赛真题解答-程序员宅基地
文章浏览阅读2.3k次。1 .高斯日记 大数学家高斯有个好习惯:无论如何都要记日记。他的日记有个与众不同的地方,他从不注明年月日,而是用一个整数代替,比如:4210后来人们知道,那个整数就是日期,它表示那一天是高斯出生后的第几天。这或许也是个好习惯,它时时刻刻提醒着主人:日子又过去一天,还有多少时光可以用于浪费呢?高斯出生于:1777年4月30日。在高斯发现的一个重要定理的日记_2013年第四届c a组蓝桥杯省赛真题解答
基于供需算法优化的核极限学习机(KELM)分类算法-程序员宅基地
文章浏览阅读851次,点赞17次,收藏22次。摘要:本文利用供需算法对核极限学习机(KELM)进行优化,并用于分类。
metasploitable2渗透测试_metasploitable2怎么进入-程序员宅基地
文章浏览阅读1.1k次。一、系统弱密码登录1、在kali上执行命令行telnet 192.168.26.1292、Login和password都输入msfadmin3、登录成功,进入系统4、测试如下:二、MySQL弱密码登录:1、在kali上执行mysql –h 192.168.26.129 –u root2、登录成功,进入MySQL系统3、测试效果:三、PostgreSQL弱密码登录1、在Kali上执行psql -h 192.168.26.129 –U post..._metasploitable2怎么进入
Python学习之路:从入门到精通的指南_python人工智能开发从入门到精通pdf-程序员宅基地
文章浏览阅读257次。本文将为初学者提供Python学习的详细指南,从Python的历史、基础语法和数据类型到面向对象编程、模块和库的使用。通过本文,您将能够掌握Python编程的核心概念,为今后的编程学习和实践打下坚实基础。_python人工智能开发从入门到精通pdf