Quartz项目搭建与任务执行源码分析_quartz源码-程序员宅基地
数据库准备
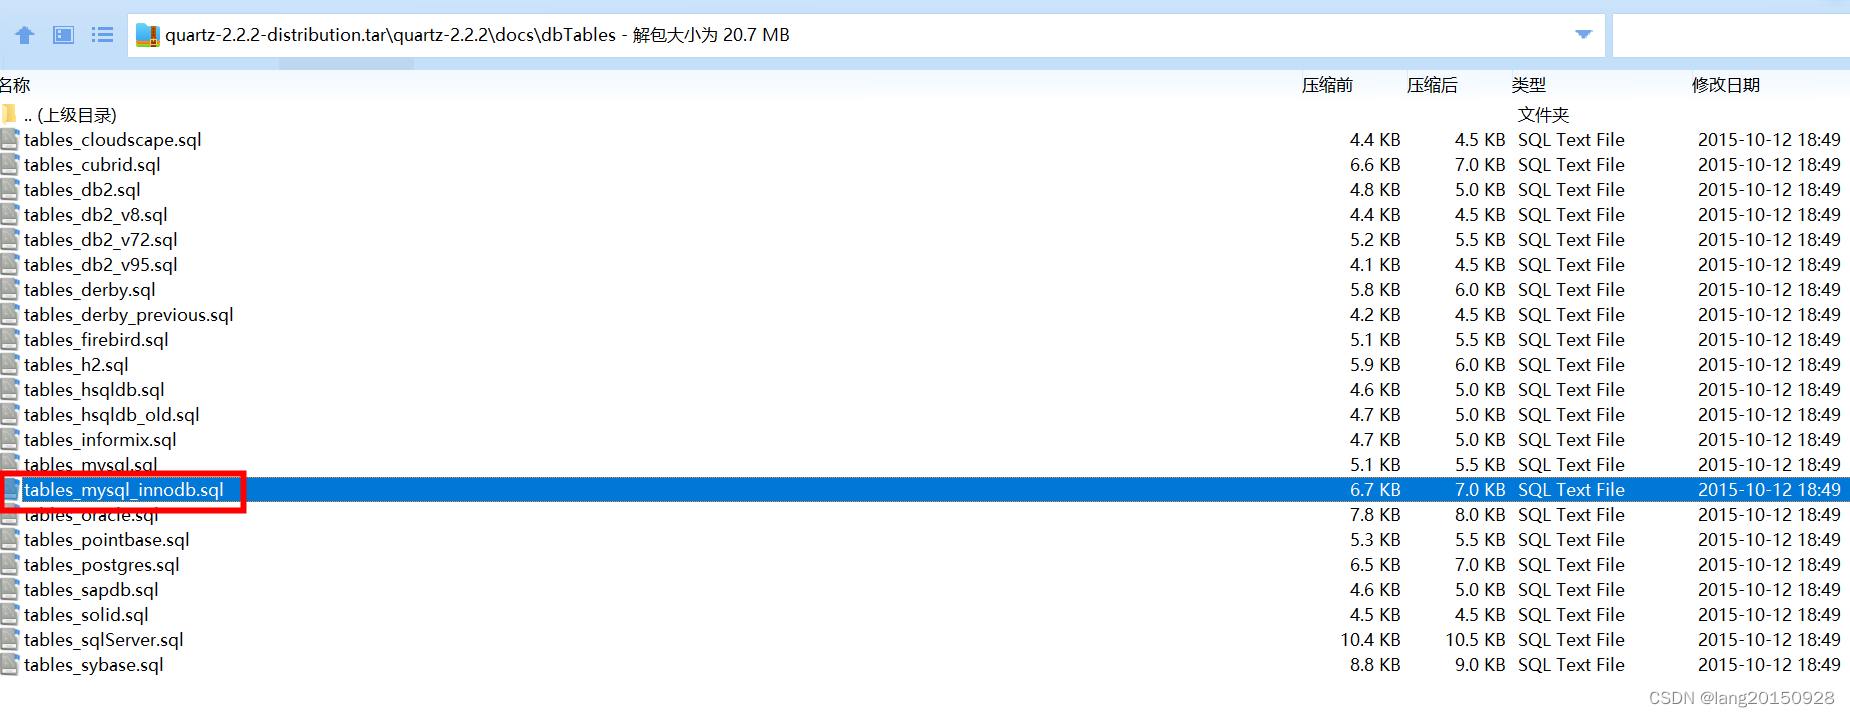
准备一个MySQL数据库,版本为8.0,然后创建一个库,并从quartz官方的版本包中找到名称为tables_mysql_innodb.sql的脚本执行进去(从绑定资源获取或者参考附录一)。
项目依赖说明
创建一个Maven项目,引入以下依赖
<dependency>
    <groupId>org.quartz-scheduler</groupId>
    <artifactId>quartz</artifactId>
    <version>2.2.1</version>
</dependency>
<dependency>
    <groupId>org.quartz-scheduler</groupId>
    <artifactId>quartz-jobs</artifactId>
    <version>2.2.1</version>
</dependency>
<dependency>
    <groupId>mysql</groupId>
    <artifactId>mysql-connector-java</artifactId>
    <version>8.0.16</version>
</dependency>
<dependency>
    <groupId>com.alibaba</groupId>
    <artifactId>druid</artifactId>
	<version>1.1.17</version>
</dependency>
Quartz简单demo
首先创建一个Job,在Quartz当中通过实现Job来执行业务逻辑
package org.quartz.myexample;

import org.quartz.Job;
import org.quartz.JobExecutionContext;
import org.quartz.JobExecutionException;
import org.quartz.SchedulerException;

import java.time.LocalDateTime;

public class HelloJob implements Job {


    /**
     * 传递给 execute() 方法的 JobExecutionContext 对象中保存着该 job 运行时的一些信息 ,执行 job 的 scheduler 的引用,
     * 触发 job 的 trigger 的引用,JobDetail 对象引用,以及一些其它信息。
     */
    @Override
    public void execute(JobExecutionContext context) throws JobExecutionException {

        Object tv1 = context.getTrigger().getJobDataMap().get("t1");
        Object tv2 = context.getTrigger().getJobDataMap().get("t2");
        Object jv1 = context.getJobDetail().getJobDataMap().get("j1");
        Object jv2 = context.getJobDetail().getJobDataMap().get("j2");
        Object sv = null;
        try {

            sv = context.getScheduler().getContext().get("skey");
        } catch (SchedulerException e) {

            e.printStackTrace();
        }
        System.out.println(tv1 + ":" + tv2);
        System.out.println(jv1 + ":" + jv2);
        System.out.println(sv);
        System.out.println("hello:" + LocalDateTime.now());
    }
}
然后,获取Scheduler实例,创建一个Trigger和JobDetail,并使用scheduler进行调度,最后启动Scheduler,分别为下面源码中的第一、二、三、四步骤。
package org.quartz.myexample;

import org.quartz.*;
import org.quartz.impl.StdSchedulerFactory;

import java.util.Date;

/**
 * -Dorg.quartz.properties=D:\Tools\activtiDemo\src\main\resources\quartz.properties
 */
public class QuartzTest {


    public static void main(String[] args) {

        try {

        	// 第一步
            // Grab the scheduler instance from the Factory
            Scheduler scheduler = StdSchedulerFactory.getDefaultScheduler();
            scheduler.getContext().put("skey", "svalue");
			// 第二步
            // Trigger the job to run now, and then repeat every 40 seconds
            Trigger trigger = TriggerBuilder.newTrigger()
                    .withIdentity("mytrigger", "group1")
                    .usingJobData("t1", "tv1")
//                    .startNow()
                    .withSchedule(SimpleScheduleBuilder.simpleSchedule()
                            .withIntervalInSeconds(3)
                            .repeatForever())
                    .build();

            trigger.getJobDataMap().put("t2", "tv2");

            // define the job and tie it to our HelloJob class
            JobDetail job = JobBuilder.newJob(HelloJob.class)
                    .usingJobData("j1", "jv1")
                    .withIdentity("myjob", "group1")
                    .build();
            job.getJobDataMap().put("j2", "jv2");

            scheduler.deleteJob(job.getKey());

			// 第三步
            // Tell quartz to schedule the job using our trigger
            /**
             * 为什么既有 Job,又有 Trigger 呢?很多任务调度器并不区分 Job 和 Trigger。有些调度器只是简单地通过一个执行时间
             * 和一些 job 标识符来定义一个 Job;其它的一些调度器将 Quartz 的 Job 和 Trigger 对象合二为一。在开发 Quartz 的时候,
             * 我们认为将调度和要调度的任务分离是合理的。在我们看来,这可以带来很多好处。
             *
             * 例如,Job 被创建后,可以保存在 Scheduler 中,与 Trigger 是独立的,同一个 Job可以有多个 Trigger;
             * 这种松耦合的另一个好处是,当与 Scheduler 中的 Job 关联的 trigger 都过期时,可以配置 Job 稍后被重新调度,
             * 而不用重新定义 Job;还有,可以修改或者替换 Trigger,而不用重新定义与之关联的 Job。
             */
            scheduler.scheduleJob(job, trigger);
            // and start it
            // 第四步
            scheduler.start();

            Thread.sleep(Integer.MAX_VALUE);

            scheduler.shutdown();

        } catch (SchedulerException | InterruptedException e) {

            e.printStackTrace();
        }
    }
程序配置
编辑一个quartz.properties文件,内容如下
# Default Properties file for use by StdSchedulerFactory
# to create a Quartz Scheduler Instance, if a different
# properties file is not explicitly specified.
#

## 此调度程序的名称
org.quartz.scheduler.instanceName: DefaultQuartzScheduler
org.quartz.scheduler.skipUpdateCheck=true

org.quartz.threadPool.threadCount: 10
org.quartz.threadPool.threadPriority: 5

org.quartz.jobStore.class = org.quartz.impl.jdbcjobstore.JobStoreTX
org.quartz.jobStore.driverDelegateClass = org.quartz.impl.jdbcjobstore.StdJDBCDelegate
org.quartz.jobStore.tablePrefix = QRTZ_
org.quartz.jobStore.dataSource = myDS
org.quartz.dataSource.myDS.connectionProvider.class:com.alibaba.druid.support.quartz.DruidQuartzConnectionProvider
org.quartz.dataSource.myDS.driverClassName = com.mysql.cj.jdbc.Driver
org.quartz.dataSource.myDS.url = jdbc:mysql://localhost:3306/quartz?characterEncoding=utf-8
org.quartz.dataSource.myDS.username = root
org.quartz.dataSource.myDS.password = root
org.quartz.dataSource.myDS.maxActive = 5

#============================================================================
# Other Example Delegates
#============================================================================
#org.quartz.jobStore.driverDelegateClass=org.quartz.impl.jdbcjobstore.DB2v6Delegate
#org.quartz.jobStore.driverDelegateClass=org.quartz.impl.jdbcjobstore.DB2v7Delegate
#org.quartz.jobStore.driverDelegateClass=org.quartz.impl.jdbcjobstore.DriverDelegate
#org.quartz.jobStore.driverDelegateClass=org.quartz.impl.jdbcjobstore.HSQLDBDelegate
#org.quartz.jobStore.driverDelegateClass=org.quartz.impl.jdbcjobstore.MSSQLDelegate
#org.quartz.jobStore.driverDelegateClass=org.quartz.impl.jdbcjobstore.PointbaseDelegate
#org.quartz.jobStore.driverDelegateClass=org.quartz.impl.jdbcjobstore.PostgreSQLDelegate
#org.quartz.jobStore.driverDelegateClass=org.quartz.impl.jdbcjobstore.StdJDBCDelegate
#org.quartz.jobStore.driverDelegateClass=org.quartz.impl.jdbcjobstore.WebLogicDelegate
#org.quartz.jobStore.driverDelegateClass=org.quartz.impl.jdbcjobstore.oracle.OracleDelegate
#org.quartz.jobStore.driverDelegateClass=org.quartz.impl.jdbcjobstore.oracle.WebLogicOracleDelegate
程序执行
执行QuartzTest时,需要指定启动参数读取配置文件,比如
-Dorg.quartz.properties=D:\Tools\activtiDemo\src\main\resources\quartz.properties
源码分析
1. 启动流程
通过StdSchedulerFactory#getDefaultScheduler获取一个调度器对象。在此过程中会执行org.quartz.impl.StdSchedulerFactory#instantiate()方法完成初始化操作。
此过程中会创建用于任务执行的工作线程
// Get ThreadPool Properties
// ~~~~~~~~~~~~~~~~~~~~~~~~~~~~~~~~~~~~~~~~~~~~~~~

String tpClass = cfg.getStringProperty(PROP_THREAD_POOL_CLASS, SimpleThreadPool.class.getName());

if (tpClass == null) {

    initException = new SchedulerException(
            "ThreadPool class not specified. ");
    throw initException;
}

try {

    tp = (ThreadPool) loadHelper.loadClass(tpClass).newInstance();
} catch (Exception e) {

    initException = new SchedulerException("ThreadPool class '"
            + tpClass + "' could not be instantiated.", e);
    throw initException;
}
tProps = cfg.getPropertyGroup(PROP_THREAD_POOL_PREFIX, true);
try {

    setBeanProps(tp, tProps);
} catch (Exception e) {

    initException = new SchedulerException("ThreadPool class '"
            + tpClass + "' props could not be configured.", e);
    throw initException;
}
线程池实现类使用的默认值,而线程池大小设置为10,线程优先级为正常值(NORM_PRIORITY)。
org.quartz.threadPool.threadCount: 10
org.quartz.threadPool.threadPriority: 5
创建JobStore对象
// Get JobStore Properties
// ~~~~~~~~~~~~~~~~~~~~~~~~~~~~~~~~~~~~~~~~~~~~~~~~~

String jsClass = cfg.getStringProperty(PROP_JOB_STORE_CLASS,
        RAMJobStore.class.getName());

if (jsClass == null) {

    initException = new SchedulerException(
            "JobStore class not specified. ");
    throw initException;
}

try {

    js = (JobStore) loadHelper.loadClass(jsClass).newInstance();
} catch (Exception e) {

    initException = new SchedulerException("JobStore class '" + jsClass
            + "' could not be instantiated.", e);
    throw initException;
}

SchedulerDetailsSetter.setDetails(js, schedName, schedInstId);

tProps = cfg.getPropertyGroup(PROP_JOB_STORE_PREFIX, true, new String[] {
    PROP_JOB_STORE_LOCK_HANDLER_PREFIX});
try {

    setBeanProps(js, tProps);
} catch (Exception e) {

    initException = new SchedulerException("JobStore class '" + jsClass
            + "' props could not be configured.", e);
    throw initException;
}
对应配置为
org.quartz.jobStore.class = org.quartz.impl.jdbcjobstore.JobStoreTX
org.quartz.jobStore.driverDelegateClass = org.quartz.impl.jdbcjobstore.StdJDBCDelegate
org.quartz.jobStore.tablePrefix = QRTZ_
org.quartz.jobStore.dataSource = myDS
默认使用的是内存数据库,这里配置使用外部数据库。
配置了以上参数之后,首先会构造一个JobStoreTX对象,然后分别设置对象以下的属性。
protected Class<? extends DriverDelegate> delegateClass = StdJDBCDelegate.class;
protected String dsName;
protected String tablePrefix = DEFAULT_TABLE_PREFIX;
从这里可以看出来,其实driverDelegateClass和tablePrefix都是有默认值的,与配置文件中是一样的。整个Quartz的调度都离不开中间数据,这些中间数据都是靠JobStore来保存的。JobStoreTX指定使用数据库来保存数据,肯定就离不开数据源了。
初始化JobStore之后,就来创建数据源了
// Set up any DataSources
// ~~~~~~~~~~~~~~~~~~~~~~~~~~~~~~~~~~~~~~~~~~~~~~~~~~

String[] dsNames = cfg.getPropertyGroups(PROP_DATASOURCE_PREFIX);
for (int i = 0; i < dsNames.length; i++) {

    PropertiesParser pp = new PropertiesParser(cfg.getPropertyGroup(
            PROP_DATASOURCE_PREFIX + "." + dsNames[i], true));

    String cpClass = pp.getStringProperty(PROP_CONNECTION_PROVIDER_CLASS, null);

    // custom connectionProvider...
    if(cpClass != null) {

        ConnectionProvider cp = null;
        try {

            cp = (ConnectionProvider) loadHelper.loadClass(cpClass).newInstance();
        } catch (Exception e) {

            initException = new SchedulerException("ConnectionProvider class '" + cpClass
                    + "' could not be instantiated.", e);
            throw initException;
        }

        try {

            // remove the class name, so it isn't attempted to be set
            pp.getUnderlyingProperties().remove(
                    PROP_CONNECTION_PROVIDER_CLASS);

            setBeanProps(cp, pp.getUnderlyingProperties());
            cp.initialize();
        } catch (Exception e) {

            initException = new SchedulerException("ConnectionProvider class '" + cpClass
                    + "' props could not be configured.", e);
            throw initException;
        }

        dbMgr = DBConnectionManager.getInstance();
        dbMgr.addConnectionProvider(dsNames[i], cp);
 	}
 // ... 其他场景省略
这里相关的配置参数为
org.quartz.jobStore.dataSource = myDS
org.quartz.dataSource.myDS.connectionProvider.class:com.alibaba.druid.support.quartz.DruidQuartzConnectionProvider
org.quartz.dataSource.myDS.driverClassName = com.mysql.cj.jdbc.Driver
org.quartz.dataSource.myDS.url = jdbc:mysql://191.168.1.60:3306/quartz?characterEncoding=utf-8
org.quartz.dataSource.myDS.username = tools_user
org.quartz.dataSource.myDS.password = xams_tools_20230714
org.quartz.dataSource.myDS.maxActive = 5
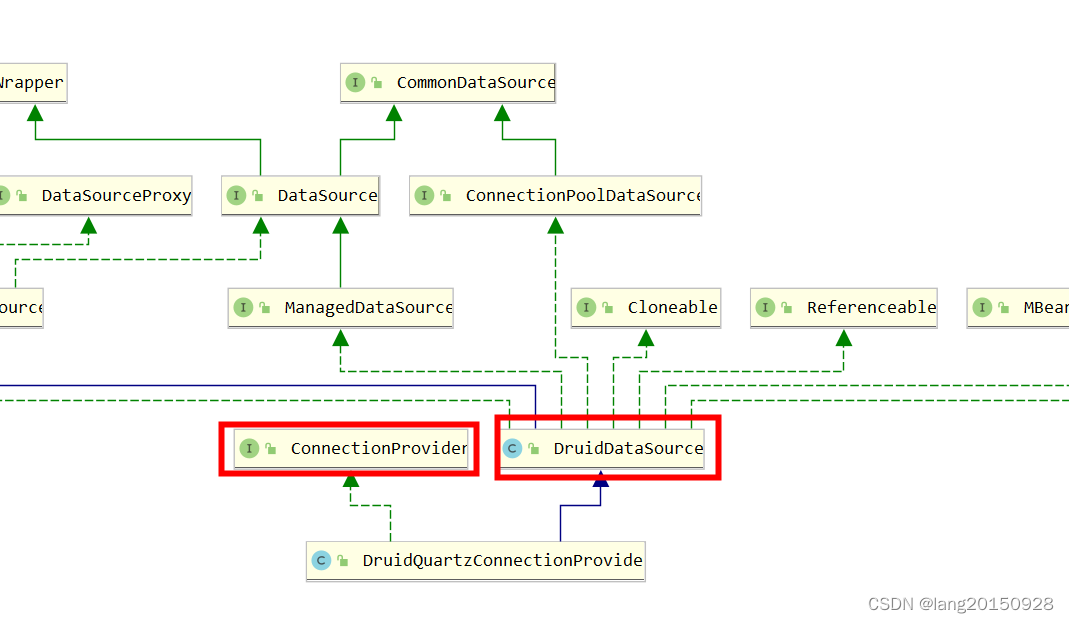
指定了一个名称为myDS数据源,类型为DruidQuartzConnectionProvider,这个数据源是druid数据源专门为Quartz准备的,从上面的源码看,自定义的数据源必须实现ConnectionProvider接口,而DruidQuartzConnectionProvider正好实现了这个接口,并且继承了DruidDataSource。
创建完这个连接提供者对象之后,就会交给DBConnectionManager数据库连接管理器来管理。看起来这里跟JobStoreTX没有任何关系,其实这种联系需要等到真正获取连接的时候,才会体现出来。JobStoreTX每次获取连接的时候,会从连接管理器中通过DataSource名称来查找连接。
protected Connection getConnection() throws JobPersistenceException {

    Connection conn;
    try {

        conn = DBConnectionManager.getInstance().getConnection(
                getDataSource());
此时就会根据数据池名称(我们配置的为myDS)查找到对应的数据源对象获取连接了。
public Connection getConnection(String dsName) throws SQLException {

    ConnectionProvider provider = providers.get(dsName);
    if (provider == null) {

        throw new SQLException("There is no DataSource named '"
                + dsName + "'");
    }

    return provider.getConnection();
}
所以以上这些配置最终就定义好了JobStore要操作的数据库了。
2. 创建Job和Trigger并调度
通过构造者模式创建Job和Trigger对象然后调用scheduler.scheduleJob(job, trigger)将Job绑定到Trigger,构造对象不涉及数据库操作,只是简单构造对象,这里不详述。一旦调用scheduleJob方法,在org.quartz.core.QuartzScheduler#scheduleJob(org.quartz.JobDetail, org.quartz.Trigger)方法中,首先会针对Job和Trigger做各种属性检查,然后调用resources.getJobStore().storeJobAndTrigger(jobDetail, trig)来持久化。对应的实现为
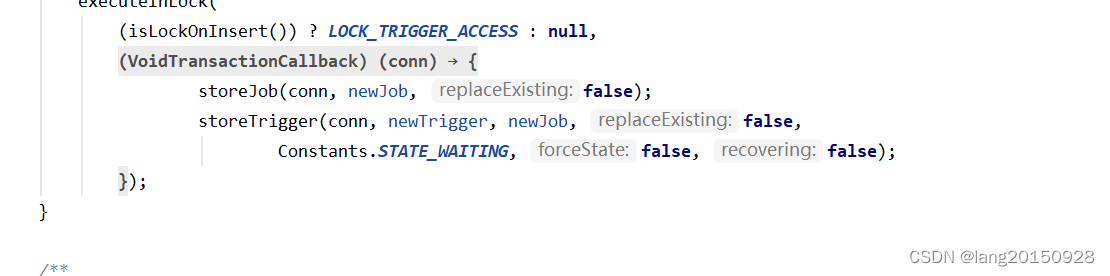
org.quartz.impl.jdbcjobstore.JobStoreSupport#storeJobAndTrigger
public void storeJobAndTrigger(final JobDetail newJob,
        final OperableTrigger newTrigger)
    throws JobPersistenceException {

    executeInLock(
        (isLockOnInsert()) ? LOCK_TRIGGER_ACCESS : null,
        new VoidTransactionCallback() {

            public void executeVoid(Connection conn) throws JobPersistenceException {

                storeJob(conn, newJob, false);
                storeTrigger(conn, newTrigger, newJob, false,
                        Constants.STATE_WAITING, false, false);
            }
        });
}
这里会将storeJob和storeTrigger会放在一个事务当中进行操作,并且使用内存排他锁防止并发。保存Job和Tigger的操作都比较简单,无非是将结果保存到库当中,不过要注意的是,如果Job的JobKey或者TriggerKey已经存在了,都会报错。
上面的案例当中,新建Job和Trigger之前都执行了deleteJob操作,这里会删除数据库当中与Job相关的是所有Trigger以及当前Job,所以案例可以多次重复执行而不报错。
因为storeJob中的第三个参数为false,指定不允许替换。最后执行org.quartz.impl.jdbcjobstore.StdJDBCDelegate#insertJobDetail方法,将Job插入到数据库当中,对应源码如下
public int insertJobDetail(Connection conn, JobDetail job)
     throws IOException, SQLException {

     ByteArrayOutputStream baos = serializeJobData(job.getJobDataMap());

     PreparedStatement ps = null;

     int insertResult = 0;

     try {

         ps = conn.prepareStatement(rtp(INSERT_JOB_DETAIL));
         ps.setString(1, job.getKey().getName());
         ps.setString(2, job.getKey().getGroup());
         ps.setString(3, job.getDescription());
         ps.setString(4, job.getJobClass().getName());
         setBoolean(ps, 5, job.isDurable());
         setBoolean(ps, 6, job.isConcurrentExectionDisallowed());
         setBoolean(ps, 7, job.isPersistJobDataAfterExecution());
         setBoolean(ps, 8, job.requestsRecovery());
         setBytes(ps, 9, baos);

         insertResult = ps.executeUpdate();
     } finally {

         closeStatement(ps);
     }

     return insertResult;
 }
可以看出,这里使用的原生JDBC来操作数据库,这里的常量org.quartz.impl.jdbcjobstore.StdJDBCConstants#INSERT_JOB_DETAIL定义了操作的数据库SQL。内容为
    // Table names
    String TABLE_JOB_DETAILS = "JOB_DETAILS";

    String INSERT_JOB_DETAIL = "INSERT INTO "
            + TABLE_PREFIX_SUBST + TABLE_JOB_DETAILS + " ("
            + COL_SCHEDULER_NAME + ", " + COL_JOB_NAME
            + ", " + COL_JOB_GROUP + ", " + COL_DESCRIPTION + ", "
            + COL_JOB_CLASS + ", " + COL_IS_DURABLE + ", "
            + COL_IS_NONCONCURRENT +  ", " + COL_IS_UPDATE_DATA + ", "
            + COL_REQUESTS_RECOVERY + ", "
            + COL_JOB_DATAMAP + ") " + " VALUES(" + SCHED_NAME_SUBST + ", ?, ?, ?, ?, ?, ?, ?, ?, ?)";
操作的表为自定义表前缀加上JOB_DETAILS,前缀为QRTZ_,所以这里Job定义保存到了QRTZ_JOB_DETAILS表当中。
StdJDBCConstants这个类中定义了Quartz当中绝大多数操作数据库的SQL定义,很具有参考意义
保存Trigger同样不允许覆盖,另外内部会检查Job是否存在,这里传入的状态为WAITING状态,代表任务处于等待的状态,当然在org.quartz.impl.jdbcjobstore.JobStoreSupport#storeTrigger方法中会涉及到一些状态转换的情况,由于是第一次创建这里不涉及,所以最后保存的状态也是WAITING,保存Trigger的表为QRTZ_TRIGGERS,但Trigger通常没有Job简单,org.quartz.impl.jdbcjobstore.StdJDBCDelegate#insertTrigger源码如下
try {

     ps = conn.prepareStatement(rtp(INSERT_TRIGGER));
     ps.setString(1, trigger.getKey().getName());
     ps.setString(2, trigger.getKey().getGroup());
     ps.setString(3, trigger.getJobKey().getName());
     ps.setString(4, trigger.getJobKey().getGroup());
     ps.setString(5, trigger.getDescription());
     if(trigger.getNextFireTime() != null)
         ps.setBigDecimal(6, new BigDecimal(String.valueOf(trigger
                 .getNextFireTime().getTime())));
     else
         ps.setBigDecimal(6, null);
     long prevFireTime = -1;
     if (trigger.getPreviousFireTime() != null) {

         prevFireTime = trigger.getPreviousFireTime().getTime();
     }
     ps.setBigDecimal(7, new BigDecimal(String.valueOf(prevFireTime)));
     ps.setString(8, state);

     TriggerPersistenceDelegate tDel = findTriggerPersistenceDelegate(trigger);

     String type = TTYPE_BLOB;
     if(tDel != null)
         type = tDel.getHandledTriggerTypeDiscriminator();
     ps.setString(9, type);

     ps.setBigDecimal(10, new BigDecimal(String.valueOf(trigger
             .getStartTime().getTime())));
     long endTime = 0;
     if (trigger.getEndTime() != null) {

         endTime = trigger.getEndTime().getTime();
     }
     ps.setBigDecimal(11, new BigDecimal(String.valueOf(endTime)));
     ps.setString(12, trigger.getCalendarName());
     ps.setInt(13, trigger.getMisfireInstruction());
     setBytes(ps, 14, baos);
     ps.setInt(15, trigger.getPriority());

     insertResult = ps.executeUpdate();

     if(tDel == null)
         insertBlobTrigger(conn, trigger);
     else
         tDel.insertExtendedTriggerProperties(conn, trigger, state, jobDetail);

 } finally {

     closeStatement(ps);
 }
这里不但要计算下一次的触发事件nextFireTime,还需要通过TriggerPersistenceDelegate来处理一些特殊Trigger的额外属性。
protected void addDefaultTriggerPersistenceDelegates() {

    addTriggerPersistenceDelegate(new SimpleTriggerPersistenceDelegate());
    addTriggerPersistenceDelegate(new CronTriggerPersistenceDelegate());
    addTriggerPersistenceDelegate(new CalendarIntervalTriggerPersistenceDelegate());
    addTriggerPersistenceDelegate(new DailyTimeIntervalTriggerPersistenceDelegate());
}

public TriggerPersistenceDelegate findTriggerPersistenceDelegate(OperableTrigger trigger)  {

    for(TriggerPersistenceDelegate delegate: triggerPersistenceDelegates) {

        if(delegate.canHandleTriggerType(trigger))
            return delegate;
    }

    return null;
}
其实这里有四种特殊情况,还包括一种通用情况,从org.quartz.impl.jdbcjobstore.Constants类中以上属性可以看出。
// TRIGGER TYPES
/** Simple Trigger type. */
String TTYPE_SIMPLE = "SIMPLE";

/** Cron Trigger type. */
String TTYPE_CRON = "CRON";

/** Calendar Interval Trigger type. */
String TTYPE_CAL_INT = "CAL_INT";

/** Daily Time Interval Trigger type. */
String TTYPE_DAILY_TIME_INT = "DAILY_I";

/** A general blob Trigger type. */
String TTYPE_BLOB = "BLOB";
比如org.quartz.impl.jdbcjobstore.CronTriggerPersistenceDelegate#canHandleTriggerType的实现为
public boolean canHandleTriggerType(OperableTrigger trigger) {

    return ((trigger instanceof CronTriggerImpl) && !((CronTriggerImpl)trigger).hasAdditionalProperties());
}
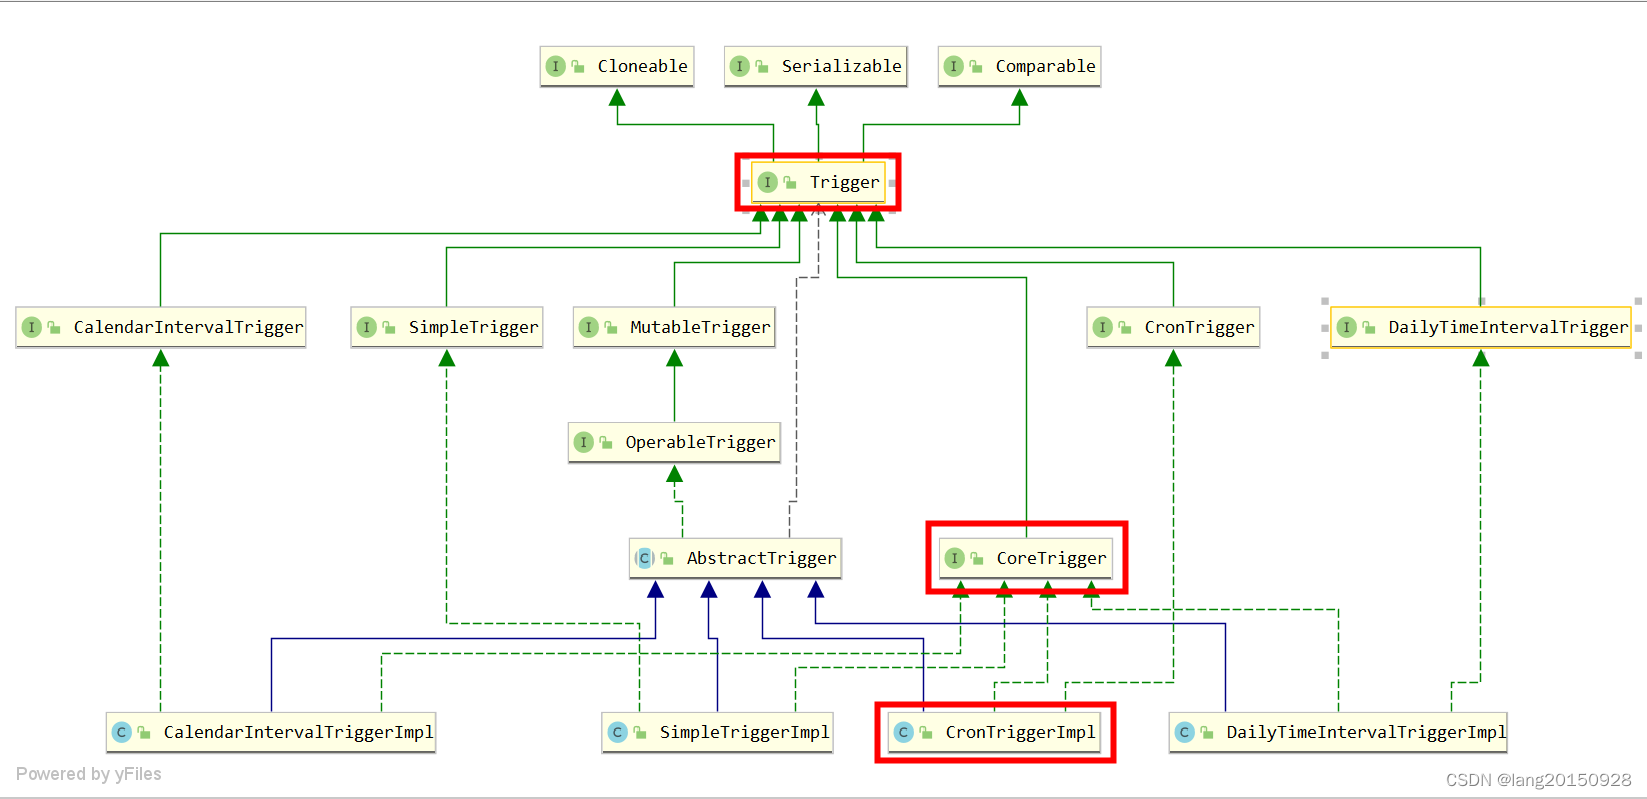
CronTriggerImpl是CronTrigger的实现类,也属于一种Trigger。如果当前传入的是这种类型的Trigger,会在保存数据到QRTZ_TRIGGERS的同时,会调用CronTriggerPersistenceDelegate#insertExtendedTriggerProperties方法将一些额外的参数保存到QRTZ_CRON_TRIGGERS表当中。如下所示
CronTrigger cronTrigger = (CronTrigger)trigger;

PreparedStatement ps = null;

try {

    ps = conn.prepareStatement(Util.rtp(INSERT_CRON_TRIGGER, tablePrefix, schedNameLiteral));
    ps.setString(1, trigger.getKey().getName());
    ps.setString(2, trigger.getKey().getGroup());
    ps.setString(3, cronTrigger.getCronExpression());
    ps.setString(4, cronTrigger.getTimeZone().getID());

    return ps.executeUpdate();
} finally {

    Util.closeStatement(ps);
}
这其中就包含了Cron表达式以及时区编号。如果是最普通的Trigger,则将Trigger定义序列化保存到QRTZ_BLOB_TRIGGERS表当中。
public int insertBlobTrigger(Connection conn, OperableTrigger trigger)
    throws SQLException, IOException {

    PreparedStatement ps = null;
    ByteArrayOutputStream os = null;

    try {

        // update the blob
        os = new ByteArrayOutputStream();
        ObjectOutputStream oos = new ObjectOutputStream(os);
        oos.writeObject(trigger);
        oos.close();

        byte[] buf = os.toByteArray();
        ByteArrayInputStream is = new ByteArrayInputStream(buf);

        ps = conn.prepareStatement(rtp(INSERT_BLOB_TRIGGER));
        ps.setString(1, trigger.getKey().getName());
        ps.setString(2, trigger.getKey().getGroup());
        ps.setBinaryStream(3, is, buf.length);

        return ps.executeUpdate();
    } finally {

        closeStatement(ps);
    }
}
总结一下
| Trigger Type | TriggerPersistenceDelegate | 操作表 |
|---|---|---|
| SIMPLE | SimpleTriggerPersistenceDelegate | QRTZ_SIMPLE_TRIGGERS |
| CRON | CronTriggerPersistenceDelegate | QRTZ_CRON_TRIGGERS |
| CAL_INT | CalendarIntervalTriggerPersistenceDelegate | QRTZ_SIMPROP_TRIGGERS |
| DAILY_I | DailyTimeIntervalTriggerPersistenceDelegate | QRTZ_SIMPROP_TRIGGERS |
| BLOB |
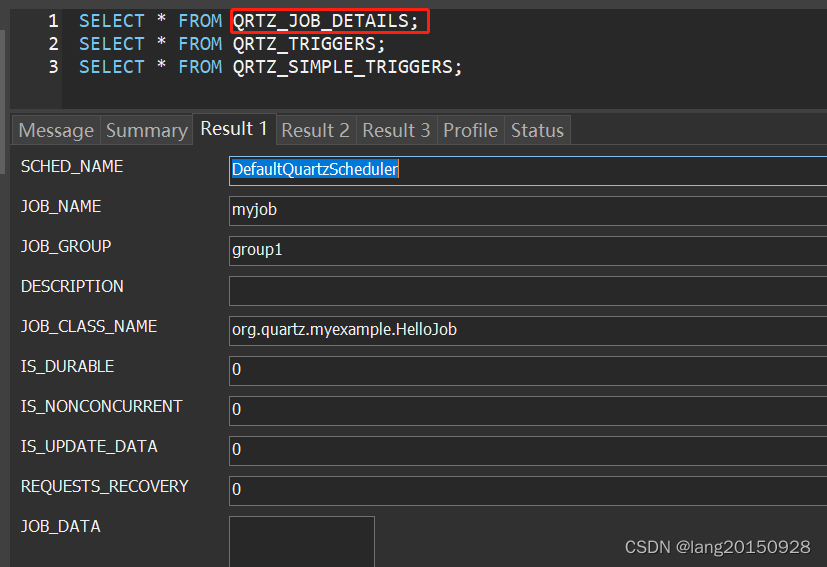
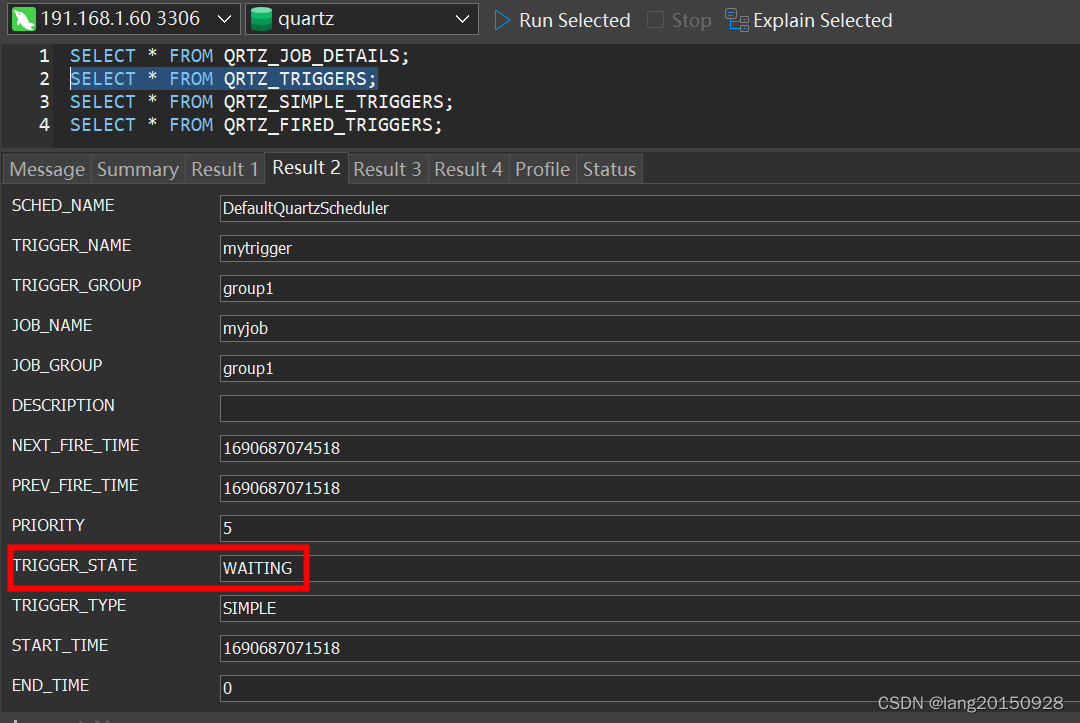
在当前案例中,通过以上操作之后,最终涉及三张表,
SELECT * FROM QRTZ_JOB_DETAILS;
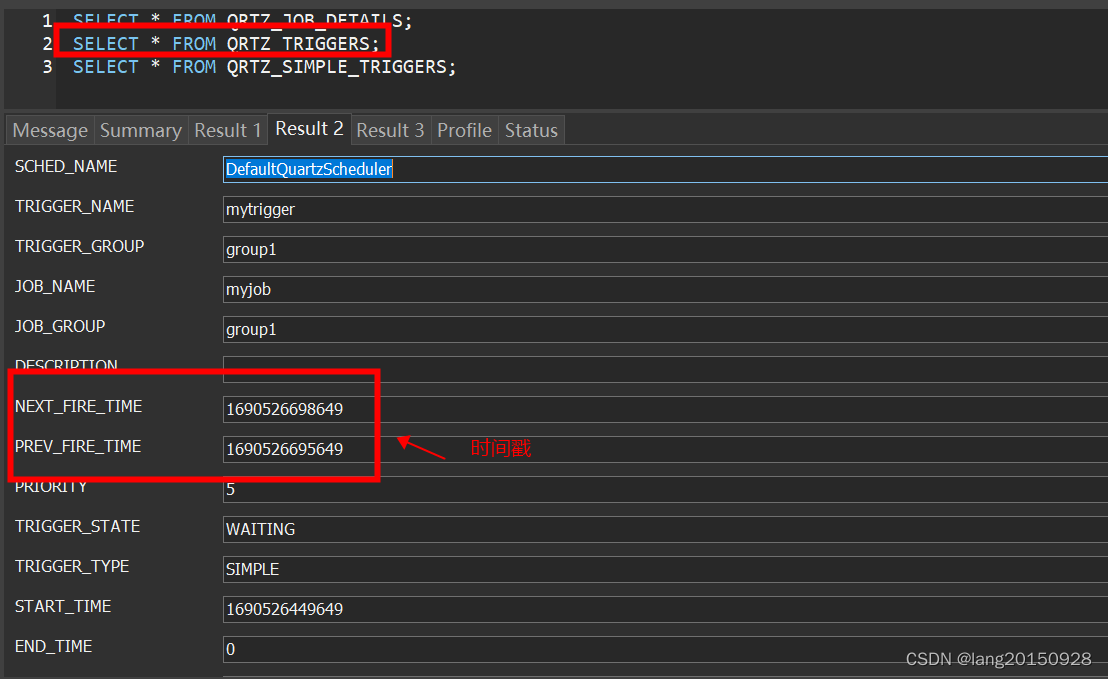
SELECT * FROM QRTZ_TRIGGERS;
SELECT * FROM QRTZ_SIMPLE_TRIGGERS;
数据库中的数据情况如下

3. 启动任务调度器
通过scheduler.start()操作会真实启动调度器,前面无论什么操作,创建的任务并不会真实执行,因为调度线程schedThread(org.quartz.core.QuartzScheduler#schedThread)的paused属性一直还是true,所以这个线程并不能真正进入任务的调度。当然scheduler.start()并不仅仅只是将这个状态修改了,而且针对数据库中的任务调度数据进行了初始化。源码如下:
if (initialStart == null) {

    initialStart = new Date();
    this.resources.getJobStore().schedulerStarted();
    startPlugins();
} else {

    resources.getJobStore().schedulerResumed();
}

schedThread.togglePause(false);
可以看到,这里首先是调用了org.quartz.spi.JobStore#schedulerStarted,然后开启了插件,再触发了paused状态改变。
org.quartz.impl.jdbcjobstore.JobStoreSupport#schedulerStarted中主要是通知JobStore做一些调度开始前的集群初始化或者恢复任务初始化状态,然后启动一个MisfireHandler线程来处理错过触发的任务。默认情况下,Quartz都是单机的,需要配置以下的参数才会是集群模式,所以这里不深入讲解。另外关于任务错过触发以及处理的逻辑这里也不是重点,先不介绍。
org.quartz.jobStore.isClustered=true
这里介绍一下任务恢复操作,对应的源码为org.quartz.impl.jdbcjobstore.JobStoreSupport#recoverJobs()。
/**
 * Recover any failed or misfired jobs and clean up the data store as
 * appropriate.
 *
 * @throws JobPersistenceException if jobs could not be recovered
 */
protected void recoverJobs() throws JobPersistenceException {

    executeInNonManagedTXLock(
        LOCK_TRIGGER_ACCESS,
        new VoidTransactionCallback() {

            public void executeVoid(Connection conn) throws JobPersistenceException {

                recoverJobs(conn);
            }
        }, null);
}
整个恢复工作还是比较复杂的。主要包含以下部分
- 将
QRTZ_TRIGGERS表中BLOCKED和ACQUIRED状态恢复为WAITING状态,PAUSED_BLOCKED和PAUSED_BLOCKED状态修改为PAUSED。
// update inconsistent job states
int rows = getDelegate().updateTriggerStatesFromOtherStates(conn,
        STATE_WAITING, STATE_ACQUIRED, STATE_BLOCKED);

rows += getDelegate().updateTriggerStatesFromOtherStates(conn,
            STATE_PAUSED, STATE_PAUSED_BLOCKED, STATE_PAUSED_BLOCKED);
- 处理错过触发的任务,主要是从
QRTZ_TRIGGERS表中查找错过触发的trigger,然后根据触发器的misfireInstruction属性重新计算下一次触发事件,然后更新数据库的过程。这里和上面谈及的MisfireHandler线程的操作基本一致,只是调用的recoverMisfiredJobs方法中的recovering参数一个为false,一个为true的差别。此处也不详述。
// clean up misfired jobs
recoverMisfiredJobs(conn, true);
- 查找
QRTZ_FIRED_TRIGGERS表中REQUESTS_RECOVERY字段为1(true)的数据,并重新计算下一次触发时间,然后新增一条Trigger数据插入到QRTZ_TRIGGERS表中。
// recover jobs marked for recovery that were not fully executed
List<OperableTrigger> recoveringJobTriggers = getDelegate()
        .selectTriggersForRecoveringJobs(conn);
getLog()
        .info(
                "Recovering "
                        + recoveringJobTriggers.size()
                        + " jobs that were in-progress at the time of the last shut-down.");

for (OperableTrigger recoveringJobTrigger: recoveringJobTriggers) {

    if (jobExists(conn, recoveringJobTrigger.getJobKey())) {

        recoveringJobTrigger.computeFirstFireTime(null);
        storeTrigger(conn, recoveringJobTrigger, null, false,
                STATE_WAITING, false, true);
    }
}
getLog().info("Recovery complete.");
- 删除已完成的触发器
从QRTZ_TRIGGERS表中查询状态为COMPLETE的触发器,然后将其删除。如果触发器对应的任务是非持久的(isDurable属性为false),任务也会被删除掉。
// remove lingering 'complete' triggers...
List<TriggerKey> cts = getDelegate().selectTriggersInState(conn, STATE_COMPLETE);
for(TriggerKey ct: cts) {

    removeTrigger(conn, ct);
}
getLog().info(
    "Removed " + cts.size() + " 'complete' triggers.");

// clean up any fired trigger entries
int n = getDelegate().deleteFiredTriggers(conn);
总结一下:恢复工作就是将未完成的工作重新计算触发时间,并修改状态为WAITING状态,对于已经完成的工作,则删除触发器,甚至是任务。
4. 任务调度
在QuartzSchedulerThread线程启动之后,run方法中会一直处于等待状态,直到在上一步中paused被设置为false。
 while (paused && !halted.get()) {

     try {

         // wait until togglePause(false) is called...
         sigLock.wait(1000L);
     } catch (InterruptedException ignore) {

     }
 }
接下来只要工作线程池有可用线程时,就会进入任务查询和任务执行之中。
int availThreadCount = qsRsrcs.getThreadPool().blockForAvailableThreads();
整体分为三个部分
- 查询下一波待触发的Triggers
triggers = qsRsrcs.getJobStore().acquireNextTriggers(
                                now + idleWaitTime, Math.min(availThreadCount, qsRsrcs.getMaxBatchSize()), qsRsrcs.getBatchTimeWindow());
可以看到这里查询的主要逻辑在org.quartz.spi.JobStore#acquireNextTriggers方法中,这个方法涉及三个参数,分别为
- noLaterThan:满足条件的Trigger的下一次触发时间的最大值,因为任务肯定需要在被执行之前被查询出来,所以这个值必须大于零,要不然没有意义。默认值为30000+当前时间戳,也就是查询未来30s内要执行的Trigger,用户可以通过参数
org.quartz.scheduler.idleWaitTime来指定。 - maxCount:本次查询的最大数量,这个值等于工作线程的可用数量(因为结果列表大于可用工作线程的数量,还是需要等待的)和配置参数maxBatchSize中较小的值(这个值默认为1)。
- timeWindow:时间窗口,其实是对noLaterThan的一个补充,默认值为0,可以通过参数
org.quartz.scheduler.batchTriggerAcquisitionFireAheadTimeWindow来配置。真正查询的时候,会将noLaterThan + timeWindow作为DriverDelegate#selectTriggerToAcquire(java.sql.Connection, long, long, int)中noLaterThan参数的值。 - noEarlierThan:这个参数倒不是
acquireNextTriggers中的参数,而是DriverDelegate#selectTriggerToAcquire的参数,和noLaterThan一样,也是用于限制Trigger的条件,只不过noLaterThan用于限制最大值,而noEarlierThan限制最小值。这个值默认为60000L。如下图所示
private long misfireThreshold = 60000L; // one minute

public long getMisfireThreshold() {

    return misfireThreshold;
}

/**
 * The the number of milliseconds by which a trigger must have missed its
 * next-fire-time, in order for it to be considered "misfired" and thus
 * have its misfire instruction applied.
 *
 * @param misfireThreshold the misfire threshold to use, in millis
 */
@SuppressWarnings("UnusedDeclaration") /* called reflectively */
public void setMisfireThreshold(long misfireThreshold) {

    if (misfireThreshold < 1) {

        throw new IllegalArgumentException(
                "Misfirethreshold must be larger than 0");
    }
    this.misfireThreshold = misfireThreshold;
}

protected long getMisfireTime() {

    long misfireTime = System.currentTimeMillis();
    if (getMisfireThreshold() > 0) {

        misfireTime -= getMisfireThreshold();
    }

    return (misfireTime > 0) ? misfireTime : 0;
}
可以通过参数org.quartz.jobStore.misfireThreshold来配置,但是不能小于1。真正的查询方法如下
List<TriggerKey> keys = getDelegate().selectTriggerToAcquire(conn, noLaterThan + timeWindow, getMisfireTime(), maxCount);
对应的SQL语句为
SELECT TRIGGER_NAME, TRIGGER_GROUP, NEXT_FIRE_TIME, PRIORITY FROM QRTZ_TRIGGERS WHERE SCHED_NAME = {
   1} AND TRIGGER_STATE = ? AND NEXT_FIRE_TIME <= ? AND (MISFIRE_INSTR = -1 OR (MISFIRE_INSTR != -1 AND NEXT_FIRE_TIME >= ?)) ORDER BY NEXT_FIRE_TIME ASC, PRIORITY DESC
其中{1}是调度器的实例名字DefaultQuartzScheduler,通过参数org.quartz.scheduler.instanceName指定的。默认值为QuartzScheduler。而TRIGGER_STATE是在方法中写死的。如下所示
ps = conn.prepareStatement(rtp(SELECT_NEXT_TRIGGER_TO_ACQUIRE));

// Set max rows to retrieve
if (maxCount < 1)
    maxCount = 1; // we want at least one trigger back.
ps.setMaxRows(maxCount);

// Try to give jdbc driver a hint to hopefully not pull over more than the few rows we actually need.
// Note: in some jdbc drivers, such as MySQL, you must set maxRows before fetchSize, or you get exception!
ps.setFetchSize(maxCount);

ps.setString(1, STATE_WAITING);
ps.setBigDecimal(2, new BigDecimal(String.valueOf(noLaterThan)));
ps.setBigDecimal(3, new BigDecimal(String.valueOf(noEarlierThan)));
rs = ps.executeQuery();
所以以上的查询语句最后类似于
SELECT TRIGGER_NAME, TRIGGER_GROUP, NEXT_FIRE_TIME, PRIORITY
FROM QRTZ_TRIGGERS
WHERE SCHED_NAME = 'DefaultQuartzScheduler'
AND TRIGGER_STATE = 'WAITING'
AND NEXT_FIRE_TIME <= #{noLaterThan}
AND ( MISFIRE_INSTR = -1 OR (MISFIRE_INSTR != -1 AND NEXT_FIRE_TIME >= #{noEarlierThan}))
ORDER BY NEXT_FIRE_TIME ASC, PRIORITY DESC
这里MISFIRE_INSTR为-1则代表当任务错过触发之后会被立即触发,对应以下常量。
/**
 * Instructs the <code>{@link Scheduler}</code> that the
 * <code>Trigger</code> will never be evaluated for a misfire situation,
 * and that the scheduler will simply try to fire it as soon as it can,
 * and then update the Trigger as if it had fired at the proper time.
 *
 * <p>NOTE: if a trigger uses this instruction, and it has missed
 * several of its scheduled firings, then several rapid firings may occur
 * as the trigger attempt to catch back up to where it would have been.
 * For example, a SimpleTrigger that fires every 15 seconds which has
 * misfired for 5 minutes will fire 20 times once it gets the chance to
 * fire.</p>
 */
public static final int MISFIRE_INSTRUCTION_IGNORE_MISFIRE_POLICY = -1;
对于非-1的,需要额外的机制处理,这里限制在noEarlierThan时间内的才算满足条件。
通过以上语句如果有值,则会再次验证触发器和Job是否存在。这里除了QRTZ_TRIGGERS表之外,还有插入的时候涉及的相关表,比如QRTZ_SIMPLE_TRIGGERS或是QRTZ_CRON_TRIGGERS,取决于TRIGGER_TYPE,前面总结过,这里顺带提一下。因为如果报错找不到,不一定是QRTZ_TRIGGERS少了数据。如果以上都没有问题,则会执行以下操作。
// We now have a acquired trigger, let's add to return list.
// If our trigger was no longer in the expected state, try a new one.
int rowsUpdated = getDelegate().updateTriggerStateFromOtherState(conn, triggerKey, STATE_ACQUIRED, STATE_WAITING);
if (rowsUpdated <= 0) {

    continue; // next trigger
}
nextTrigger.setFireInstanceId(getFiredTriggerRecordId());
getDelegate().insertFiredTrigger(conn, nextTrigger, STATE_ACQUIRED, null);
这里首先会将QRTZ_TRIGGERS表中的数据状态从WAITING更改为ACQUIRED,注意这里其实是一个CAS操作,如果失败了,任务不会被触发(continue操作了)。修改成功,则会往QRTZ_FIRED_TRIGGERS表中插入一条数据,状态为ACQUIRED。
UPDATE QRTZ_TRIGGERS
SET TRIGGER_STATE = 'ACQUIRED'
WHERE SCHED_NAME = 'DefaultQuartzScheduler'
AND TRIGGER_NAME = ? AND TRIGGER_GROUP = ?
AND TRIGGER_STATE = 'WAITING'
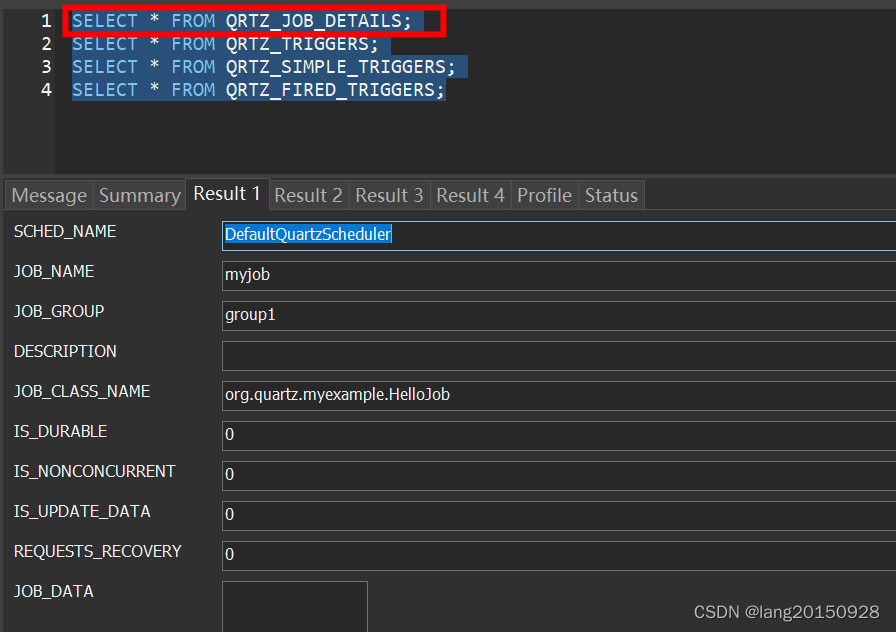
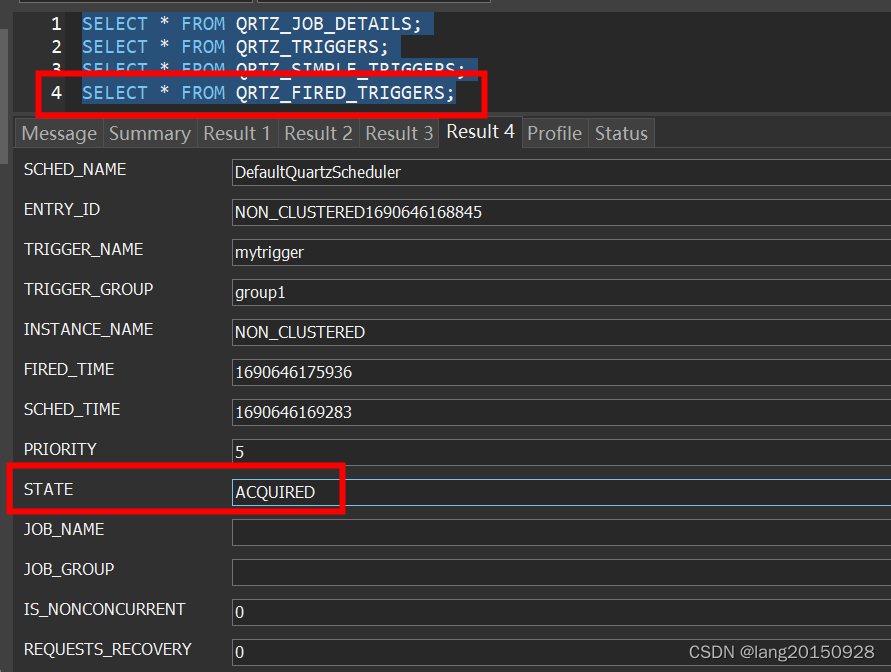
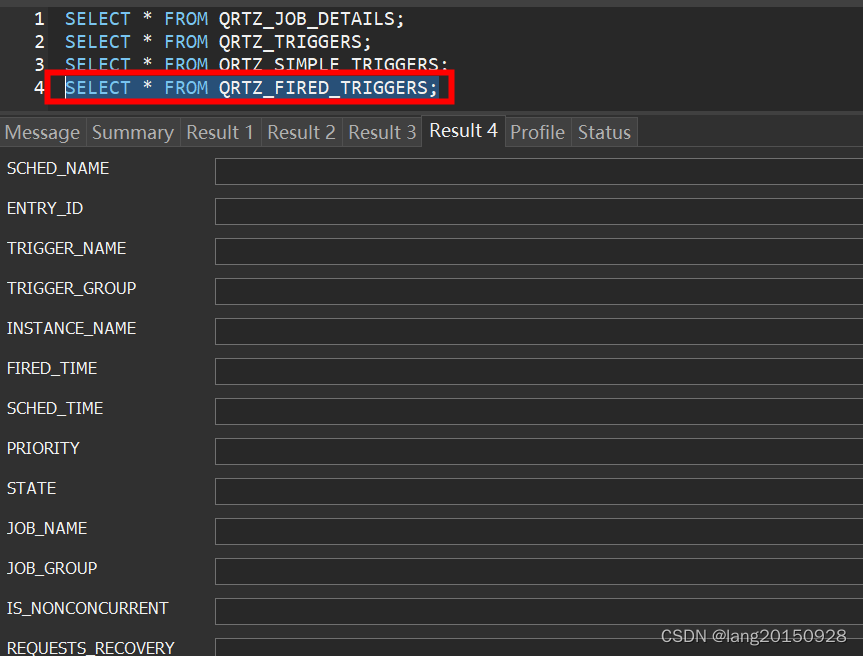
INSERT INTO QRTZ_FIRED_TRIGGERS
(SCHED_NAME, ENTRY_ID, TRIGGER_NAME, TRIGGER_GROUP, INSTANCE_NAME, FIRED_TIME, SCHED_TIME, STATE, JOB_NAME, JOB_GROUP, IS_NONCONCURRENT, REQUESTS_RECOVERY, PRIORITY) VALUES
('DefaultQuartzScheduler', ?, ?, ?, ?, ?, ?, 'ACQUIRED', ?, ?, ?, ?, ?)
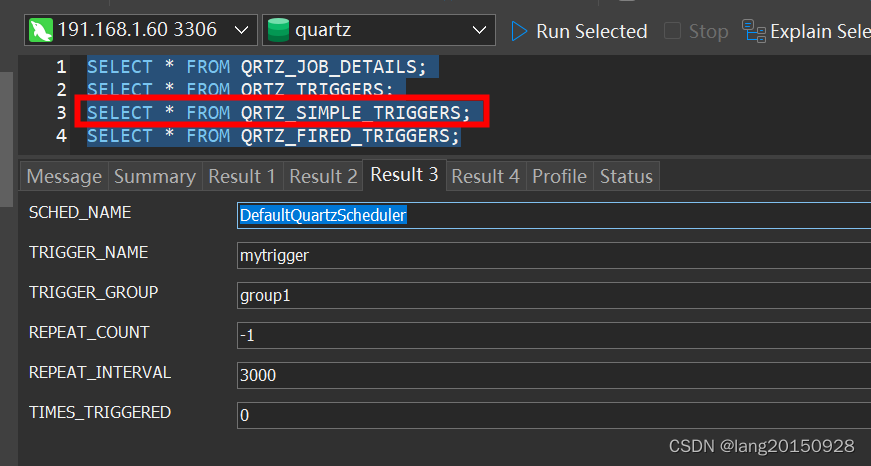
此时数据库中相关数据如下图

- 修改Trigger状态为executing
源码对应为
List<TriggerFiredResult> res = qsRsrcs.getJobStore().triggersFired(triggers);
最终调用org.quartz.impl.jdbcjobstore.JobStoreSupport#triggerFired,这里首先会检查Trigger的状态是否为ACQUIRED,主要是保证没有被并发修改。
// Make sure trigger wasn't deleted, paused, or completed...
try {
     // if trigger was deleted, state will be STATE_DELETED
    String state = getDelegate().selectTriggerState(conn,
            trigger.getKey());
    if (!state.equals(STATE_ACQUIRED)) {

        return null;
    }
} catch (SQLException e) {

    throw new JobPersistenceException("Couldn't select trigger state: "
            + e.getMessage(), e);
}
还要检查Job是否存在,通常不会有问题。
try {

    job = retrieveJob(conn, trigger.getJobKey());
    if (job == null) {
     return null; }
} catch (JobPersistenceException jpe) {

    try {

        getLog().error("Error retrieving job, setting trigger state to ERROR.", jpe);
        getDelegate().updateTriggerState(conn, trigger.getKey(),
                STATE_ERROR);
    } catch (SQLException sqle) {

        getLog().error("Unable to set trigger state to ERROR.", sqle);
    }
    throw jpe;
}
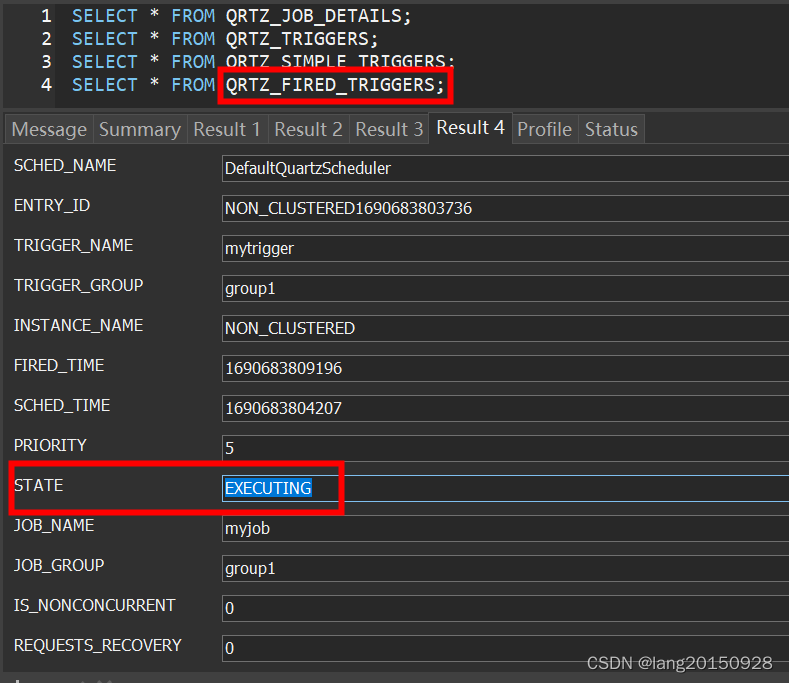
修改QRTZ_FIRED_TRIGGERS表中对应数据的状态为EXECUTING(原来的状态为ACQUIRED)。
 try {

     getDelegate().updateFiredTrigger(conn, trigger, STATE_EXECUTING, job);
 } catch (SQLException e) {

     throw new JobPersistenceException("Couldn't insert fired trigger: "
             + e.getMessage(), e);
 }
还会根据任务是否支持并发、Trigger是否还有下一次触发时间(比如一次性触发不会再次触发),会修改Trigger的状态以及下一次触发时间。
// call triggered - to update the trigger's next-fire-time state...
trigger.triggered(cal);

String state = STATE_WAITING;
boolean force = true;

if (job.isConcurrentExectionDisallowed()) {

    state = STATE_BLOCKED;
    force = false;
// ... 并发情况省略
}

if (trigger.getNextFireTime() == null) {

    state = STATE_COMPLETE;
    force = true;
}

storeTrigger(conn, trigger, job, true, state, force, false);
本案例中会将Trigger的状态改为WAITING,并修改下一次触发时间。最后QRTZ_FIRED_TRIGGERS表中的状态为EXECUTING,QRTZ_TRIGGERS中除了下一次触发时间,其他不变。
- 将任务交给工作线程执行
JobRunShell shell = null;
 try {

     shell = qsRsrcs.getJobRunShellFactory().createJobRunShell(bndle);
     shell.initialize(qs);
 } catch (SchedulerException se) {

     qsRsrcs.getJobStore().triggeredJobComplete(triggers.get(i), bndle.getJobDetail(), CompletedExecutionInstruction.SET_ALL_JOB_TRIGGERS_ERROR);
     continue;
 }

 if (qsRsrcs.getThreadPool().runInThread(shell) == false) {

     // this case should never happen, as it is indicative of the
     // scheduler being shutdown or a bug in the thread pool or
     // a thread pool being used concurrently - which the docs
     // say not to do...
     getLog().error("ThreadPool.runInThread() return false!");
     qsRsrcs.getJobStore().triggeredJobComplete(triggers.get(i), bndle.getJobDetail(), CompletedExecutionInstruction.SET_ALL_JOB_TRIGGERS_ERROR);
 }
}
这里会将触发器包装到一个JobRunShell任务里面,这里JobRunShell具体类型取决于JobRunShellFactory类型,而这个工厂的类型在org.quartz.impl.StdSchedulerFactory#initialize()方法中相关源码如下所示
boolean wrapJobInTx = false;
wrapJobInTx = cfg.getBooleanProperty(PROP_SCHED_WRAP_JOB_IN_USER_TX,
        wrapJobInTx);
// Fire everything up
// ~~~~~~~~~~~~~~~~~~~~~~~~~~~~~~~~~~~~~~~~~~~~~~~~~~~~~~
try {

    JobRunShellFactory jrsf = null; // Create correct run-shell factory...

    if (userTXLocation != null) {

        UserTransactionHelper.setUserTxLocation(userTXLocation);
    }

    if (wrapJobInTx) {

        jrsf = new JTAJobRunShellFactory();
    } else {

        jrsf = new JTAAnnotationAwareJobRunShellFactory();
    }
// ... 其他省略
默认值为JTAAnnotationAwareJobRunShellFactory,如果参数org.quartz.scheduler.wrapJobExecutionInUserTransaction配置为true,则使用JTAJobRunShellFactory。
这里会调用JTAAnnotationAwareJobRunShellFactory#createJobRunShell创建一个JobRunShell对象。源码如下
/**
 * <p>
 * Called by the <class>{@link org.quartz.core.QuartzSchedulerThread}
 * </code> to obtain instances of <code>
 * {@link org.quartz.core.JobRunShell}</code>.
 * </p>
 */
public JobRunShell createJobRunShell(TriggerFiredBundle bundle)
        throws SchedulerException {

    ExecuteInJTATransaction jtaAnnotation = ClassUtils.getAnnotation(bundle.getJobDetail().getJobClass(), ExecuteInJTATransaction.class);
    if(jtaAnnotation == null)
        return new JobRunShell(scheduler, bundle);
    else {

        int timeout = jtaAnnotation.timeout();
        if (timeout >= 0) {

            return new JTAJobRunShell(scheduler, bundle, timeout);
        } else {

            return new JTAJobRunShell(scheduler, bundle);
        }
    }
}
由于Job实现类上面没有注解,所以会创建一个基础的JobRunShell对象。接下来会执行初始化,初始化主要是通过反射创建一个Job对象,也就是本案例中的HelloJob实例。这里创建对象又用到了工厂模式,不同的工厂逻辑不同,这里org.quartz.spi.JobFactory主要有以下三个实现类。

其中SimpleJobFactory只会创建一个HelloJob实例,而org.quartz.simpl.PropertySettingJobFactory则会通过反射尝试为这个实例设置属性。本案例中HelloJob并没有属性,所以用哪个关系不大。SpringBeanJobFactory则是Spring提供的一个实现,使用了Spring的依赖注入来填充属性。默认实现为PropertySettingJobFactory,可以通过org.quartz.impl.StdScheduler#setJobFactory方法进行修改。
JobRunShell本身是一个Runnable实现类,最终工作线程会调用run方法来执行具体的Job。
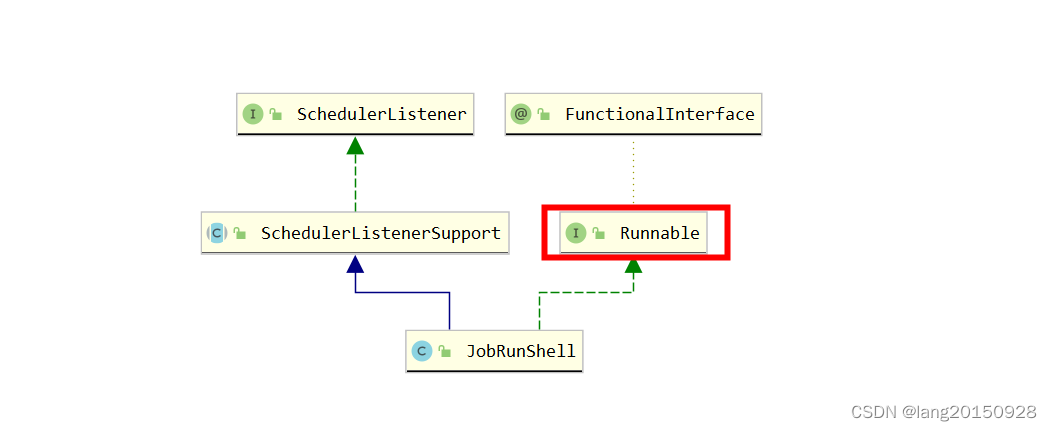
其实现如下
public void run() {

    qs.addInternalSchedulerListener(this);

    try {

        OperableTrigger trigger = (OperableTrigger) jec.getTrigger();
        JobDetail jobDetail = jec.getJobDetail();

        do {


            JobExecutionException jobExEx = null;
            Job job = jec.getJobInstance();

            try {

                begin();
            } catch (SchedulerException se) {

             // ... 异常处理逻辑
            }

            // notify job & trigger listeners...
            try {

                if (!notifyListenersBeginning(jec)) {

                    break;
                }
            } catch(VetoedException ve) {

               // ... 异常处理逻辑
            }

            long startTime = System.currentTimeMillis();
            long endTime = startTime;

            // execute the job
            try {

                log.debug("Calling execute on job " + jobDetail.getKey());
                job.execute(jec);
                endTime = System.currentTimeMillis();
            } catch (JobExecutionException jee) {

             	// ... 异常处理逻辑
            } catch (Throwable e) {

             	// ... 异常处理逻辑
            }

            jec.setJobRunTime(endTime - startTime);

            // notify all job listeners
            if (!notifyJobListenersComplete(jec, jobExEx)) {

                break;
            }

            CompletedExecutionInstruction instCode = CompletedExecutionInstruction.NOOP;

            // update the trigger
            try {

                instCode = trigger.executionComplete(jec, jobExEx);
            } catch (Exception e) {

                // If this happens, there's a bug in the trigger...
                SchedulerException se = new SchedulerException(
                        "Trigger threw an unhandled exception.", e);
                qs.notifySchedulerListenersError(
                        "Please report this error to the Quartz developers.",
                        se);
            }

            // notify all trigger listeners
            if (!notifyTriggerListenersComplete(jec, instCode)) {

                break;
            }

            // update job/trigger or re-execute job
            if (instCode == CompletedExecutionInstruction.RE_EXECUTE_JOB) {

                jec.incrementRefireCount();
                try {

                    complete(false);
                } catch (SchedulerException se) {

                    qs.notifySchedulerListenersError("Error executing Job ("
                            + jec.getJobDetail().getKey()
                            + ": couldn't finalize execution.", se);
                }
                continue;
            }

            try {

                complete(true);
            } catch (SchedulerException se) {

                qs.notifySchedulerListenersError("Error executing Job ("
                        + jec.getJobDetail().getKey()
                        + ": couldn't finalize execution.", se);
                continue;
            }

            qs.notifyJobStoreJobComplete(trigger, jobDetail, instCode);
            break;
        } while (true);

    } finally {

        qs.removeInternalSchedulerListener(this);
    }
}
这里在真正执行任务的前后为子类保留了扩展(默认没有实现),如下所示
protected void begin() throws SchedulerException {

}

protected void complete(boolean successfulExecution)
    throws SchedulerException {

}
另外还有一些监听器通知的操作,简化一下如下所示
begin();
notifyListenersBeginning(jec);
job.execute(jec);  // 真正执行任务
notifyJobListenersComplete(jec, jobExEx);
CompletedExecutionInstruction instCode = CompletedExecutionInstruction.NOOP;
instCode = trigger.executionComplete(jec, jobExEx);
notifyTriggerListenersComplete(jec, instCode);
complete(true);
qs.notifyJobStoreJobComplete(trigger, jobDetail, instCode);
其中job.execute(jec)会执行真实Job实现逻辑,而trigger.executionComplete会决定instCode 结果值,最后在qs.notifyJobStoreJobComplete中会执行org.quartz.spi.JobStore#triggeredJobComplete方法,会根据instCode 的值更新QRTZ_TRIGGERS表中的状态值,
- SET_TRIGGER_COMPLETE 修改状态为COMPLETE
- SET_TRIGGER_ERROR 修改状态为ERROR
- SET_ALL_JOB_TRIGGERS_COMPLETE 修改状态为COMPLETE
- SET_ALL_JOB_TRIGGERS_ERROR 修改状态为 ERROR
- NOOP 不做修改 状态保持为
WAITING
并最终删除QRTZ_FIRED_TRIGGERS表中的值。结果如下

总结一下触发器状态的变化如下表所示
| 表名 | scheduleJob | acquireNextTriggers | triggersFired | triggeredJobComplete |
|---|---|---|---|---|
| QRTZ_TRIGGERS | WAITING | (CAS)ACQUIRED | WAITING | WAITING |
| QRTZ_FIRED_TRIGGERS | ACQUIRED | EXECUTING |
上面在
acquireNextTriggers时修改QRTZ_TRIGGERS状态使用的CAS操作防止并发操作。这里修改失败,也不会有后续操作。
附录一
tables_mysql_innodb.sql脚本内容
#
# In your Quartz properties file, you'll need to set
# org.quartz.jobStore.driverDelegateClass = org.quartz.impl.jdbcjobstore.StdJDBCDelegate
#
#
# By: Ron Cordell - roncordell
#  I didn't see this anywhere, so I thought I'd post it here. This is the script from Quartz to create the tables in a MySQL database, modified to use INNODB instead of MYISAM.

DROP TABLE IF EXISTS QRTZ_FIRED_TRIGGERS;
DROP TABLE IF EXISTS QRTZ_PAUSED_TRIGGER_GRPS;
DROP TABLE IF EXISTS QRTZ_SCHEDULER_STATE;
DROP TABLE IF EXISTS QRTZ_LOCKS;
DROP TABLE IF EXISTS QRTZ_SIMPLE_TRIGGERS;
DROP TABLE IF EXISTS QRTZ_SIMPROP_TRIGGERS;
DROP TABLE IF EXISTS QRTZ_CRON_TRIGGERS;
DROP TABLE IF EXISTS QRTZ_BLOB_TRIGGERS;
DROP TABLE IF EXISTS QRTZ_TRIGGERS;
DROP TABLE IF EXISTS QRTZ_JOB_DETAILS;
DROP TABLE IF EXISTS QRTZ_CALENDARS;

CREATE TABLE QRTZ_JOB_DETAILS(
SCHED_NAME VARCHAR(120) NOT NULL,
JOB_NAME VARCHAR(200) NOT NULL,
JOB_GROUP VARCHAR(200) NOT NULL,
DESCRIPTION VARCHAR(250) NULL,
JOB_CLASS_NAME VARCHAR(250) NOT NULL,
IS_DURABLE VARCHAR(1) NOT NULL,
IS_NONCONCURRENT VARCHAR(1) NOT NULL,
IS_UPDATE_DATA VARCHAR(1) NOT NULL,
REQUESTS_RECOVERY VARCHAR(1) NOT NULL,
JOB_DATA BLOB NULL,
PRIMARY KEY (SCHED_NAME,JOB_NAME,JOB_GROUP))
ENGINE=InnoDB;

CREATE TABLE QRTZ_TRIGGERS (
SCHED_NAME VARCHAR(120) NOT NULL,
TRIGGER_NAME VARCHAR(200) NOT NULL,
TRIGGER_GROUP VARCHAR(200) NOT NULL,
JOB_NAME VARCHAR(200) NOT NULL,
JOB_GROUP VARCHAR(200) NOT NULL,
DESCRIPTION VARCHAR(250) NULL,
NEXT_FIRE_TIME BIGINT(13) NULL,
PREV_FIRE_TIME BIGINT(13) NULL,
PRIORITY INTEGER NULL,
TRIGGER_STATE VARCHAR(16) NOT NULL,
TRIGGER_TYPE VARCHAR(8) NOT NULL,
START_TIME BIGINT(13) NOT NULL,
END_TIME BIGINT(13) NULL,
CALENDAR_NAME VARCHAR(200) NULL,
MISFIRE_INSTR SMALLINT(2) NULL,
JOB_DATA BLOB NULL,
PRIMARY KEY (SCHED_NAME,TRIGGER_NAME,TRIGGER_GROUP),
FOREIGN KEY (SCHED_NAME,JOB_NAME,JOB_GROUP)
REFERENCES QRTZ_JOB_DETAILS(SCHED_NAME,JOB_NAME,JOB_GROUP))
ENGINE=InnoDB;

CREATE TABLE QRTZ_SIMPLE_TRIGGERS (
SCHED_NAME VARCHAR(120) NOT NULL,
TRIGGER_NAME VARCHAR(200) NOT NULL,
TRIGGER_GROUP VARCHAR(200) NOT NULL,
REPEAT_COUNT BIGINT(7) NOT NULL,
REPEAT_INTERVAL BIGINT(12) NOT NULL,
TIMES_TRIGGERED BIGINT(10) NOT NULL,
PRIMARY KEY (SCHED_NAME,TRIGGER_NAME,TRIGGER_GROUP),
FOREIGN KEY (SCHED_NAME,TRIGGER_NAME,TRIGGER_GROUP)
REFERENCES QRTZ_TRIGGERS(SCHED_NAME,TRIGGER_NAME,TRIGGER_GROUP))
ENGINE=InnoDB;

CREATE TABLE QRTZ_CRON_TRIGGERS (
SCHED_NAME VARCHAR(120) NOT NULL,
TRIGGER_NAME VARCHAR(200) NOT NULL,
TRIGGER_GROUP VARCHAR(200) NOT NULL,
CRON_EXPRESSION VARCHAR(120) NOT NULL,
TIME_ZONE_ID VARCHAR(80),
PRIMARY KEY (SCHED_NAME,TRIGGER_NAME,TRIGGER_GROUP),
FOREIGN KEY (SCHED_NAME,TRIGGER_NAME,TRIGGER_GROUP)
REFERENCES QRTZ_TRIGGERS(SCHED_NAME,TRIGGER_NAME,TRIGGER_GROUP))
ENGINE=InnoDB;

CREATE TABLE QRTZ_SIMPROP_TRIGGERS
  (
    SCHED_NAME VARCHAR(120) NOT NULL,
    TRIGGER_NAME VARCHAR(200) NOT NULL,
    TRIGGER_GROUP VARCHAR(200) NOT NULL,
    STR_PROP_1 VARCHAR(512) NULL,
    STR_PROP_2 VARCHAR(512) NULL,
    STR_PROP_3 VARCHAR(512) NULL,
    INT_PROP_1 INT NULL,
    INT_PROP_2 INT NULL,
    LONG_PROP_1 BIGINT NULL,
    LONG_PROP_2 BIGINT NULL,
    DEC_PROP_1 NUMERIC(13,4) NULL,
    DEC_PROP_2 NUMERIC(13,4) NULL,
    BOOL_PROP_1 VARCHAR(1) NULL,
    BOOL_PROP_2 VARCHAR(1) NULL,
    PRIMARY KEY (SCHED_NAME,TRIGGER_NAME,TRIGGER_GROUP),
    FOREIGN KEY (SCHED_NAME,TRIGGER_NAME,TRIGGER_GROUP)
    REFERENCES QRTZ_TRIGGERS(SCHED_NAME,TRIGGER_NAME,TRIGGER_GROUP))
ENGINE=InnoDB;

CREATE TABLE QRTZ_BLOB_TRIGGERS (
SCHED_NAME VARCHAR(120) NOT NULL,
TRIGGER_NAME VARCHAR(200) NOT NULL,
TRIGGER_GROUP VARCHAR(200) NOT NULL,
BLOB_DATA BLOB NULL,
PRIMARY KEY (SCHED_NAME,TRIGGER_NAME,TRIGGER_GROUP),
INDEX (SCHED_NAME,TRIGGER_NAME, TRIGGER_GROUP),
FOREIGN KEY (SCHED_NAME,TRIGGER_NAME,TRIGGER_GROUP)
REFERENCES QRTZ_TRIGGERS(SCHED_NAME,TRIGGER_NAME,TRIGGER_GROUP))
ENGINE=InnoDB;

CREATE TABLE QRTZ_CALENDARS (
SCHED_NAME VARCHAR(120) NOT NULL,
CALENDAR_NAME VARCHAR(200) NOT NULL,
CALENDAR BLOB NOT NULL,
PRIMARY KEY (SCHED_NAME,CALENDAR_NAME))
ENGINE=InnoDB;

CREATE TABLE QRTZ_PAUSED_TRIGGER_GRPS (
SCHED_NAME VARCHAR(120) NOT NULL,
TRIGGER_GROUP VARCHAR(200) NOT NULL,
PRIMARY KEY (SCHED_NAME,TRIGGER_GROUP))
ENGINE=InnoDB;

CREATE TABLE QRTZ_FIRED_TRIGGERS (
SCHED_NAME VARCHAR(120) NOT NULL,
ENTRY_ID VARCHAR(95) NOT NULL,
TRIGGER_NAME VARCHAR(200) NOT NULL,
TRIGGER_GROUP VARCHAR(200) NOT NULL,
INSTANCE_NAME VARCHAR(200) NOT NULL,
FIRED_TIME BIGINT(13) NOT NULL,
SCHED_TIME BIGINT(13) NOT NULL,
PRIORITY INTEGER NOT NULL,
STATE VARCHAR(16) NOT NULL,
JOB_NAME VARCHAR(200) NULL,
JOB_GROUP VARCHAR(200) NULL,
IS_NONCONCURRENT VARCHAR(1) NULL,
REQUESTS_RECOVERY VARCHAR(1) NULL,
PRIMARY KEY (SCHED_NAME,ENTRY_ID))
ENGINE=InnoDB;

CREATE TABLE QRTZ_SCHEDULER_STATE (
SCHED_NAME VARCHAR(120) NOT NULL,
INSTANCE_NAME VARCHAR(200) NOT NULL,
LAST_CHECKIN_TIME BIGINT(13) NOT NULL,
CHECKIN_INTERVAL BIGINT(13) NOT NULL,
PRIMARY KEY (SCHED_NAME,INSTANCE_NAME))
ENGINE=InnoDB;

CREATE TABLE QRTZ_LOCKS (
SCHED_NAME VARCHAR(120) NOT NULL,
LOCK_NAME VARCHAR(40) NOT NULL,
PRIMARY KEY (SCHED_NAME,LOCK_NAME))
ENGINE=InnoDB;

CREATE INDEX IDX_QRTZ_J_REQ_RECOVERY ON QRTZ_JOB_DETAILS(SCHED_NAME,REQUESTS_RECOVERY);
CREATE INDEX IDX_QRTZ_J_GRP ON QRTZ_JOB_DETAILS(SCHED_NAME,JOB_GROUP);

CREATE INDEX IDX_QRTZ_T_J ON QRTZ_TRIGGERS(SCHED_NAME,JOB_NAME,JOB_GROUP);
CREATE INDEX IDX_QRTZ_T_JG ON QRTZ_TRIGGERS(SCHED_NAME,JOB_GROUP);
CREATE INDEX IDX_QRTZ_T_C ON QRTZ_TRIGGERS(SCHED_NAME,CALENDAR_NAME);
CREATE INDEX IDX_QRTZ_T_G ON QRTZ_TRIGGERS(SCHED_NAME,TRIGGER_GROUP);
CREATE INDEX IDX_QRTZ_T_STATE ON QRTZ_TRIGGERS(SCHED_NAME,TRIGGER_STATE);
CREATE INDEX IDX_QRTZ_T_N_STATE ON QRTZ_TRIGGERS(SCHED_NAME,TRIGGER_NAME,TRIGGER_GROUP,TRIGGER_STATE);
CREATE INDEX IDX_QRTZ_T_N_G_STATE ON QRTZ_TRIGGERS(SCHED_NAME,TRIGGER_GROUP,TRIGGER_STATE);
CREATE INDEX IDX_QRTZ_T_NEXT_FIRE_TIME ON QRTZ_TRIGGERS(SCHED_NAME,NEXT_FIRE_TIME);
CREATE INDEX IDX_QRTZ_T_NFT_ST ON QRTZ_TRIGGERS(SCHED_NAME,TRIGGER_STATE,NEXT_FIRE_TIME);
CREATE INDEX IDX_QRTZ_T_NFT_MISFIRE ON QRTZ_TRIGGERS(SCHED_NAME,MISFIRE_INSTR,NEXT_FIRE_TIME);
CREATE INDEX IDX_QRTZ_T_NFT_ST_MISFIRE ON QRTZ_TRIGGERS(SCHED_NAME,MISFIRE_INSTR,NEXT_FIRE_TIME,TRIGGER_STATE);
CREATE INDEX IDX_QRTZ_T_NFT_ST_MISFIRE_GRP ON QRTZ_TRIGGERS(SCHED_NAME,MISFIRE_INSTR,NEXT_FIRE_TIME,TRIGGER_GROUP,TRIGGER_STATE);

CREATE INDEX IDX_QRTZ_FT_TRIG_INST_NAME ON QRTZ_FIRED_TRIGGERS(SCHED_NAME,INSTANCE_NAME);
CREATE INDEX IDX_QRTZ_FT_INST_JOB_REQ_RCVRY ON QRTZ_FIRED_TRIGGERS(SCHED_NAME,INSTANCE_NAME,REQUESTS_RECOVERY);
CREATE INDEX IDX_QRTZ_FT_J_G ON QRTZ_FIRED_TRIGGERS(SCHED_NAME,JOB_NAME,JOB_GROUP);
CREATE INDEX IDX_QRTZ_FT_JG ON QRTZ_FIRED_TRIGGERS(SCHED_NAME,JOB_GROUP);
CREATE INDEX IDX_QRTZ_FT_T_G ON QRTZ_FIRED_TRIGGERS(SCHED_NAME,TRIGGER_NAME,TRIGGER_GROUP);
CREATE INDEX IDX_QRTZ_FT_TG ON QRTZ_FIRED_TRIGGERS(SCHED_NAME,TRIGGER_GROUP);

commit;
智能推荐
稀疏编码的数学基础与理论分析-程序员宅基地
文章浏览阅读290次,点赞8次,收藏10次。1.背景介绍稀疏编码是一种用于处理稀疏数据的编码技术,其主要应用于信息传输、存储和处理等领域。稀疏数据是指数据中大部分元素为零或近似于零的数据,例如文本、图像、音频、视频等。稀疏编码的核心思想是将稀疏数据表示为非零元素和它们对应的位置信息,从而减少存储空间和计算复杂度。稀疏编码的研究起源于1990年代,随着大数据时代的到来,稀疏编码技术的应用范围和影响力不断扩大。目前,稀疏编码已经成为计算...
EasyGBS国标流媒体服务器GB28181国标方案安装使用文档-程序员宅基地
文章浏览阅读217次。EasyGBS - GB28181 国标方案安装使用文档下载安装包下载,正式使用需商业授权, 功能一致在线演示在线API架构图EasySIPCMSSIP 中心信令服务, 单节点, 自带一个 Redis Server, 随 EasySIPCMS 自启动, 不需要手动运行EasySIPSMSSIP 流媒体服务, 根..._easygbs-windows-2.6.0-23042316使用文档
【Web】记录巅峰极客2023 BabyURL题目复现——Jackson原生链_原生jackson 反序列化链子-程序员宅基地
文章浏览阅读1.2k次,点赞27次,收藏7次。2023巅峰极客 BabyURL之前AliyunCTF Bypassit I这题考查了这样一条链子:其实就是Jackson的原生反序列化利用今天复现的这题也是大同小异,一起来整一下。_原生jackson 反序列化链子
一文搞懂SpringCloud,详解干货,做好笔记_spring cloud-程序员宅基地
文章浏览阅读734次,点赞9次,收藏7次。微服务架构简单的说就是将单体应用进一步拆分,拆分成更小的服务,每个服务都是一个可以独立运行的项目。这么多小服务,如何管理他们?(服务治理 注册中心[服务注册 发现 剔除])这么多小服务,他们之间如何通讯?这么多小服务,客户端怎么访问他们?(网关)这么多小服务,一旦出现问题了,应该如何自处理?(容错)这么多小服务,一旦出现问题了,应该如何排错?(链路追踪)对于上面的问题,是任何一个微服务设计者都不能绕过去的,因此大部分的微服务产品都针对每一个问题提供了相应的组件来解决它们。_spring cloud
Js实现图片点击切换与轮播-程序员宅基地
文章浏览阅读5.9k次,点赞6次,收藏20次。Js实现图片点击切换与轮播图片点击切换<!DOCTYPE html><html> <head> <meta charset="UTF-8"> <title></title> <script type="text/ja..._点击图片进行轮播图切换
tensorflow-gpu版本安装教程(过程详细)_tensorflow gpu版本安装-程序员宅基地
文章浏览阅读10w+次,点赞245次,收藏1.5k次。在开始安装前,如果你的电脑装过tensorflow,请先把他们卸载干净,包括依赖的包(tensorflow-estimator、tensorboard、tensorflow、keras-applications、keras-preprocessing),不然后续安装了tensorflow-gpu可能会出现找不到cuda的问题。cuda、cudnn。..._tensorflow gpu版本安装
随便推点
物联网时代 权限滥用漏洞的攻击及防御-程序员宅基地
文章浏览阅读243次。0x00 简介权限滥用漏洞一般归类于逻辑问题,是指服务端功能开放过多或权限限制不严格,导致攻击者可以通过直接或间接调用的方式达到攻击效果。随着物联网时代的到来,这种漏洞已经屡见不鲜,各种漏洞组合利用也是千奇百怪、五花八门,这里总结漏洞是为了更好地应对和预防,如有不妥之处还请业内人士多多指教。0x01 背景2014年4月,在比特币飞涨的时代某网站曾经..._使用物联网漏洞的使用者
Visual Odometry and Depth Calculation--Epipolar Geometry--Direct Method--PnP_normalized plane coordinates-程序员宅基地
文章浏览阅读786次。A. Epipolar geometry and triangulationThe epipolar geometry mainly adopts the feature point method, such as SIFT, SURF and ORB, etc. to obtain the feature points corresponding to two frames of images. As shown in Figure 1, let the first image be and th_normalized plane coordinates
开放信息抽取(OIE)系统(三)-- 第二代开放信息抽取系统(人工规则, rule-based, 先抽取关系)_语义角色增强的关系抽取-程序员宅基地
文章浏览阅读708次,点赞2次,收藏3次。开放信息抽取(OIE)系统(三)-- 第二代开放信息抽取系统(人工规则, rule-based, 先关系再实体)一.第二代开放信息抽取系统背景 第一代开放信息抽取系统(Open Information Extraction, OIE, learning-based, 自学习, 先抽取实体)通常抽取大量冗余信息,为了消除这些冗余信息,诞生了第二代开放信息抽取系统。二.第二代开放信息抽取系统历史第二代开放信息抽取系统着眼于解决第一代系统的三大问题: 大量非信息性提取(即省略关键信息的提取)、_语义角色增强的关系抽取
10个顶尖响应式HTML5网页_html欢迎页面-程序员宅基地
文章浏览阅读1.1w次,点赞6次,收藏51次。快速完成网页设计,10个顶尖响应式HTML5网页模板助你一臂之力为了寻找一个优质的网页模板,网页设计师和开发者往往可能会花上大半天的时间。不过幸运的是,现在的网页设计师和开发人员已经开始共享HTML5,Bootstrap和CSS3中的免费网页模板资源。鉴于网站模板的灵活性和强大的功能,现在广大设计师和开发者对html5网站的实际需求日益增长。为了造福大众,Mockplus的小伙伴整理了2018年最..._html欢迎页面
计算机二级 考试科目,2018全国计算机等级考试调整,一、二级都增加了考试科目...-程序员宅基地
文章浏览阅读282次。原标题:2018全国计算机等级考试调整,一、二级都增加了考试科目全国计算机等级考试将于9月15-17日举行。在备考的最后冲刺阶段,小编为大家整理了今年新公布的全国计算机等级考试调整方案,希望对备考的小伙伴有所帮助,快随小编往下看吧!从2018年3月开始,全国计算机等级考试实施2018版考试大纲,并按新体系开考各个考试级别。具体调整内容如下:一、考试级别及科目1.一级新增“网络安全素质教育”科目(代..._计算机二级增报科目什么意思
conan简单使用_apt install conan-程序员宅基地
文章浏览阅读240次。conan简单使用。_apt install conan