Vue - vue create、vue ui、vue init三种方式创建Vue项目_vue-create-程序员宅基地
技术标签: 前端框架 node.js 前端 npm vue.js
推荐:Vue汇总
Vue - vue create、vue ui、vue init三种方式创建Vue项目
安装@vue/cli
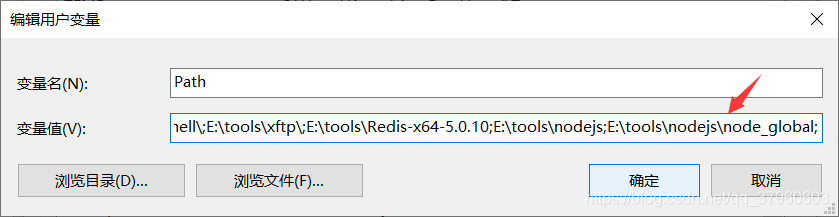
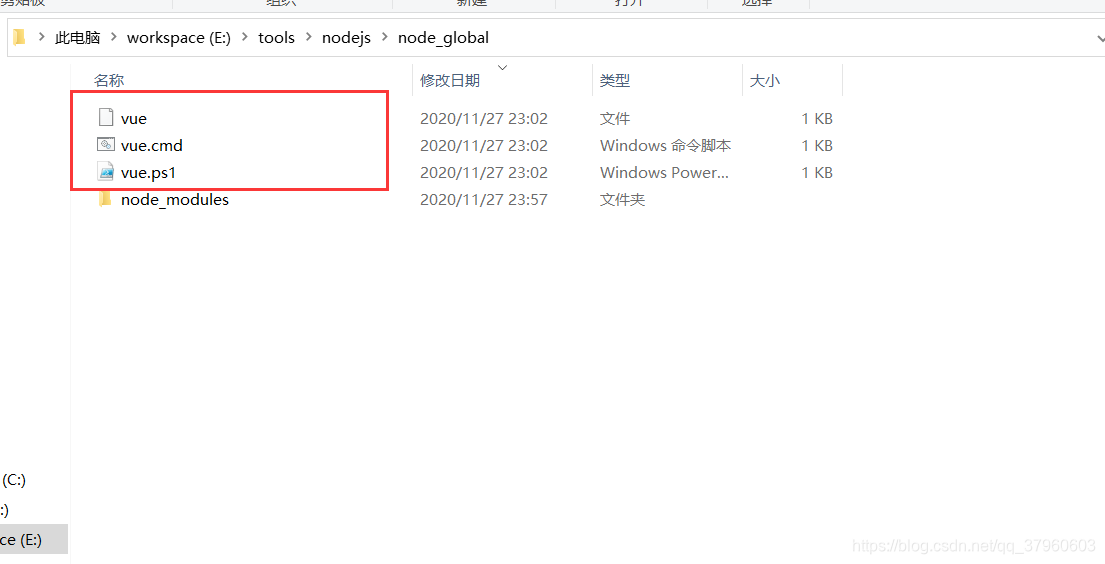
为npm安装的包配置环境变量。
运行下面这条命令。
npm install -g @vue/cli
在CMD中运行vue --version命令,如果输出了@vue/cli的版本,则说明@vue/cli安装成功了。
C:\Users\Kaven>vue --version
@vue/cli 4.5.9

创建Vue项目 - vue create
通过下面这条命令可以查看vue create命令的说明。
vue create -h
E:\workspace\WebStorm\blog\project>vue create -h
Usage: create [options] <app-name>

create a new project powered by vue-cli-service

Options:
  -p, --preset <presetName>       Skip prompts and use saved or remote preset
  -d, --default                   Skip prompts and use default preset
  -i, --inlinePreset <json>       Skip prompts and use inline JSON string as preset
  -m, --packageManager <command>  Use specified npm client when installing dependencies
  -r, --registry <url>            Use specified npm registry when installing dependencies (only for npm)
  -g, --git [message]             Force git initialization with initial commit message
  -n, --no-git                    Skip git initialization
  -f, --force                     Overwrite target directory if it exists
  --merge                         Merge target directory if it exists
  -c, --clone                     Use git clone when fetching remote preset
  -x, --proxy <proxyUrl>          Use specified proxy when creating project
  -b, --bare                      Scaffold project without beginner instructions
  --skipGetStarted                Skip displaying "Get started" instructions
  -h, --help                      output usage information
通过下面这条命令来创建Vue项目project。
vue create project
选择Vue的版本。
创建Vue项目。
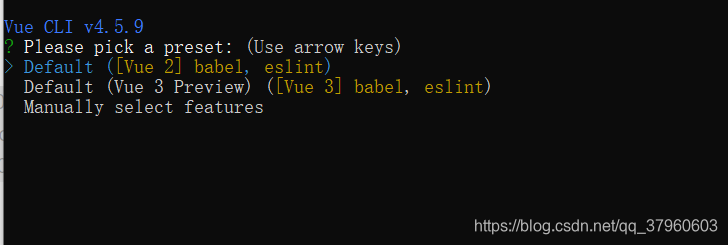
E:\workspace\WebStorm\blog\project>vue create project


Vue CLI v4.5.9
? Please pick a preset: Default ([Vue 2] babel, eslint)


Vue CLI v4.5.9
  Creating project in E:\workspace\WebStorm\blog\project\project.
  Initializing git repository...
️  Installing CLI plugins. This might take a while...


> yorkie@2.0.0 install E:\workspace\WebStorm\blog\project\project\node_modules\yorkie
> node bin/install.js

setting up Git hooks
done


> core-js@3.8.0 postinstall E:\workspace\WebStorm\blog\project\project\node_modules\core-js
> node -e "try{require('./postinstall')}catch(e){}"


> ejs@2.7.4 postinstall E:\workspace\WebStorm\blog\project\project\node_modules\ejs
> node ./postinstall.js

added 1248 packages from 938 contributors in 33.831s

61 packages are looking for funding
  run `npm fund` for details

  Invoking generators...
  Installing additional dependencies...

added 53 packages from 36 contributors in 6.473s

65 packages are looking for funding
  run `npm fund` for details

  Running completion hooks...

  Generating README.md...

  Successfully created project project.
  Get started with the following commands:

 $ cd project
 $ npm run serve
运行项目。
E:\workspace\WebStorm\blog\project>cd project

E:\workspace\WebStorm\blog\project\project>npm run serve

> project@0.1.0 serve E:\workspace\WebStorm\blog\project\project
> vue-cli-service serve

 INFO  Starting development server...
98% after emitting CopyPlugin

 DONE  Compiled successfully in 1973ms                                                                      下午11:18:40


  App running at:
  - Local:   http://localhost:8080/
  - Network: http://192.168.1.103:8080/

  Note that the development build is not optimized.
  To create a production build, run npm run build.
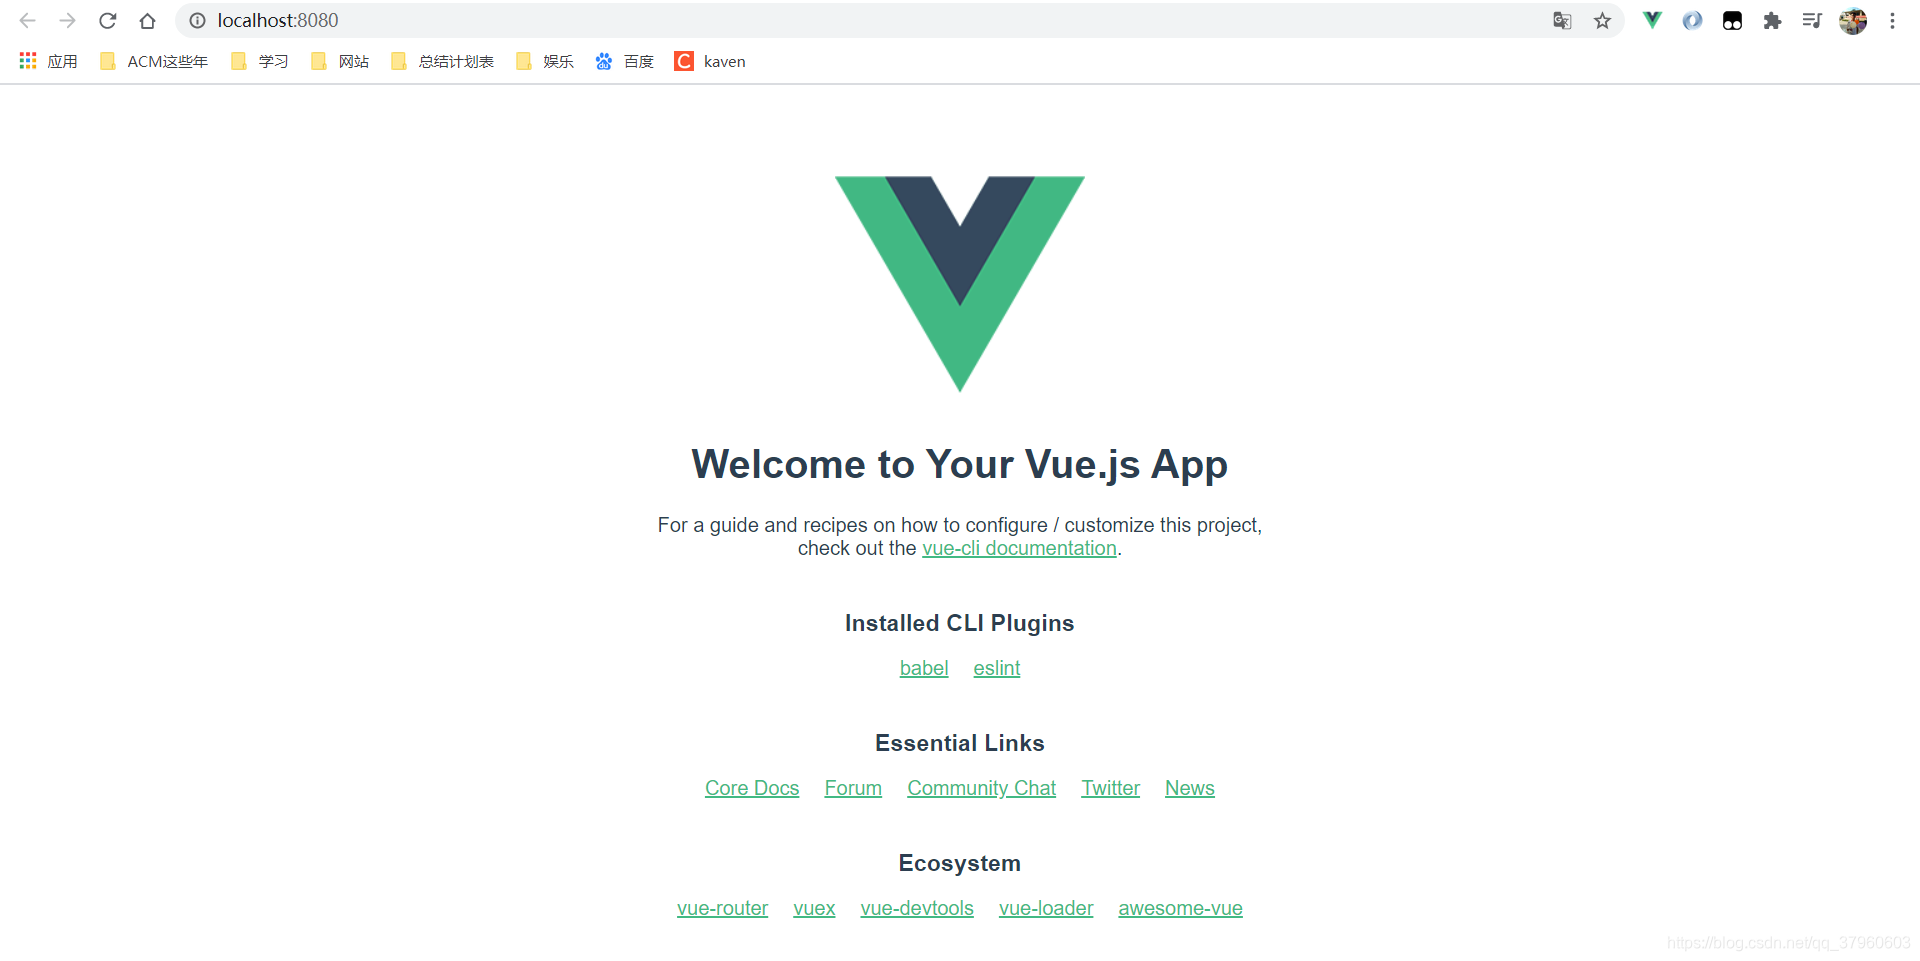
访问http://localhost:8080/得到如下图所示页面,说明Vue项目已经运行成功了。

创建Vue项目 - vue ui
vue ui命令的说明。
E:\workspace\WebStorm\blog\project>vue ui -h
Usage: ui [options]

start and open the vue-cli ui

Options:
  -H, --host <host>  Host used for the UI server (default: localhost)
  -p, --port <port>  Port used for the UI server (by default search for available port)
  -D, --dev          Run in dev mode
  --quiet            Don't output starting messages
  --headless         Don't open browser on start and output port
  -h, --help         output usage information
通过下面这条命令来打开一个管理Vue项目的可视化页面。
vue ui
E:\workspace\WebStorm\blog\project>vue ui
  Starting GUI...
  Ready on http://localhost:8000
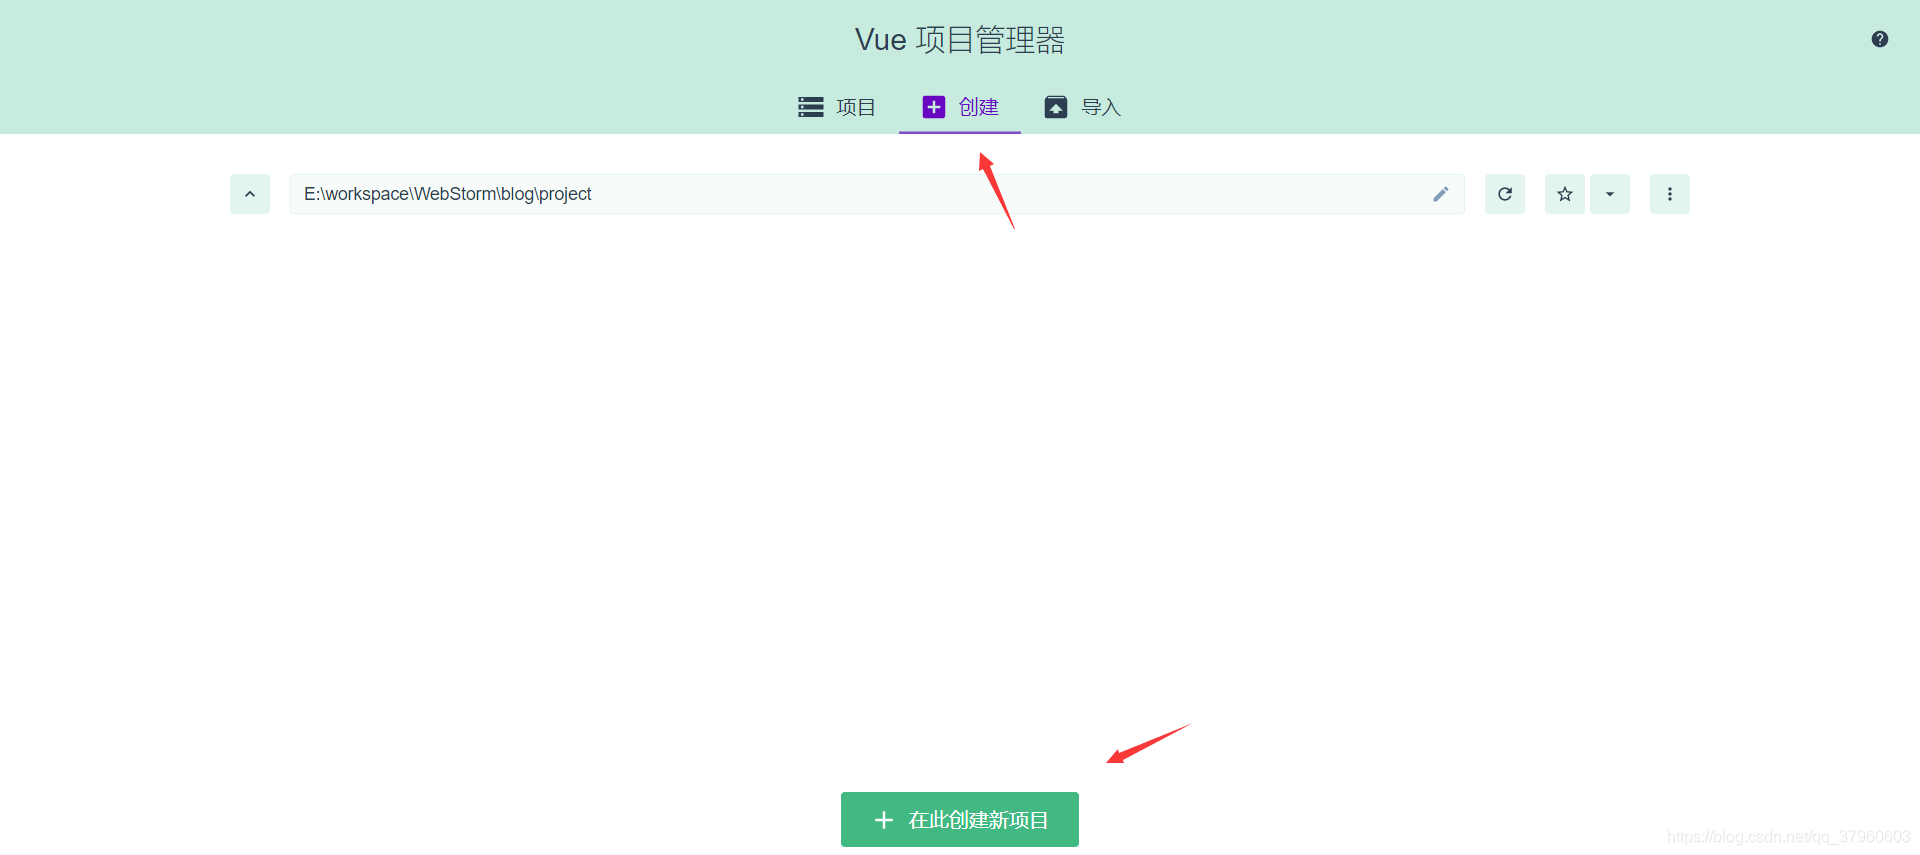
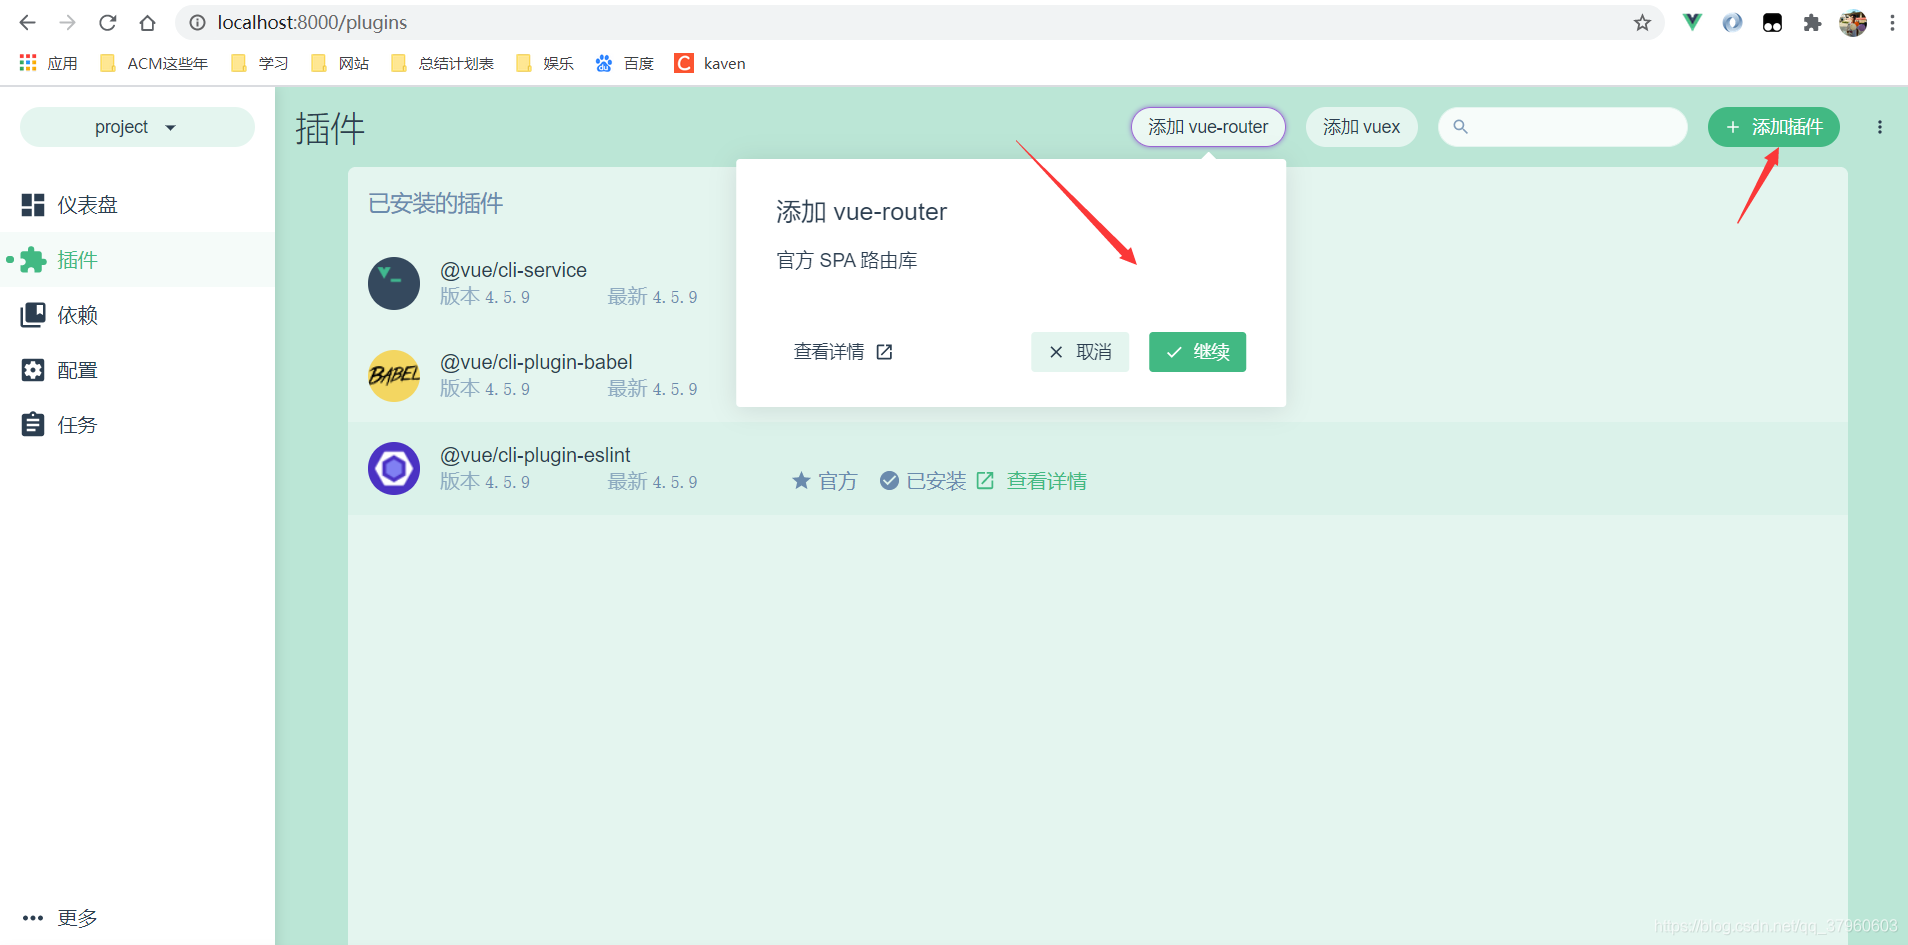
出现如下图所示页面,可以管理现有的Vue项目、创建新的Vue项目、导入Vue项目。
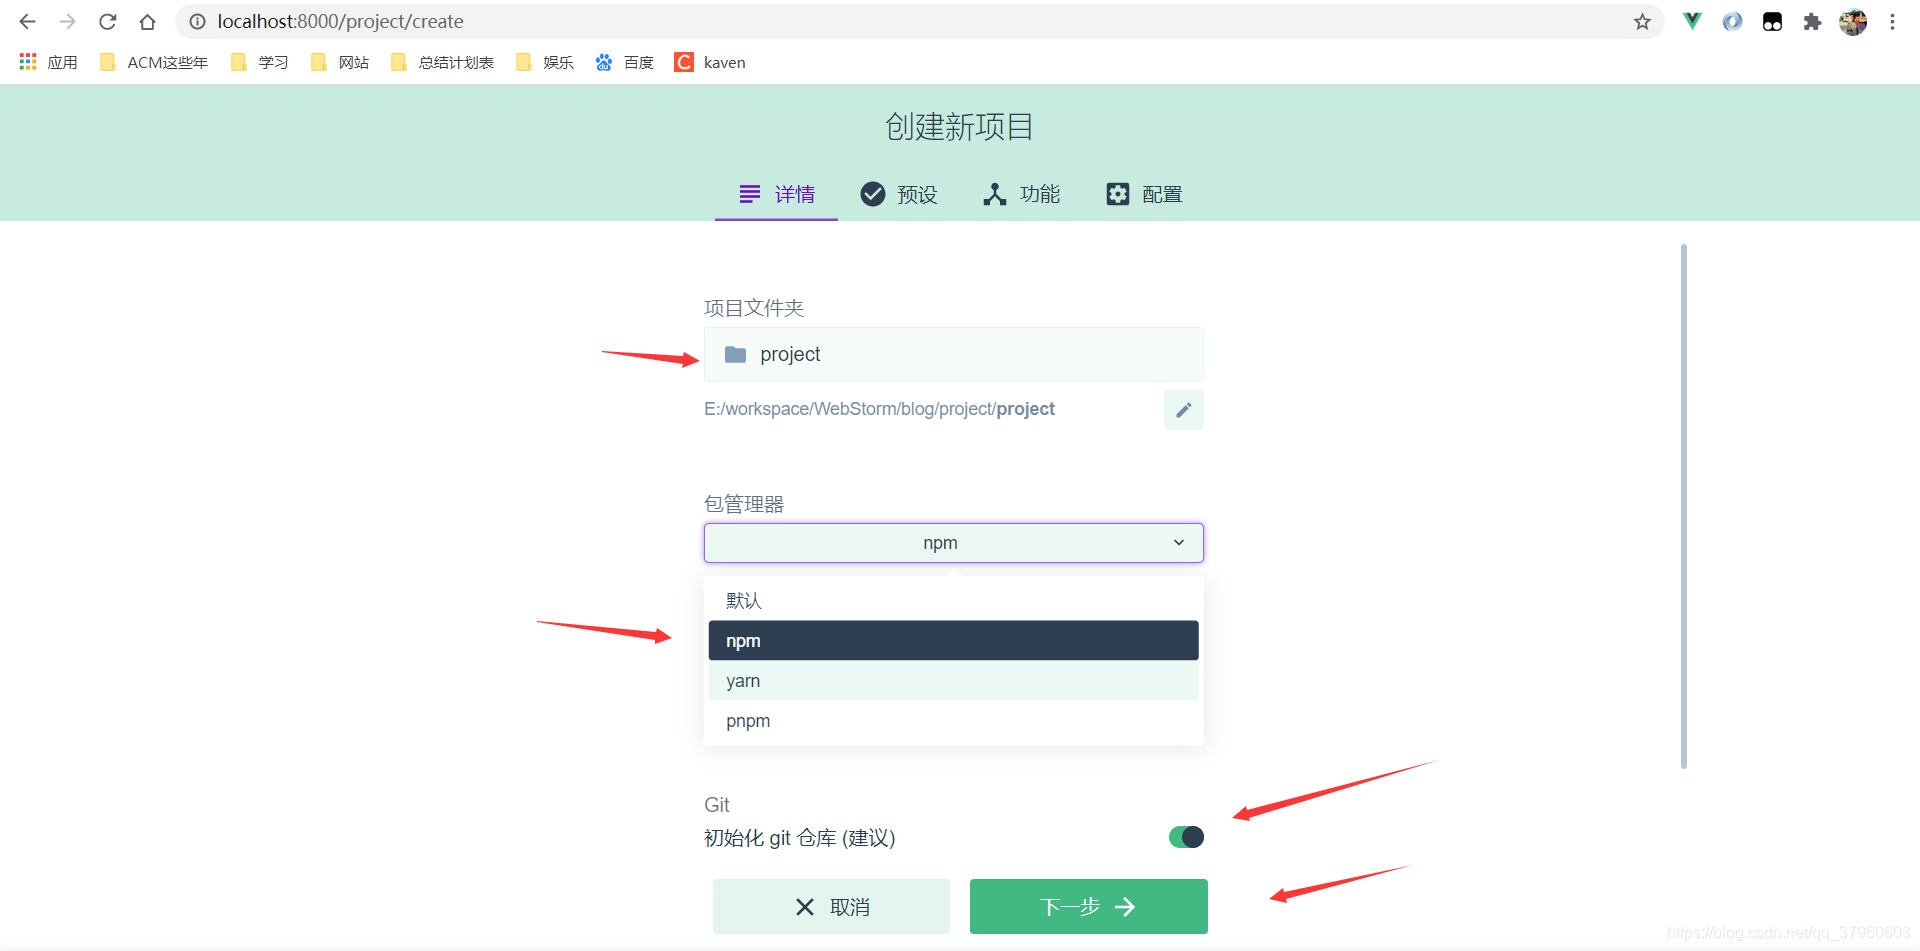
选择创建,点击在此创建新项目。
输入项目名,选择包管理器,默认初始化git仓库,点击下一步。
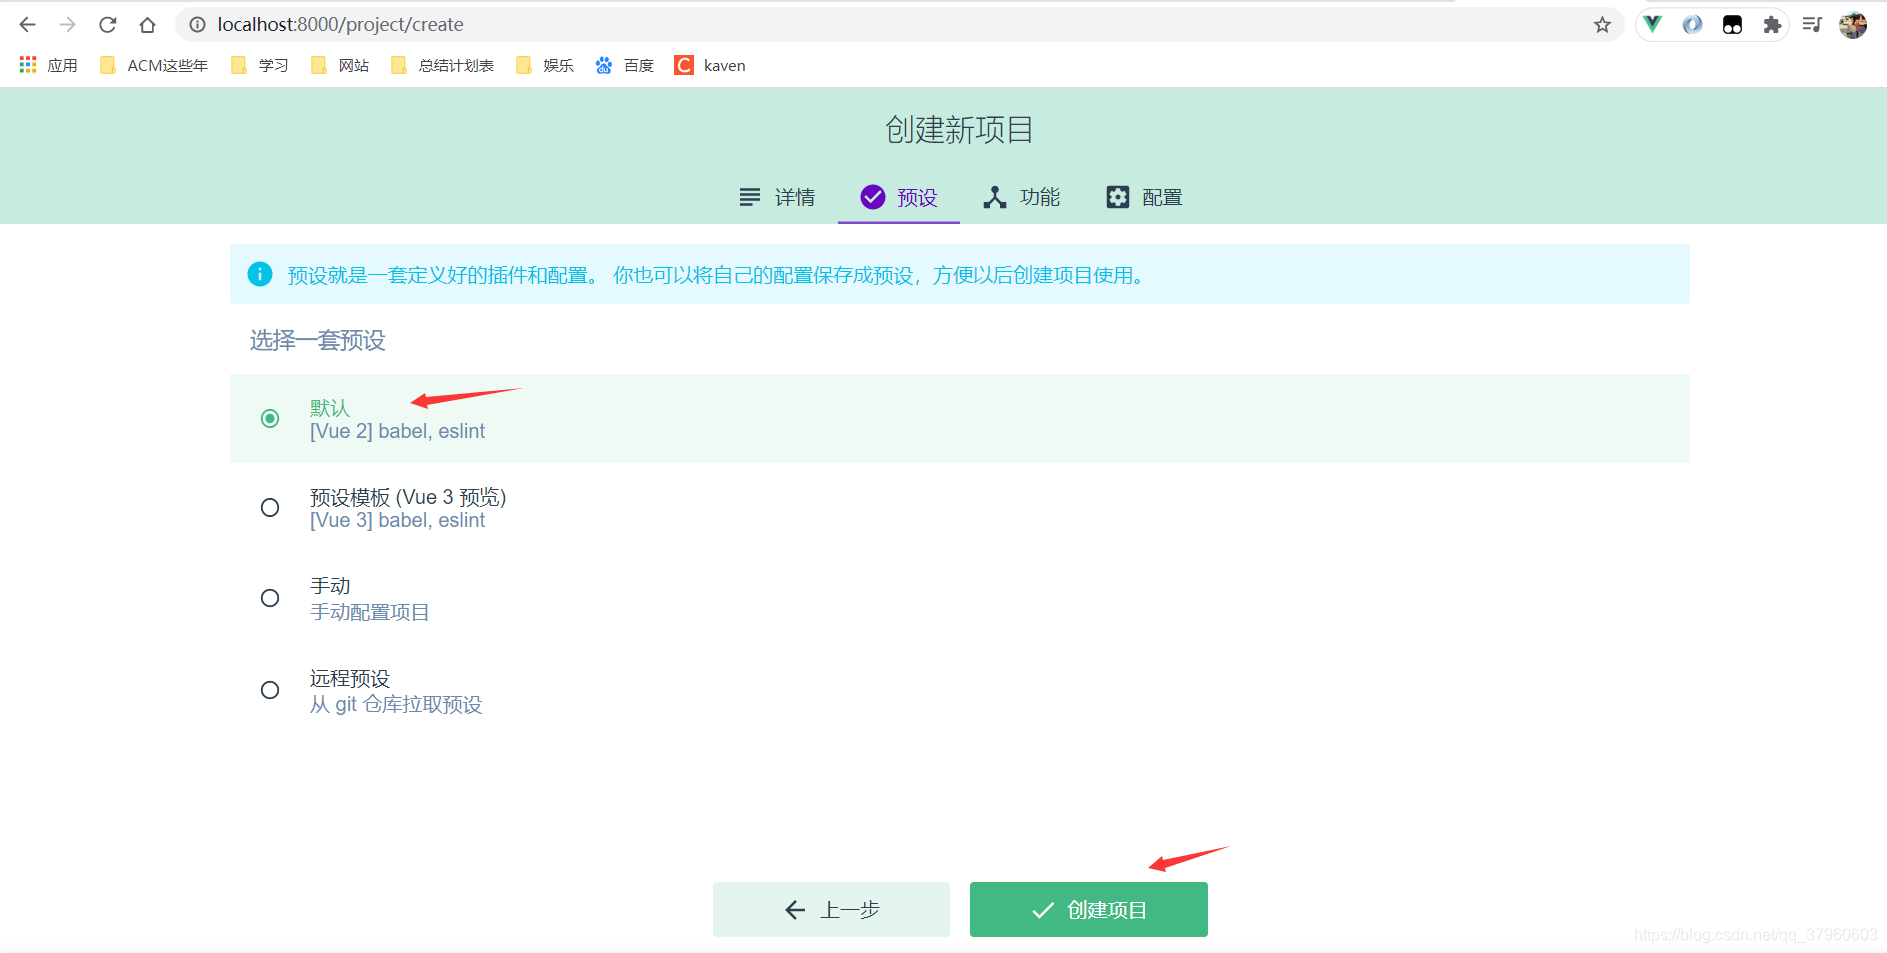
选择Vue版本,点击创建项目。
项目创建成功,得到如下图所示页面。
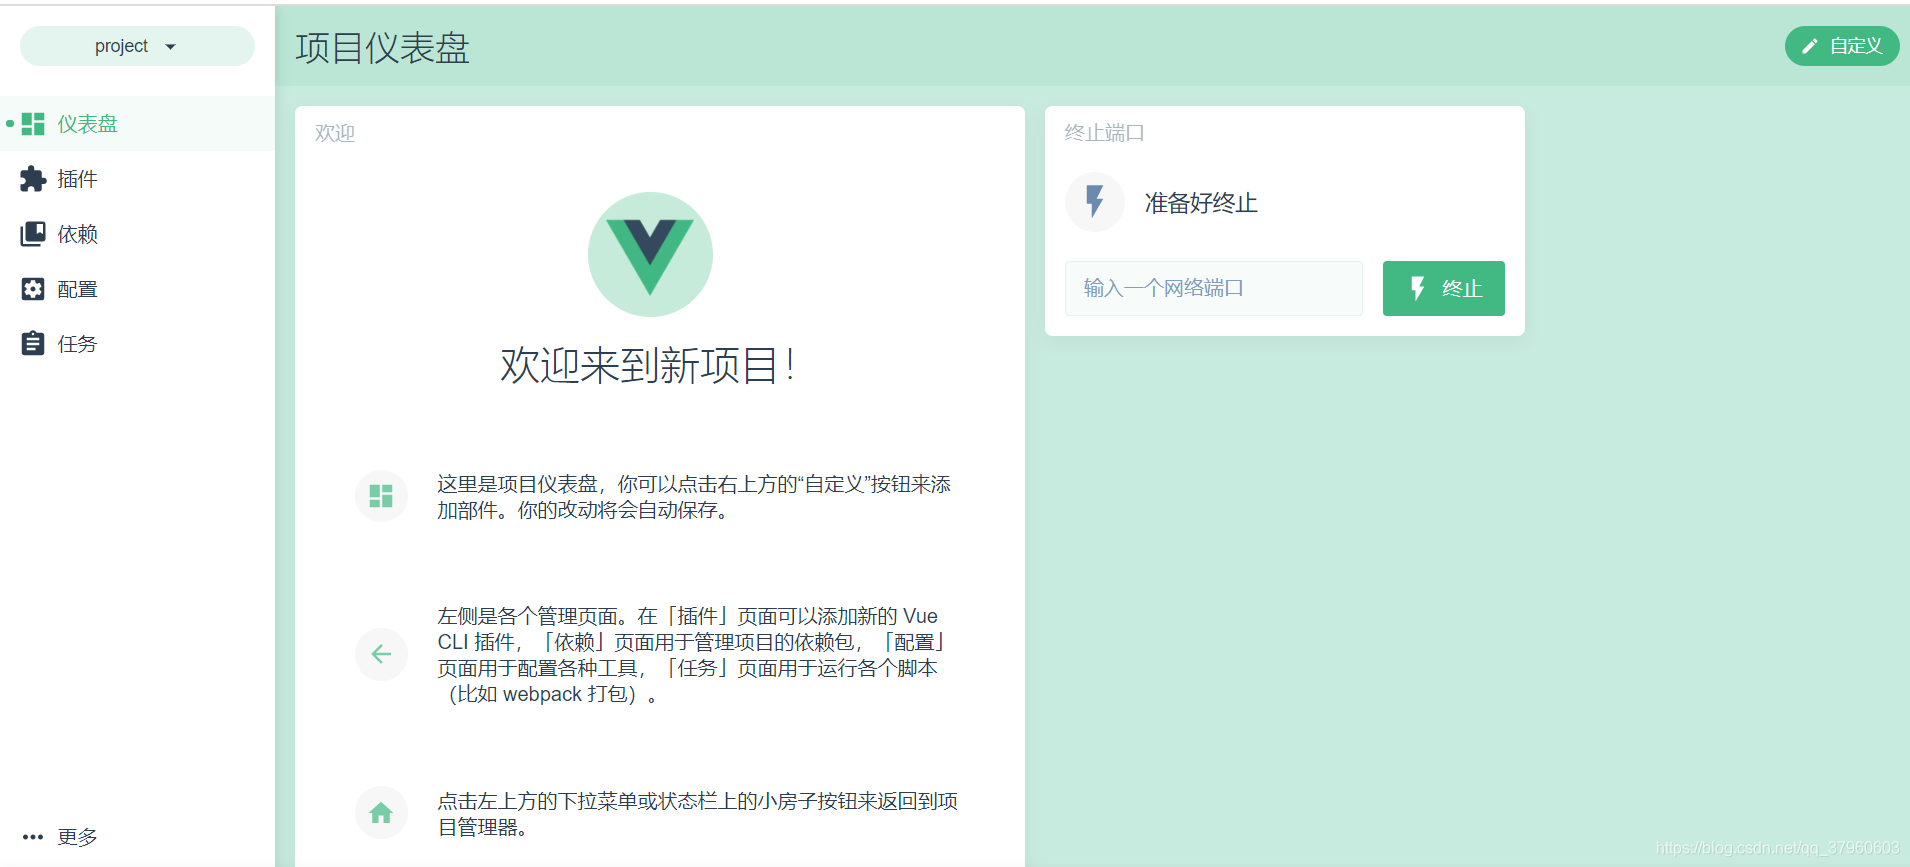
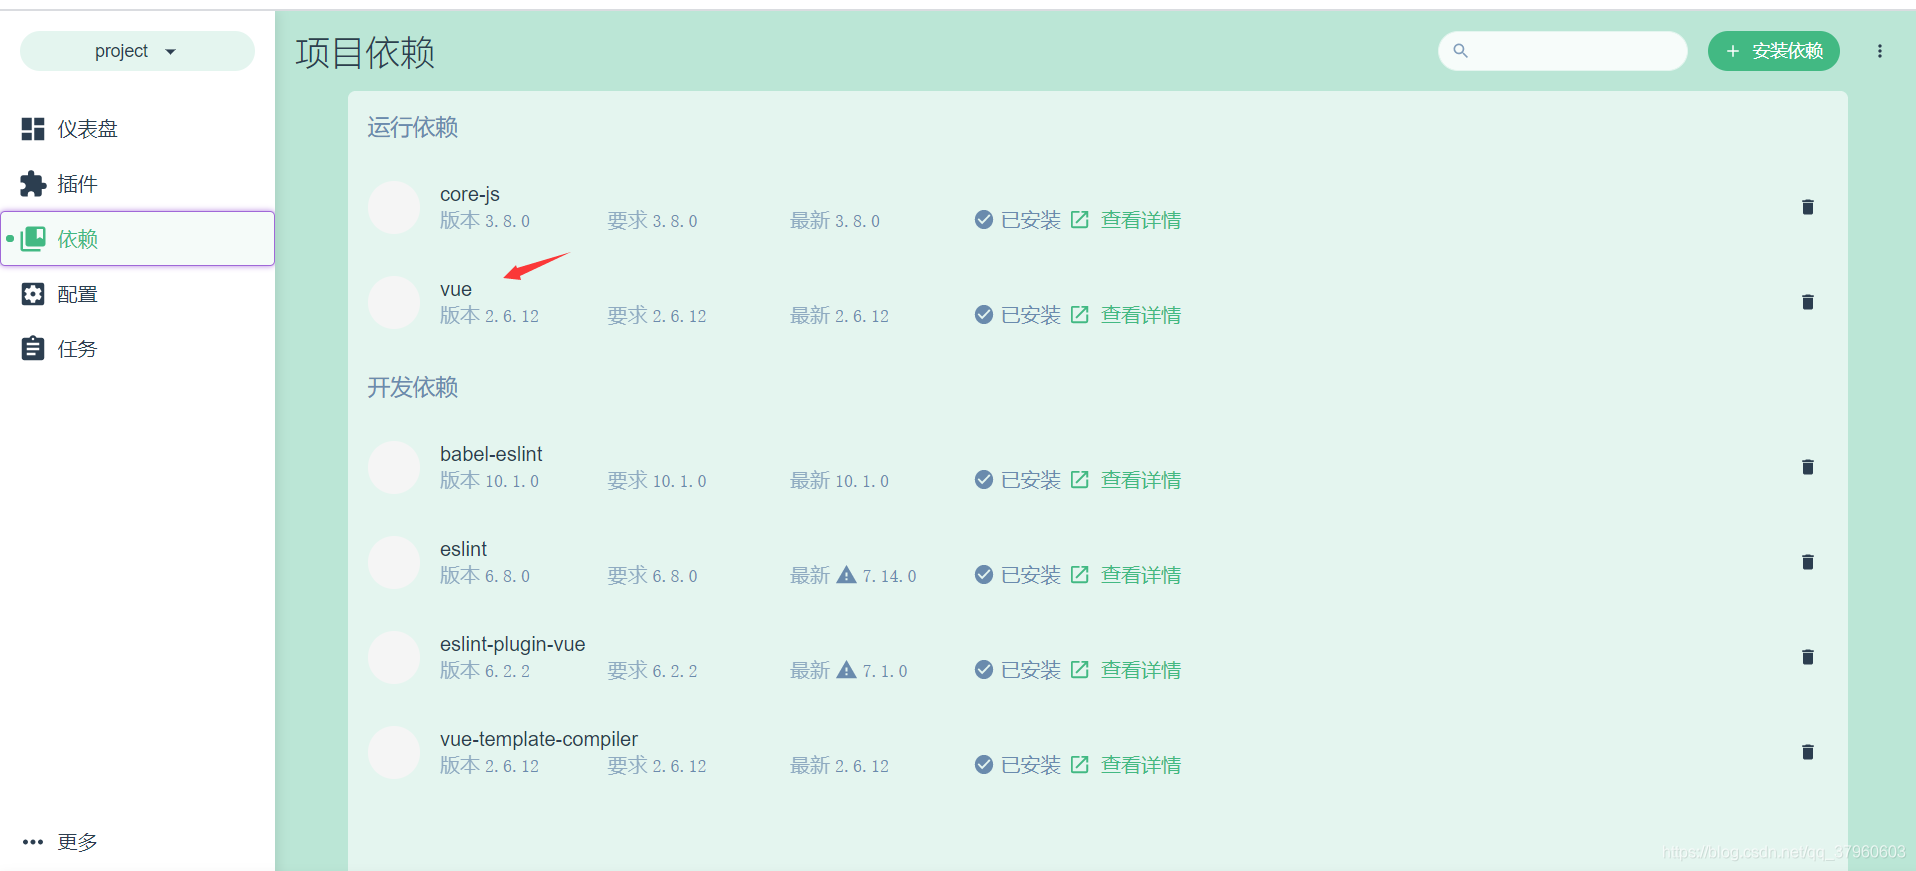
可以查看项目的依赖。
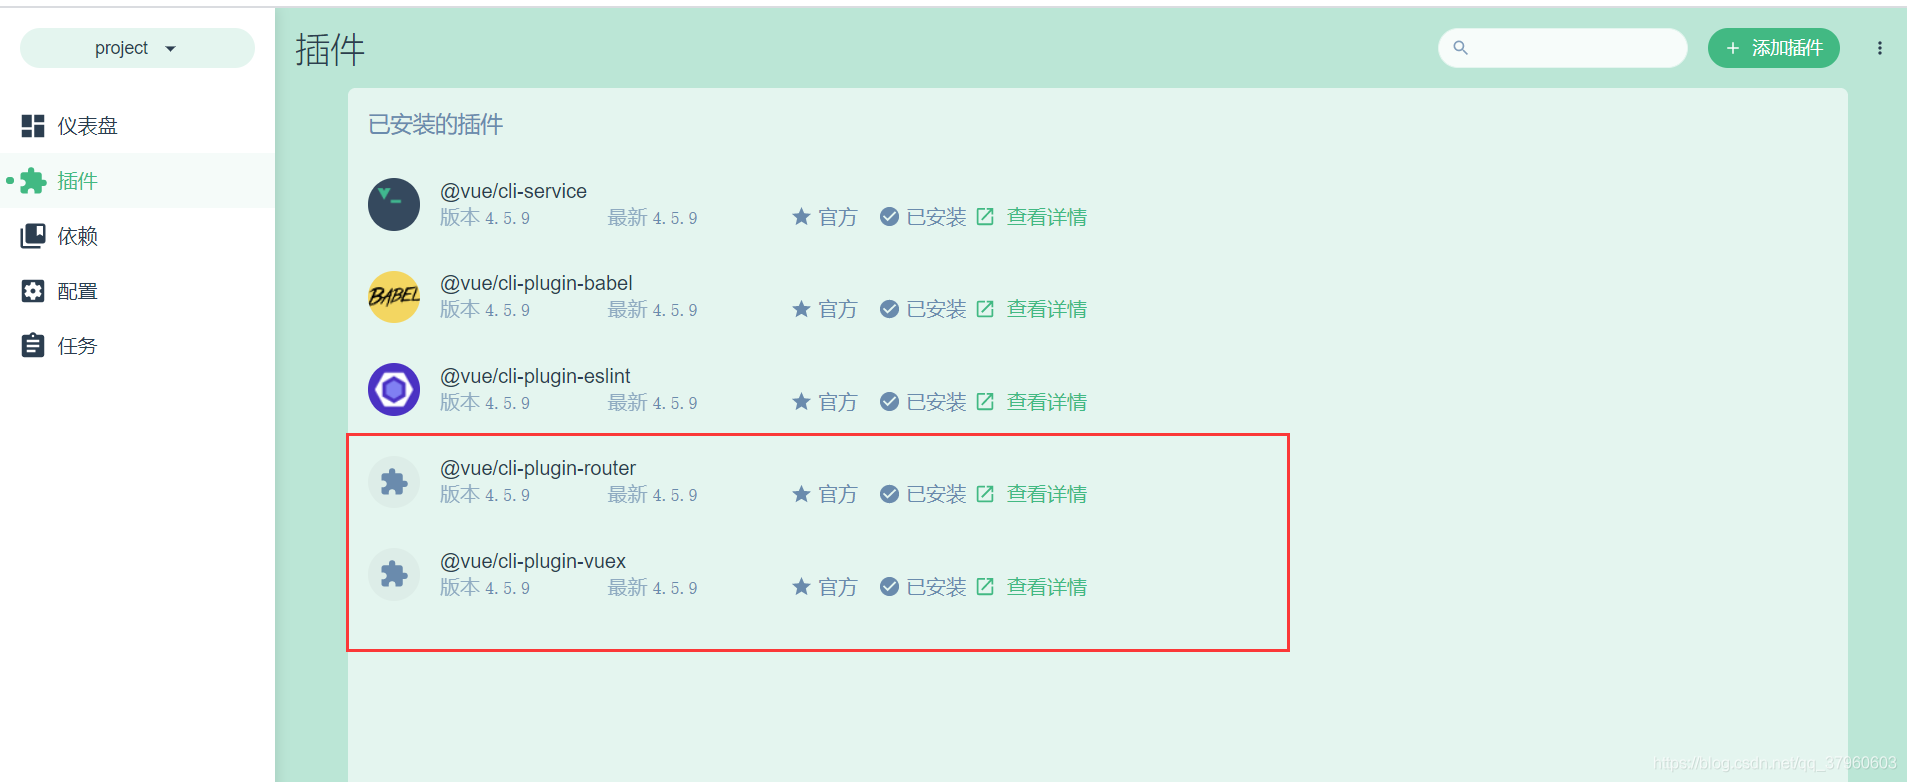
还可以添加插件。
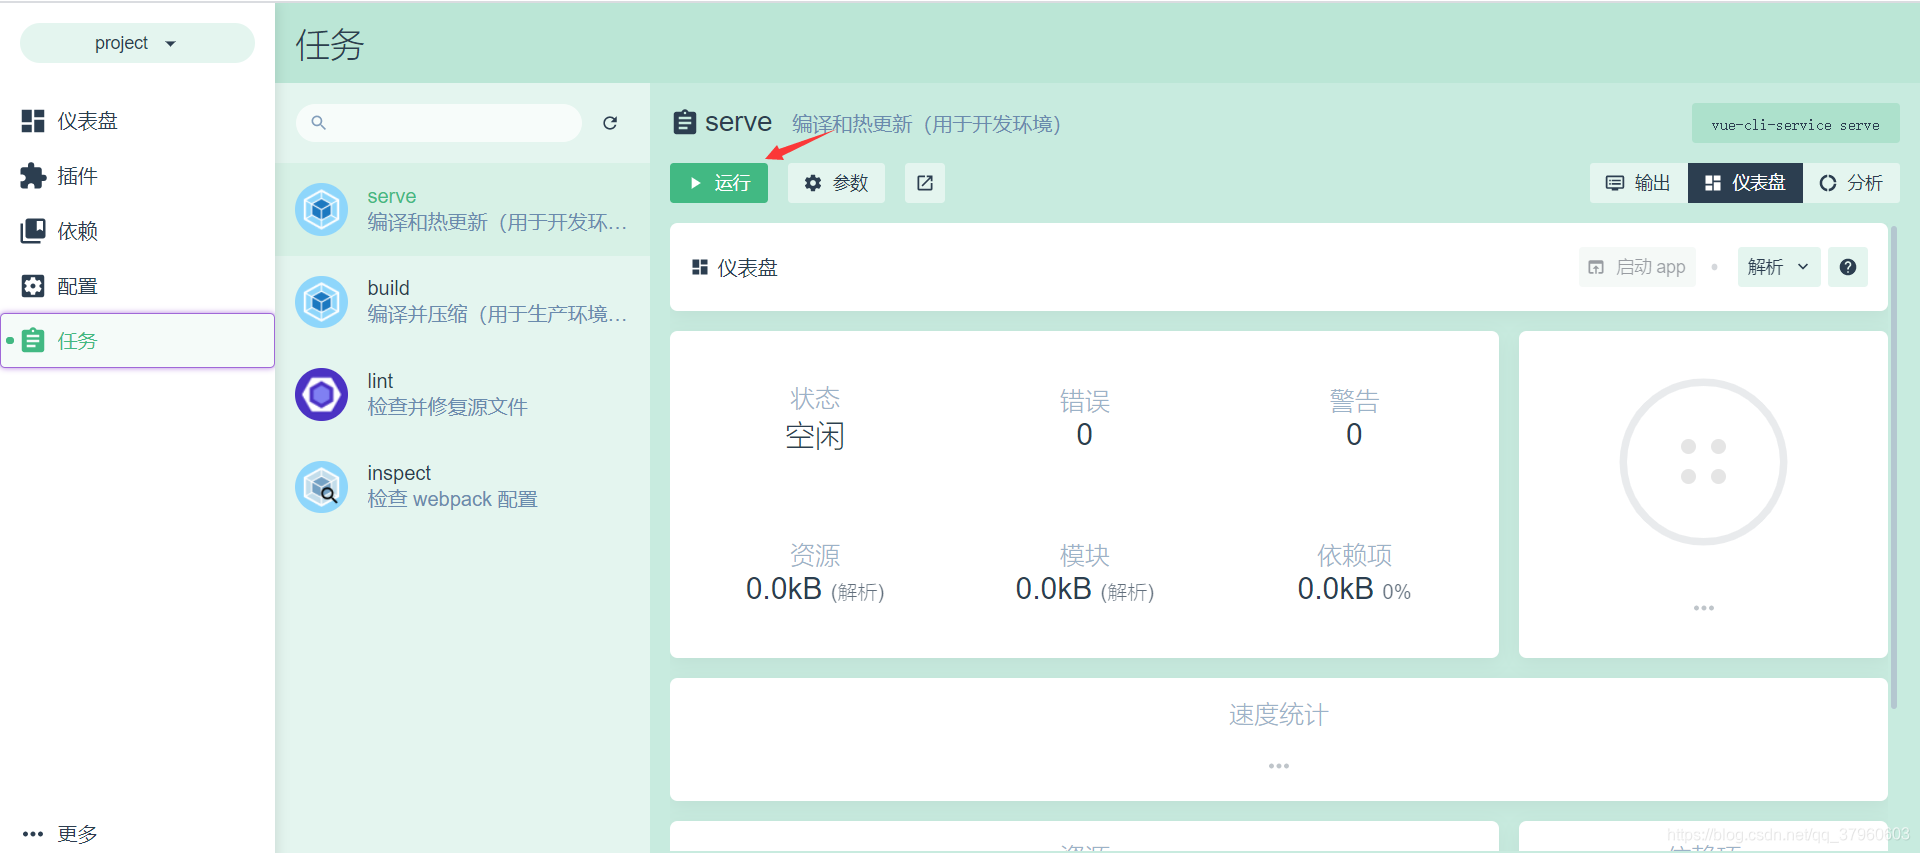
运行项目。
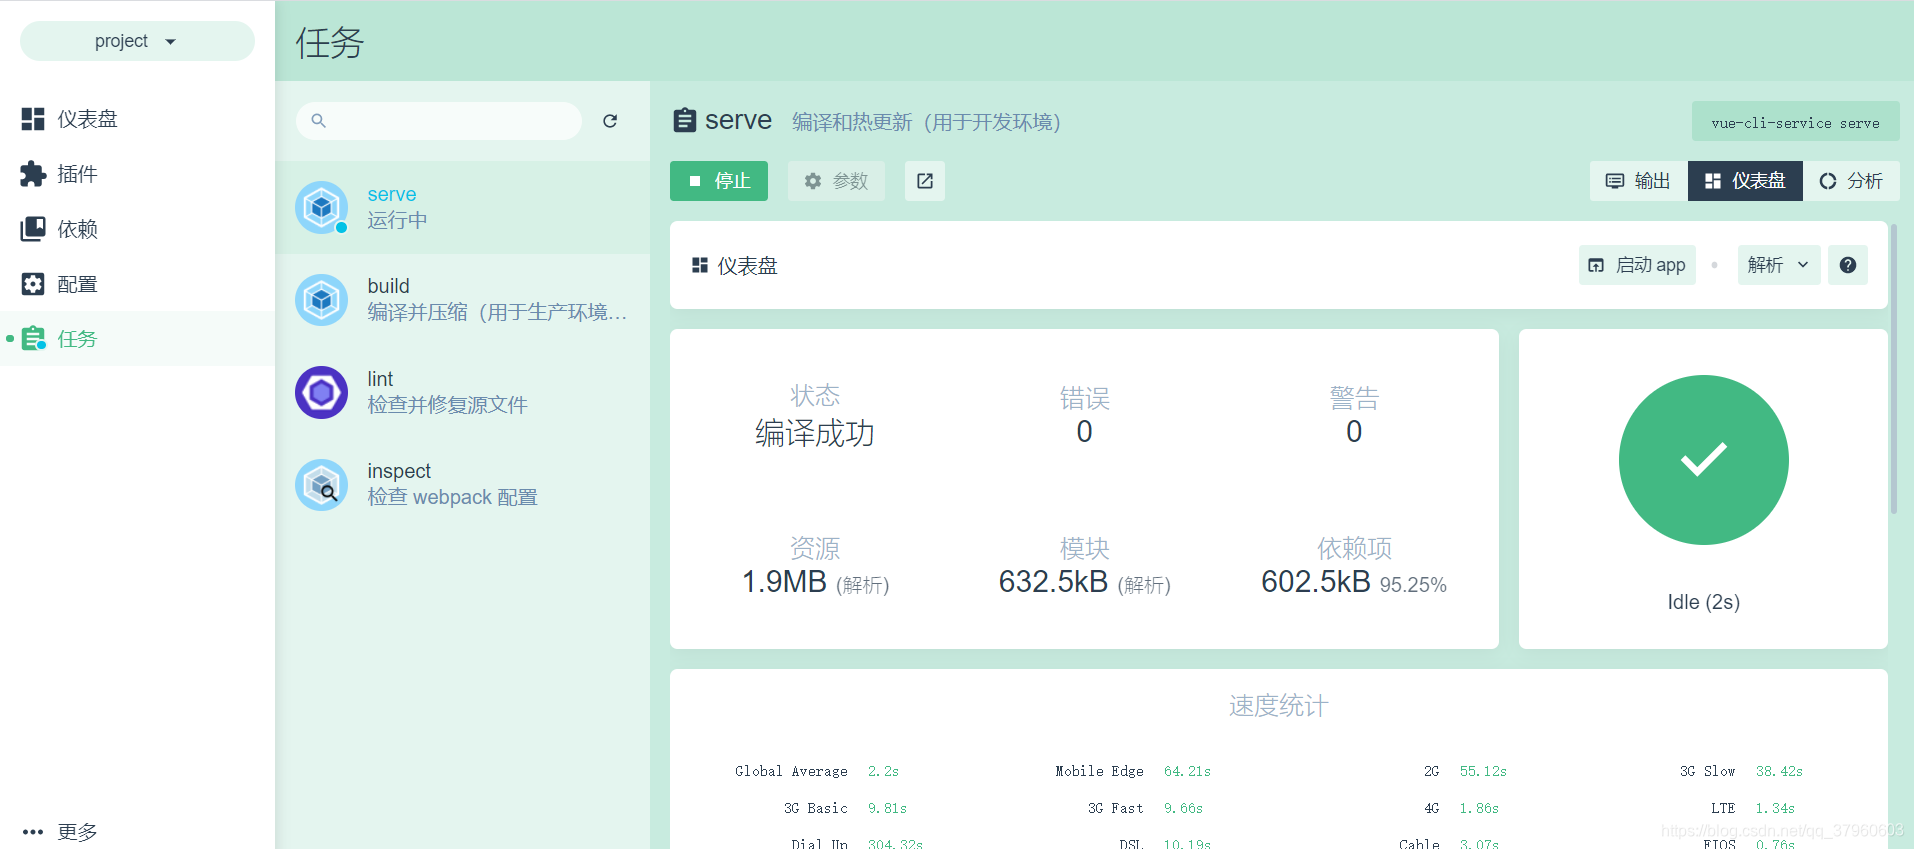
项目运行成功。
访问项目。
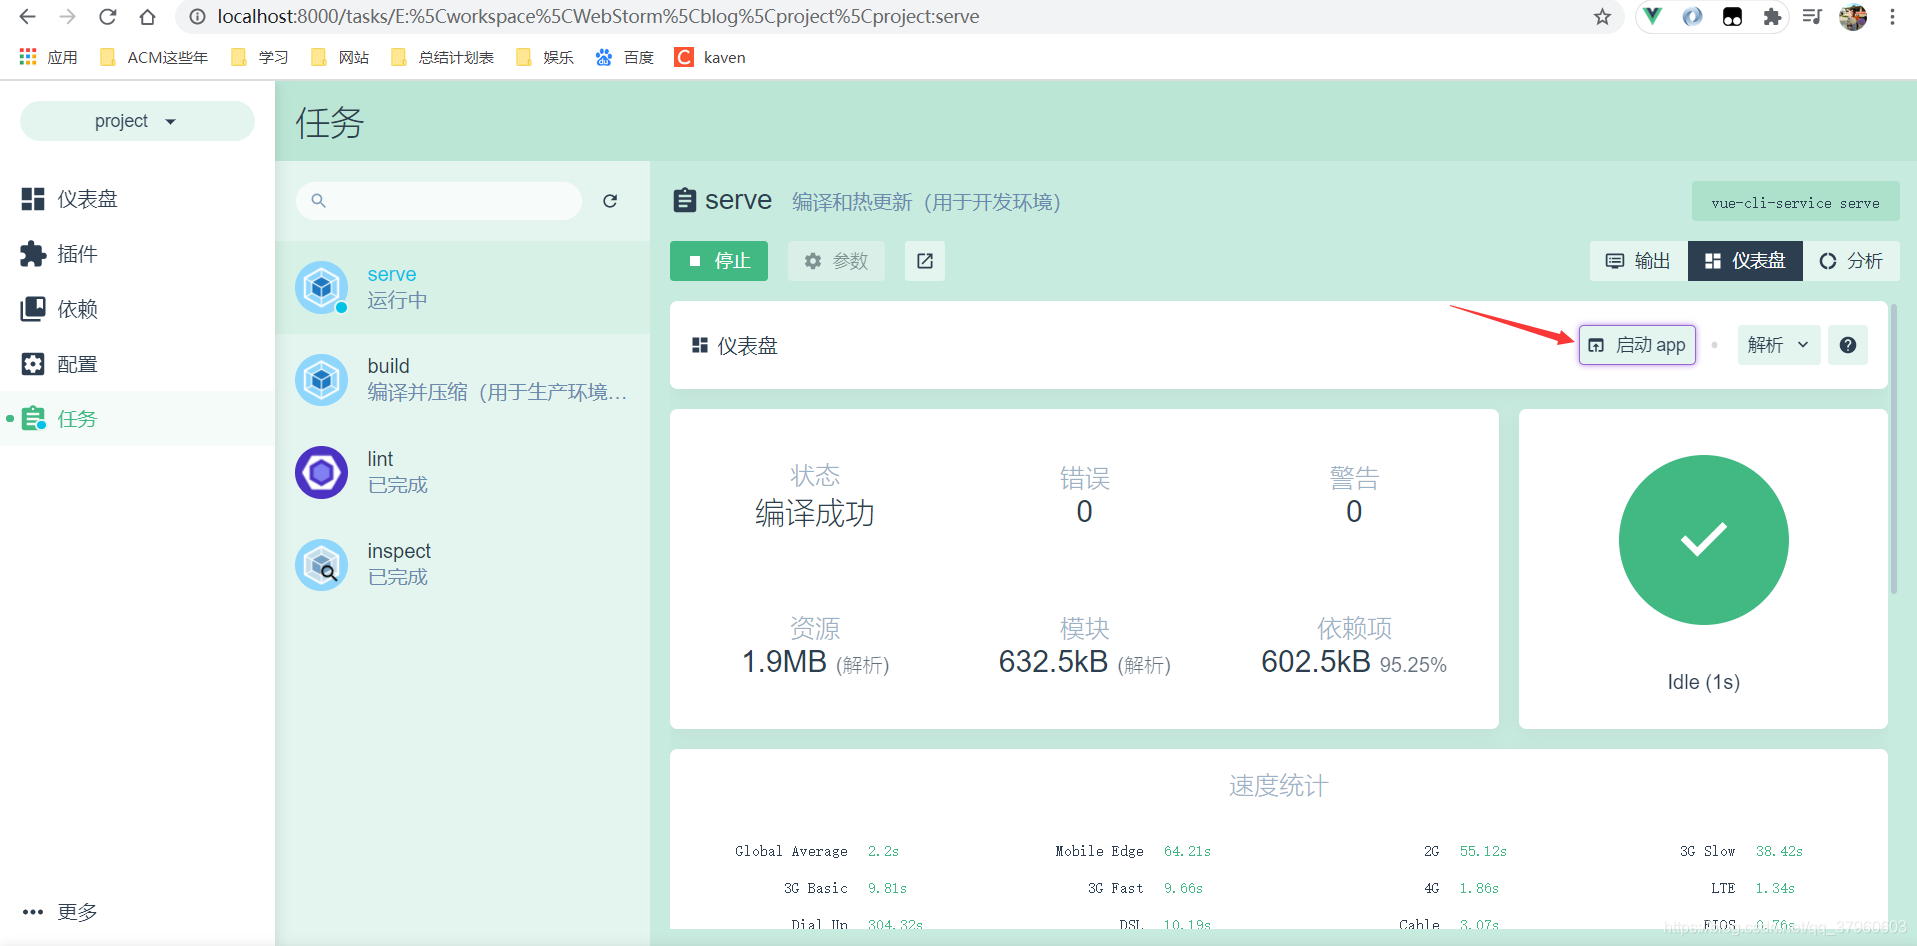
项目可以正常访问。
创建Vue项目 - vue init
先安装@vue/cli-init。
E:\workspace\WebStorm\blog\project>npm i -g @vue/cli-init
...
+ @vue/cli-init@4.5.9
added 251 packages from 206 contributors in 18.065s
vue init命令的说明。
E:\workspace\WebStorm\blog\project>vue init -h
Usage: init [options] <template> <app-name>

generate a project from a remote template (legacy API, requires @vue/cli-init)

Options:
  -c, --clone  Use git clone when fetching remote template
  --offline    Use cached template
  -h, --help   output usage information
还可以通过下面这条命令来创建Vue项目,这里的webpack参数是一种模板(template),project参数就是项目名称(app-name)。
vue init webpack project
E:\workspace\WebStorm\blog\project>vue init webpack project

? Project name project
? Project description A Vue.js project
? Author ITKaven <xxxxxxxx@qq.com>
? Vue build standalone
? Install vue-router? Yes
? Use ESLint to lint your code? Yes
? Pick an ESLint preset Standard
? Set up unit tests No
? Setup e2e tests with Nightwatch? No
? Should we run `npm install` for you after the project has been created? (recommended) npm

   vue-cli · Generated "project".

# Installing project dependencies ...
added 1380 packages from 715 contributors in 31.707s

41 packages are looking for funding
  run `npm fund` for details

Running eslint --fix to comply with chosen preset rules...
# ========================


> project@1.0.0 lint E:\workspace\WebStorm\blog\project\project
> eslint --ext .js,.vue src "--fix"


# Project initialization finished!
# ========================

To get started:

  cd project
  npm run dev

Documentation can be found at https://vuejs-templates.github.io/webpack
运行项目。
E:\workspace\WebStorm\blog\project>cd project

E:\workspace\WebStorm\blog\project\project>npm run dev

> project@1.0.0 dev E:\workspace\WebStorm\blog\project\project
> webpack-dev-server --inline --progress --config build/webpack.dev.conf.js

 13% building modules 26/31 modules 5 active ...torm\blog\project\project\src\App.vue{
     parser: "babylon" } is deprecated; we now treat it as {
     parser: "babel" }.
 95% emitting

 DONE  Compiled successfully in 2614ms                                                                      下午11:53:24

 I  Your application is running here: http://localhost:8080
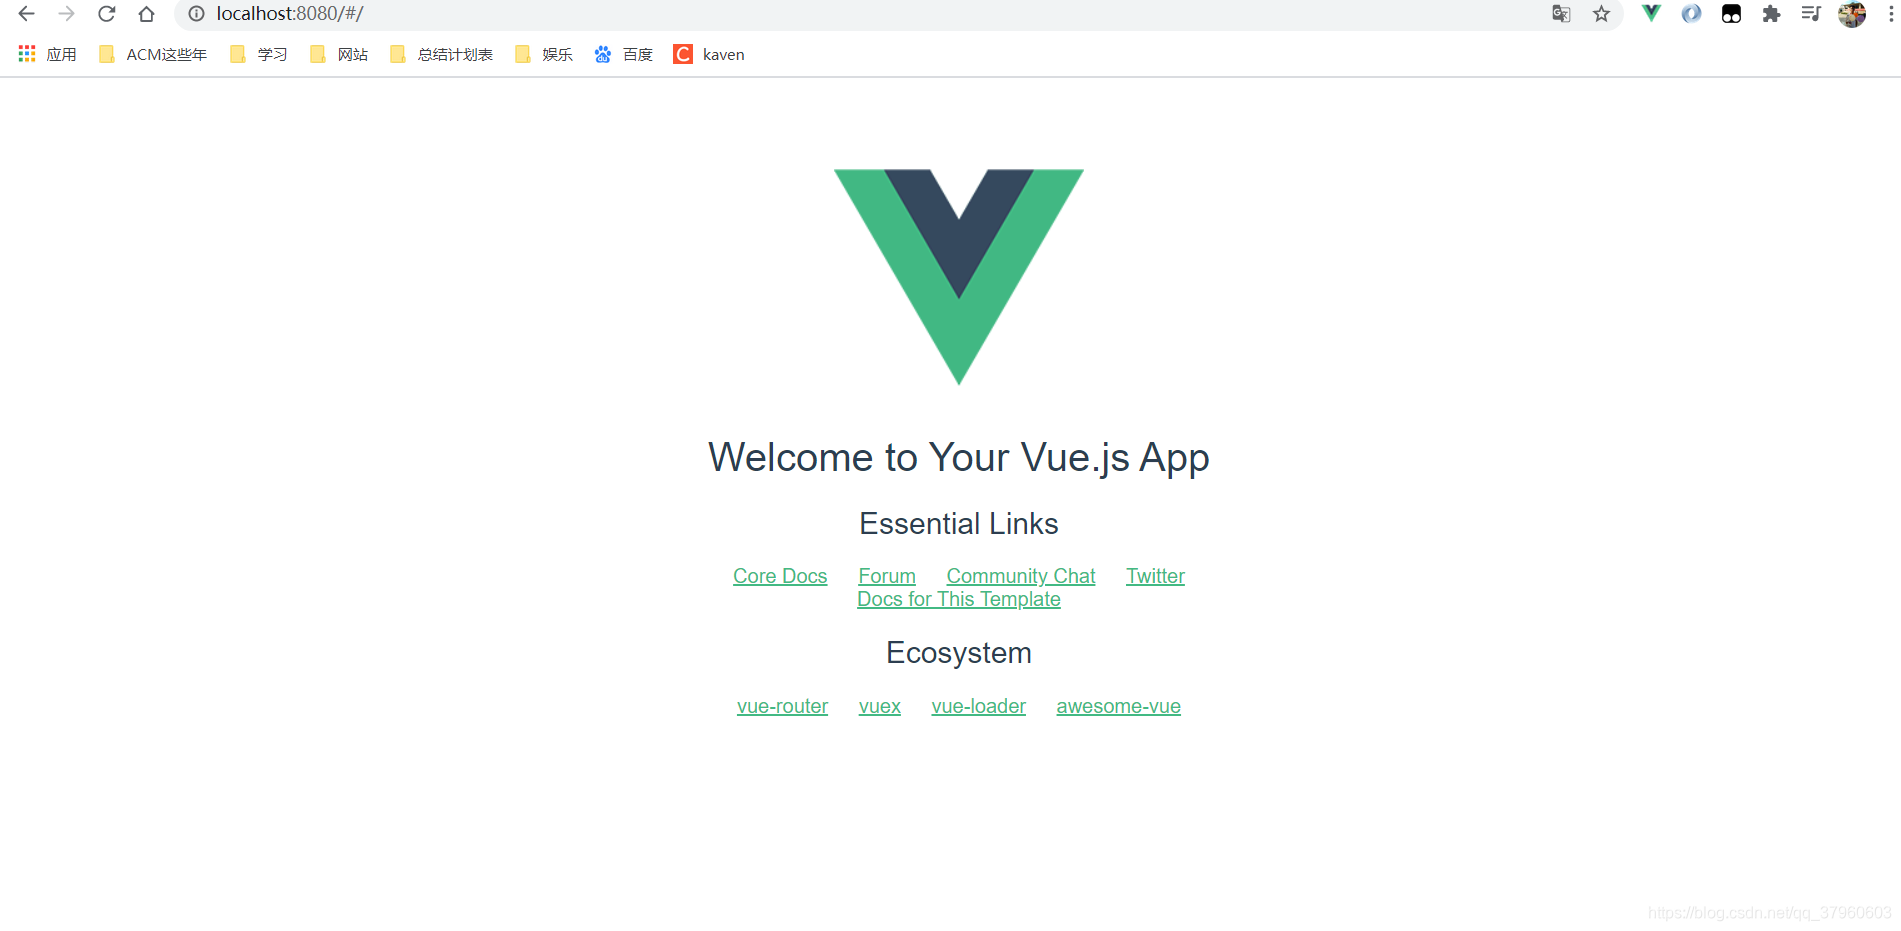
访问http://localhost:8080/得到如下图所示页面,说明Vue项目已经运行成功了。
区别
vue create
vue creat命令是vue-cli3.x提供创建Vue项目的方式,模板是固定的,模板选项可自由配置。
使用方式:vue create [options] <app-name>。
vue ui
vue ui命令也是vue-cli3.x提供创建Vue项目的方式,可以通过操作可视化页面来创建和管理Vue项目。
vue init
vue init命令是vue-cli2.x提供创建Vue项目的方式,可以使用github上面的一些模板来初始化项目。比如webpack就是官方推荐的标准模板。
使用方式:vue init [options] <template> <app-name>。
vue create、vue ui、vue init三种方式创建Vue项目就介绍到这里。
写博客是博主记录自己的学习过程,如果有错误,请指正,谢谢!
智能推荐
Unity ShaderLab 中的内置变量_shaderlab 内置参数-程序员宅基地
文章浏览阅读1.5k次。点此获取官方文档地址所有的这些内置变量类型无需声明,直接使用,需要包含:UnityCG.cginc file.Transformationsfloat4x4 UNITYMATRIXMVP Current modelviewprojection matrixfloat4x4 UNITYMATRIXMV Current model*view matrixfloa_shaderlab 内置参数
MFC定义圆角矩形按钮_修改mfcgroupbox为圆角矩形-程序员宅基地
文章浏览阅读6.8k次。使用仅需两步!第一步:CButton替换为CBtnNoImg。第二步:设置各个状态的颜色,和字体(字体设置可选) { CFont *pFont = new CFont(); pFont->CreateFont(11, //以逻辑单位方式指定字体的高度 0, //以逻辑单位方式指定字体中字符的平均宽度 0, //指定偏离垂线和X轴在显示面上的夹角(单位:0.1_修改mfcgroupbox为圆角矩形
xml配置文件引用properties文件报错_xml文件找不到propertycommonconfigurer.class-程序员宅基地
文章浏览阅读1.6k次。一般是配置文件引用失败引起的正确的配置:<bean id="propertyConfigurer" class="com.jcl.common.spring.web.***PropertyPlaceholderConfigurer"> <property name="envPropFiles"> <lis..._xml文件找不到propertycommonconfigurer.class
Linux结构目录详解-程序员宅基地
文章浏览阅读1.1k次,点赞26次,收藏15次。Linux在Linux中,系统默认的用户是root,其实和 windows 的 administrator 类似,root 用户可以操作操作系统的任何文件和设备,所以在生产环境就不要乱用root了,权利越大,责任越大。学习Linux,就要习惯通过命令行的方式学习,。目前的Linux导图如下。
unity scrollview滚动到指定的位置_unity scrollview滚动到指定位置-程序员宅基地
文章浏览阅读2.8k次,点赞3次,收藏5次。unity scrollview 滚动到指定位置,需要使用 normalizedPosition,或者 verticalNormalizedPosition,或者 horizontalNormalizedPosition_unity scrollview滚动到指定位置
人脸识别技术优势-程序员宅基地
文章浏览阅读693次。当下人们对信息安全问题格外的注重,并且信息安全也成为这个时代的热门话题。基于密码、个人识别码、磁卡和钥匙等传统的安全措施已不能完全满足社会要求,所以人们把目光投向了生物特征识别技术——利用人体固有的生理特征或行..._人脸识别技术的优点
随便推点
汇编语言的简答入门--斐波那契数列(递归)_汇编语言递归求斐波那契-程序员宅基地
文章浏览阅读9k次。TITLE Save an array and dispalyINCLUDE Irvine32.inc.dataarray DWORD 12 DUP (?) ; define a array for saving Fibonacci numbersstep = type arraynum DWORD ?count DWORD ?prompt byte "The first_汇编语言递归求斐波那契
pip命令使用详解-程序员宅基地
文章浏览阅读10w+次,点赞29次,收藏188次。pip很像CentOS系统中的yum命令,用于安装及维护Python包。pip的安装windows其实在windows下是默认安装了pip工具的,只是没有将其所在目录加入Path,导致命令查找不到。 将python安装目录下的scripts目录加入环境变量Path中即可。Linux执行下面命令即可完成安装# wget https://bootstrap.pyp..._pip
2013.9.7 CISA pass的一点感想-程序员宅基地
文章浏览阅读68次。2013.9.7 CISA pass的一点感想 先说一个本人基本情况从事信息安全和BCM工作,考试前没有参加培训机构的培训,从6月中旬开始复习CISA,复习材料就是汇哲的教材书和2本红宝书。 看到论坛上各位大牛600+通过,我的通过分数4开头,就不拿出来show了,以免丢人现眼。在此就和大家分享几点个人复习和备考的感受。1、看到论坛上有大..._cisa 初步成绩报告 not pass
SpringSecurity的使用_spring security 3.7使用-程序员宅基地
文章浏览阅读3.9k次。Spring Security 是针对Spring项目的安全框架,也是Spring Boot底层安全模块默认的技术选型,他可以实现强大的Web安全控制,对于安全控制,我们仅需要引入 spring-boot-starter-security 模块,进行少量的配置,即可实现强大的安全管理!使用步骤:1:加入依赖 <dependency> <groupId>org.springframework.boot</groupId> _spring security 3.7使用
Linux 执行定时任务 shell脚本_linux定时任务shell脚本-程序员宅基地
文章浏览阅读540次。https://www.cnblogs.com/grimm/p/8794707.html Linux上面执行定时任务,我们可以利用crontab -e直接编辑定时任务 另外我们还可以写好shell脚本,定时去执行shell脚本,这两个方法都可以起到定时执行的作用下面我详细说一下入如何执行shell脚本1.声明一下我安装的lnmp环境,shell脚本存放的位置在 /usr/local..._linux定时任务shell脚本
给WordPress的文章插入数学公式_word公式在wordpress-程序员宅基地
文章浏览阅读5k次。这里是我的个人网站: https://endlesslethe.com/insert-math-formula-into-wordpress.html 有更多总结分享,最新更新也只会发布在我的个人网站上。排版也可能会更好看一点=v= 问题背景 我使用OneNote写总结。在总结数论相关的算法时,文章会包含数学公式。数学公式是MS特有的格式。直接将OneNote复制到WordPre_word公式在wordpress