AndroidStudio入门基础(一)——基础布局_android studio-程序员宅基地
技术标签: AndroidStudio 布局 android 基础 课程设计
写在前面:
上学期学习了Android,从一开始的什么都不懂到后来成功做出一个课程设计作品,回忆起来一路还是充满坎坷和辛酸泪的啊。
遗忘是可怕的,为了防止以后把好不容易学到的东西忘得一干二净,我打算写一系列的AndroidStudio教程记录一些有用的知识点,当然,我会从最基础的地方写起,希望可以帮助到一些初学者~
最后,如果时间和精力允许的情况下,我会一步步的还原我的课程设~
目录
1.认识目录
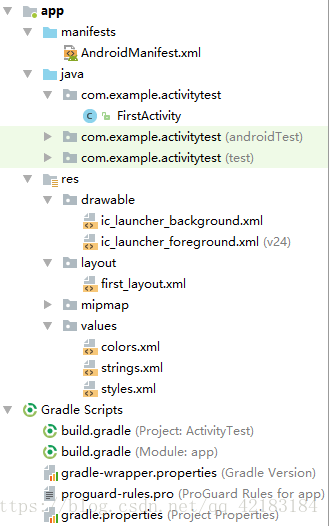
以FirstActivity为例子,我们需要掌握的文件有:
- manifest
- java
- drawable
- layout
- values
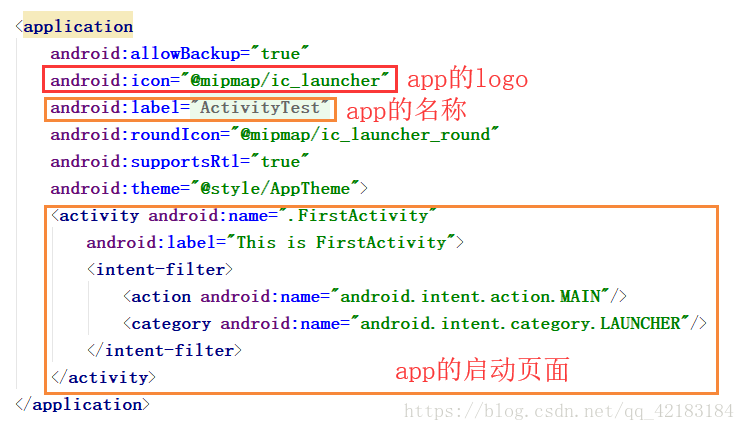
①manifest文件夹里面只有一个AndroidManifest.xml文件,在这个文件里,我们是对整个app进行一些设置,例如app的logo,app一进去的启动页面,app的名字...
②java文件夹里面是.java文件,负责整个app的逻辑处理,是完成整个app的核心所在。java文件真的超级powerful,后续会慢慢用例子体现,现在说一大堆显得有点空洞。
TIPS: 初学者一般再Java文件建立好了之后,不要随便移动它的位置。
③drawable文件夹里面放app需要用到的图片
④layout文件夹里面放的是“画页面”的.xml文件,里面的文件也叫布局文件。如果你会html&css&js的话,就很好理解了。.xml文件的作用就和.html和.css文件的作用类似,页面需要什么组件?怎么布局?用一些什么样式?都在.xml里面设置。但是对于一些复杂的样式,在.xml文件里面可能设置不了那么精美,就可以在java文件里面设置。
⑤value文件夹里面放了一些字符串,颜色等常量,例如:
//color.xml
<resources>
    <color name="colorPrimary">#3F51B5</color>
</resources>


//firstActivity.xml
<Button
    android:background="@color/colorPrimary"
    />
对于颜色#3F51B5,我给它起名字叫colorPrimary,之后我在布局文件中用这个颜色,就只需要喊它的名字colorPrimary就可以了。
最后总结一些基本思想:
- layout和java文件夹是最重要的。如果把app比作一个人,layout就是一个人的脸,java就是一个人是灵魂。前者决定了这个app长什么样子,后者决定了这个app可以实现那么功能。
- 对于初学者,AndroidManifest.xml和value文件夹的作用不用着急掌握,到了某一天你需要实现某个功能需要用到这些,你就可以真真切切的知道它的用处了。
2.RelativeLayout
AndroidStudio里面支持的布局有挺多种的,但是最最重要的是RelativeLayout(相对布局)和LinearLayout(线性布局),熟练掌握这两种布局也非常够用了,当然还有GridLayout...但是对于初学者,先学会了相对布局和线性布局,再去学习其他布局,就会觉得非常简单轻松了。还有一个非常有用的布局,叫RecyclerLayout,因为要结合adapter使用,所以对于初学者略难,这里就先不讲了,之后会非常详细的介绍它。
学习布局需要掌握的东西很简单,就是它有的属性,以及取不同属性值可以达到的效果,下面我就慢慢列出来。
- layout_width
- layout_height
这两个属性就决定了布局的宽度和高度,把RelativeLayout想象成一个相框或者一个容器,在这个相框里面可以装其他的组件。对于嵌套在相框里面的组件,其所在的相框就是它的父空间。这个相框的大小呢,就用上面这两个属性举例,取值有三种:
- wrap_content 刚刚把文字组件包裹满的长度
- match_parent 撑满整个父空间的长度
- 100px 具体的像素值
对于相对布局有一个地方要注意!!!
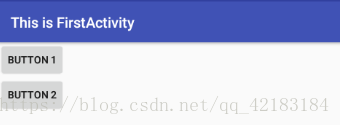
相对布局里面的组件需要设置id(在同一个.xml文件里面的所有组件,其id不可以重复哦~)然后用layout_below设置组件的相对位置。
<?xml version="1.0" encoding="utf-8"?>
<RelativeLayout
    xmlns:android="http://schemas.android.com/apk/res/android"
    android:layout_width="match_parent"
    android:layout_height="match_parent">

    <Button
        android:id="@+id/button_1"
        android:layout_width="wrap_content"
        android:layout_height="wrap_content"
        android:text="Button 1"
        />

    <Button
        android:id="@+id/button_2"
        android:layout_below="@id/button_1"
        android:layout_width="wrap_content"
        android:layout_height="wrap_content"
        android:text="Button 2"
        />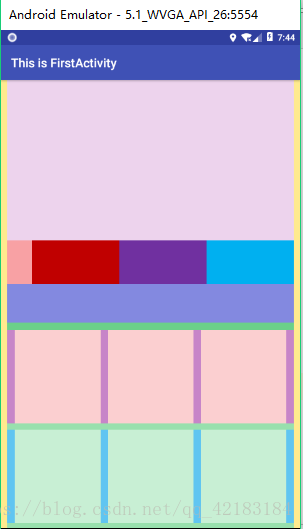
</RelativeLayout>例如上面这个例子,在RelativeLayout里面有两个按钮,第一个按钮的id是button_1,android:id="@+id/button_1",第二个按钮的id是button_2,为button_2设置了android:layout_below="@id/button_1"表示按钮2在按钮1的下面。所以效果图如下:
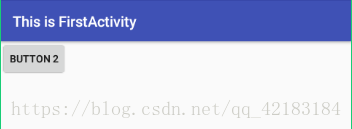
如果我不为按钮2设置相对向下的对象会怎样呢?也就是删掉android:layout_below="@id/button_1"。答案是按钮二会覆盖按钮一。
如果想让按钮居中怎么办?答案就是为RelativeLayout添加一个属性 android:gravity="center"
如果继续追问,我希望按钮一和按钮二并排在一起怎么办?答案是:sorry,RelativeLayout做不到啊~~
但是LinearLayout可以做到哦!
RelativeLayout还有很多其他的属性,可以自己试着玩,重要的属性就是上面这些,我用红色的粗体标记啦~
3.LinearLayout
线性布局要灵活一些,在实际应用上也是最最最广泛的。
- layout_width
- layout_height
和相对布局一样的用法和属性值,我就不赘述了!
区别于RelativeLayout,LinearLayout就不要求每个组件都要设置自己的id了,但是最好还是设置一下,这是一个好习惯哦。
那么问题来了,我怎么设置两个组件是横着并排还是竖着并排呢??现在就隆重介绍线性布局的重要属性 orientation
取值有两种:vertical(垂直)和 horizontal(水平)
<LinearLayout
    xmlns:android="http://schemas.android.com/apk/res/android"
    android:layout_width="match_parent"
    android:layout_height="match_parent"
    android:orientation="horizontal"
    >

    <Button
        android:id="@+id/button_1"
        android:layout_width="200px"
        android:layout_height="100px"
        android:text="Button 1"
        />

    <Button
        android:id="@+id/button_2"
        android:layout_width="200px"
        android:layout_height="100px"
        android:text="Button 2"
        />

    <Button
        android:id="@+id/button_3"
        android:layout_width="200px"
        android:layout_height="100px"
        android:text="Button 3"
        />

</LinearLayout>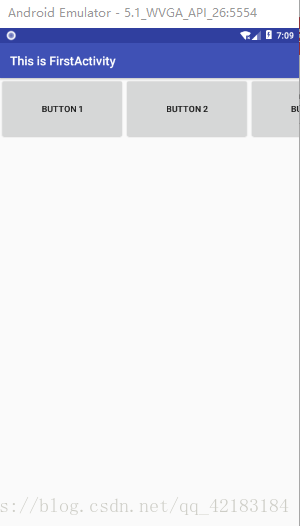
android:orientation="horizontal" 决定了容器里面的所有组件都绝对是水平排列的
!!!需要注意的就是,哪怕我的组件已经装不下了,也不会被挤到下一排,而是只显示一截,甚至完全不显示。
<?xml version="1.0" encoding="utf-8"?>
<LinearLayout
    xmlns:android="http://schemas.android.com/apk/res/android"
    android:layout_width="match_parent"
    android:layout_height="match_parent"
    android:orientation="vertical"
    >

    <Button
        android:id="@+id/button_1"
        android:layout_width="200px"
        android:layout_height="100px"
        android:text="Button 1"
        />

    <Button
        android:id="@+id/button_2"
        android:layout_width="200px"
        android:layout_height="100px"
        android:text="Button 2"
        />

</LinearLayout>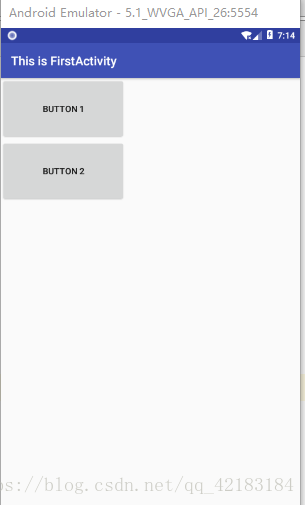
android:orientation="vertical"决定了容器里的组件都是垂直排列,这就很好理解了。
线性布局还有一个重要的属性 layout_weight 取值一般是1、2、3...表示权重的大小,例如:
<LinearLayout
    xmlns:android="http://schemas.android.com/apk/res/android"
    android:layout_width="match_parent"
    android:layout_height="match_parent"
    android:orientation="vertical"
    >

    <Button
        android:id="@+id/button_1"
        android:layout_width="200px"
        android:layout_height="100px"
        android:layout_weight="1"
        android:text="Button 1"
        />

    <Button
        android:id="@+id/button_2"
        android:layout_width="200px"
        android:layout_height="100px"
        android:layout_weight="2"
        android:text="Button 2"
        />

</LinearLayout>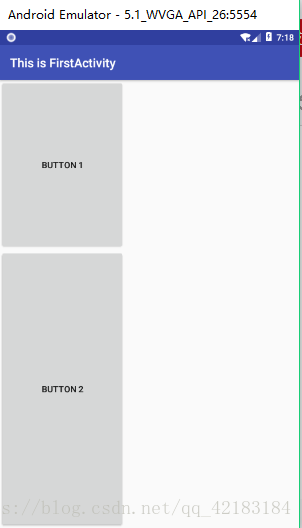
LinearLayout的强大就在于它是可以嵌套的,从而实现很多复杂的布局。
为了巩固你对它的认识,我出一个小小的题目,这是我的课程设计的一个页面,你会怎么设计这个布局呢??
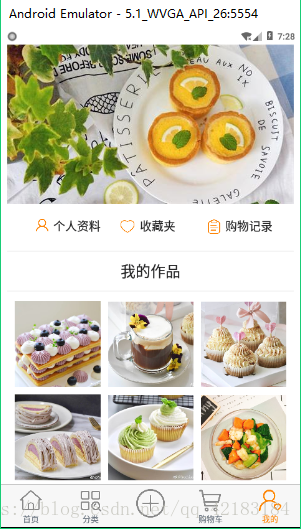
我自己也再试了试:
<?xml version="1.0" encoding="utf-8"?>
<LinearLayout
    xmlns:android="http://schemas.android.com/apk/res/android"
    android:layout_width="match_parent"
    android:layout_height="match_parent"
    android:orientation="vertical"
    android:paddingLeft="10dp"
    android:paddingRight="10dp"
    android:background="#FFEA8E"
    >
    <RelativeLayout
        android:layout_width="match_parent"
        android:layout_height="match_parent"
        android:background="#98E0AD">

                <ImageView
                    android:id="@+id/image_bg"
                    android:layout_width="match_parent"
                    android:layout_height="258dp"
                    android:background="#EDD3ED"/>

                <LinearLayout
                    android:layout_below="@id/image_bg"
                    android:id="@+id/layout_button"
                    android:layout_width="match_parent"
                    android:layout_height="70dp"
                    android:background="#F8A1A4"
                    android:orientation="vertical">

                    <RadioGroup
                        android:id="@+id/rg_main"
                        android:layout_width="match_parent"
                        android:layout_height="70dp"
                        android:layout_marginLeft="40dp"
                        android:layout_alignParentBottom="true"
                        android:background="#C785C8"
                        android:orientation="horizontal">

                        <RadioButton
                            android:id="@+id/rb_me"
                            android:layout_width="0dp"
                            android:layout_height="match_parent"
                            android:layout_weight="1"
                            android:paddingRight="28dp"
                            android:background="#C00000"
                            android:button="@null"
                            android:gravity="center"
                            android:textSize="19sp" />

                        <RadioButton
                            android:id="@+id/rb_heart"
                            android:layout_width="0dp"
                            android:layout_height="match_parent"
                            android:paddingRight="33dp"
                            android:layout_weight="1"
                            android:button="@null"
                            android:background="#7030A0"
                            android:gravity="center"
                            android:textSize="19sp" />

                        <RadioButton
                            android:id="@+id/rb_order"
                            android:layout_width="0dp"
                            android:layout_height="match_parent"
                            android:layout_weight="1"
                            android:background="#00B0F0"
                            android:paddingRight="34dp"
                            android:button="@null"
                            android:gravity="center"
                            android:textSize="19sp" />
                    </RadioGroup>
                </LinearLayout>


                <LinearLayout
                    android:id="@+id/layout_mywork"
                    android:layout_below="@id/layout_button"
                    android:layout_width="match_parent"
                    android:layout_height="74dp"
                    android:background="#6BD089"
                    android:orientation="vertical">

                    <TextView
                        android:layout_width="match_parent"
                        android:layout_height="62dp"
                        android:textColor="#212122"
                        android:gravity="center"
                        android:background="#8389E0"
                        android:textSize="24sp"
                        />

                </LinearLayout>

                <LinearLayout
                    android:id="@+id/layout_work1"
                    android:layout_below="@id/layout_mywork"
                    android:layout_width="match_parent"
                    android:orientation="horizontal"
                    android:paddingRight="6dp"
                    android:paddingLeft="6dp"
                    android:background="#C785C8"
                    android:layout_height="150dp">

                    <ImageView
                        android:padding="0dp"
                        android:layout_width="match_parent"
                        android:layout_weight="1"
                        android:layout_height="160dp"
                        android:background="#FBCFD0"
                        android:layout_marginRight="6dp"
                        android:layout_marginLeft="6dp"
                        />

                    <ImageView
                        android:layout_width="match_parent"
                        android:layout_weight="1"
                        android:background="#FBCFD0"
                        android:layout_marginRight="6dp"
                        android:layout_marginLeft="6dp"
                        android:layout_height="160dp"
                        />

                    <ImageView
                        android:id="@+id/work1"
                        android:layout_width="match_parent"
                        android:layout_weight="1"
                        android:background="#FBCFD0"
                        android:layout_marginRight="6dp"
                        android:layout_marginLeft="6dp"
                        android:layout_height="160dp"
                        />

                </LinearLayout>

                <LinearLayout
                    android:id="@+id/layout_work2"
                    android:layout_below="@id/layout_work1"
                    android:layout_width="match_parent"
                    android:layout_marginTop="10px"
                    android:orientation="horizontal"
                    android:paddingRight="6dp"
                    android:paddingLeft="6dp"
                    android:background="#60C5F1"
                    android:layout_height="150dp">

                    <ImageView
                        android:padding="0dp"
                        android:layout_width="match_parent"
                        android:layout_weight="1"
                        android:layout_height="160dp"
                        android:layout_marginRight="6dp"
                        android:layout_marginLeft="6dp"
                        android:background="#C8EFD4"
                        />

                    <ImageView
                        android:layout_width="match_parent"
                        android:layout_weight="1"
                        android:layout_marginRight="6dp"
                        android:layout_marginLeft="6dp"
                        android:layout_height="160dp"
                        android:background="#C8EFD4"
                       />

                    <ImageView
                        android:layout_width="match_parent"
                        android:layout_weight="1"
                        android:layout_marginRight="6dp"
                        android:layout_marginLeft="6dp"
                        android:layout_height="160dp"
                        android:background="#C8EFD4"
                        />

                </LinearLayout>

            </RelativeLayout>

</LinearLayout>
总结:
这一篇主要讲了布局,都是在layout文件夹的.xml文件中实现,现在还没涉及到java文件。
下一步是介绍一些常用的组件~~ 传送门
智能推荐
影视站长必备资料合集_九草影视-程序员宅基地
文章浏览阅读4.8w次。苹果cms最新程序官方网盘:https://www.lanzous.com/u/magicblack推荐使用卧龙资源: http://wolongzy.net (速度快,稳定)共有资源30719+八戒资源站 http://zy.bajieziyuan.com (秒播)共有资源20308+麻花资源资源站http://www.mahuazy.ne..._九草影视
python语言属于什么语言,python属于什么类型语言-程序员宅基地
文章浏览阅读861次,点赞21次,收藏10次。而今以及未来的时代,将会是人工智能以及大数据的时代,在这样一个时代背景下,必然要顺应时代的发展与变化,未来新一代青少年,需要掌握人工智能此类高端技术,那么,在众多编程语言当中,最为擅长数据处理,最能够在"人工智能”方面发挥作用的,就是Python!2 通过大量招聘与应聘数据的记录(有多少招聘岗位的发布,某种类型岗位的平均薪酬是多少,每天固定时间收集并处理一次数据),通过一年数据的积累,能够得到某种岗位的发展趋势以及时间(月份)对工作的相关影响。大量的数据处理,是大数据以及人工智能技术的基础。
[附源码]PHP计算机毕业设计天津市杨柳青智慧景区信息系统(程序+LW)_php景区票系统源码-程序员宅基地
文章浏览阅读159次。附源码]PHP计算机毕业设计天津市杨柳青智慧景区信息系统(程序+LW)该项目含有源码、文档、程序、数据库、配套开发软件、软件安装教程。欢迎交流项目运行环境配置:小皮PHPstudy。项目技术:php+ Vue等等组成,B/S模式 +Vscode管理+前后端分离等等。环境需要1.运行环境:最好是小皮phpstudy最新版,我们在这个版本上开发的。其他版本理论上也可以。2.开发环境:Vscode或HbuilderX都可以。推荐HbuilderX;3.mysql。_php景区票系统源码
SpringBoot基于微信小程序的电子书阅读管理系统的设计(小说、书城)_微信小程序 阅读管理项目-程序员宅基地
文章浏览阅读1.1k次,点赞3次,收藏21次。系统是帮助管理员方便对电子书阅读系统弄进行统一管理的功能系统,能有效提升管理效率,并且可以减少维护成本。本系统主要是分为后台和小程序端,后台是用来做数据管理和维护,小程序端主要进行的是图书的搜索、浏览以及个人用户信息的相关操作,主要功能包括了:登录、注册、小说搜索、今日推荐、广告轮播图、小说分类、小说查看、小说阅读、我的书架、关于我们、我的阅读、我的信息等功能。管理员主要实现了登录、统计分析、用户管理、广告管理、分类管理、小说管理、章节管理、评论管理、管理员管理等功能。_微信小程序 阅读管理项目
SQL Server2019配置管理器无法连接到 WMI 提供程序_sqlserver配置管理器无法连接到wmi提供程序-程序员宅基地
文章浏览阅读3.3k次,点赞9次,收藏23次。SQLServer配置管理器无法连接到WMI提供程序:今天在打开sql server 的时候打不开。报了一个错误,然后我打开sql server配置管理器,就看到了如下图这个错误。然后就去网上搜了这个问题的解决方法,综合起来有以下几种:第一种:给数据库程序network service读取权限。通过上面两个大佬的方法里面得出主要是分析这两个文件的区别(在SQL server2019的数据库中包含有这几个文件(找到之后复制路径,再以管理员的身份允许cmd,执行。在这两位大佬的几个方法中我的还是没有解决!_sqlserver配置管理器无法连接到wmi提供程序
【华为OD机试真题 Python】采样过滤-程序员宅基地
文章浏览阅读343次,点赞6次,收藏8次。在做物理实验时,为了计算物体移动的速率,通过相机等工具周期性的采样物体移动距离。由于工具故障,采样数据存在误差甚至相误的情况。需要通过一个算法过滤掉不正确的采样值,不同工具的故意模式存在差异,算法的各关门限会根据工具类型做相应的调整。请实现一个算法,计算出给定一组采样值中正常值的最长连续周期。
随便推点
VxWorks基本概念及常见问题及BSP 概念-程序员宅基地
文章浏览阅读5.2k次。VxWorks基本概念及常见问题 (Drew 在开发过程中对下面概念的理解) Bootrom和Boot image的区别,Boot image和VxWorks image的联系和区别bootrom 是指on-chip bootrom,在CPU芯片内部,内嵌有小的boot程序(bootloader),类似于PC机主板上的BIOS的存储区域。和boot image不是一回事。VxWorks文档中的bo_vxworks基本概念及常见问题
TypeScript & Flow的基本使用_@babel/preset-flow-程序员宅基地
文章浏览阅读484次。强类型:语言层面限制函数的实参类型必须与形参类型相同弱类型:语言层面不会限制实参的类型总结:强类型语言中不允许任意的隐式类型转换,而弱类型是允许的静态类型:一个变量声明时它的类型就是明确的,声明过后它的类型就不允许再修改动态类型:运行阶段才能够明确变量类型,而且变量的类型随时可以改变弱类型的问题 异常需要等到运行时才能发现 函数功能可能发生改变 对象索引器的错误用法强类型的优势 错误更早暴露 代码更智能,编码更准确 重构更牢靠 减少不必要的类型判.._@babel/preset-flow
idea在运用DH密钥交换算法时出现“Unsupported secret key algorithm:AES”错误的解决办法_unsupported secret key algorithm: des-程序员宅基地
文章浏览阅读897次,点赞2次,收藏7次。idea在运用DH密钥交换算法时出现“Unsupported secret key algorithm:AES”错误的解决办法Idea在使用加密算法编程中的非对称密码时,用到的DH密钥交换算法出现以下错误信息:Exception in thread "main" java.security.NoSuchAlgorithmException: Unsupported secret key algorithm: DES at com.sun.crypto.provider.DHKeyAgreement.e_unsupported secret key algorithm: des
3DE DELMIA Role: MAE - Assembly Simulation Engineer-程序员宅基地
文章浏览阅读122次。Assembly Simulation Engineer, 对组装或拆卸过程进行可行性研究,以减轻问题,加快上市时间,提高首次质量。
node 第三方模块系列----fs-extra 文件操作相关工具库_fs-extra 确保目录-程序员宅基地
文章浏览阅读2.8k次。fs-extra模块 是基于fs 的文件操作相关工具库,封装了一些fs实现起来相对复杂的工具,主要使用方法如下:使用:let fse = require('fs-extra')常用api:1. copy 复制文件copy(src, dest, [option],callback)2. emptyDir 清空目录确保一个目录是空的。如果目录非空删除目录内容。如果目录不..._fs-extra 确保目录
Zynq UltraScale+ ZCU102入门教程02-BRAM的读写_vivado sdk可以用内存监视器看bram的数据吗-程序员宅基地
文章浏览阅读4.4k次,点赞4次,收藏32次。0.前言上一章介绍了GPIO点亮了ZCU上的8个流水灯,今天介绍BRAM的读写。BRAM 是Block RAM的缩写,它的作用主要是作为数据的缓存,用于IP和内存之间的少量数据交互,CPU提前将数据存入BRAM,当IP需要BRAM中的数据时,可直接从BRAM里面读取。上一章利用的是官方例程,细心的人可看到其实上一章已经生成了BRAM,所以这一章我们仍然基于上一章的工程来做。掌握内容:单口..._vivado sdk可以用内存监视器看bram的数据吗