【代码案例】博客页面设计(附完整源码)_博客网页源代码压缩包-程序员宅基地
技术标签: 【一文搞定一问题】 [手把手带你学Java EE] css javascript css3
博客页面设计
本篇文章主要利用前面学习的前端知识来构建出一个博客的网页页面。
博客主要分为四个页面:
- 博客列表页
- 博客正文页
- 博客登录页
- 博客编辑页
博客列表页
首先创建一个blog_list.html文件,用于编写博客列表页。
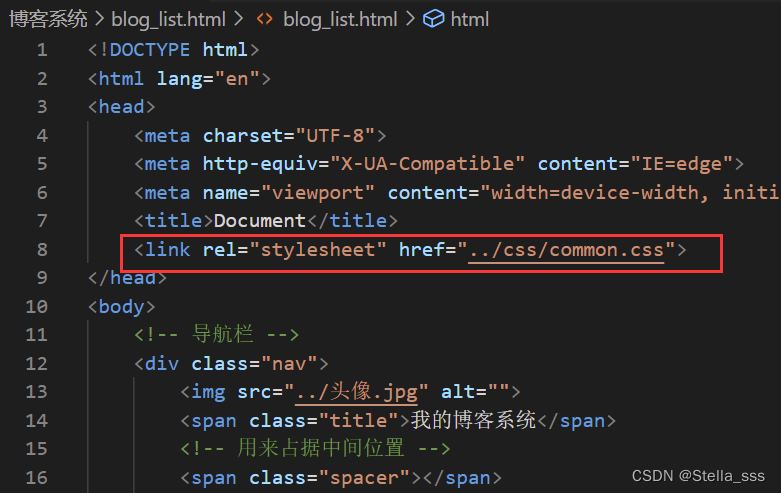
实现导航栏
- 导航栏中包含logo(此处使用的是我的头像)、标题、以及一些跳转链接。
- 为了实现左右排列,在logo和链接之间加一个spacer作为占位器。
<!DOCTYPE html>
<html lang="en">
<head>
    <meta charset="UTF-8">
    <meta http-equiv="X-UA-Compatible" content="IE=edge">
    <meta name="viewport" content="width=device-width, initial-scale=1.0">
    <title>Document</title>
</head>
<body>
    <!-- 导航栏 -->
    <div class="nav">
        <img src="/博客系统/头像.jpg" alt="">
        <span class="title">我的博客系统</span>
        <!-- 用来占据中间位置 -->
        <span class="apacer"></span>
        <a href="blog_list.html">主页</a>
        <a href="blog_edit.html">写博客</a>
        <a href="login.html">注销</a>
    </div>
</body>
</html>
注意:上面 a 标签中的链接在此时就可以提前创建好噢~
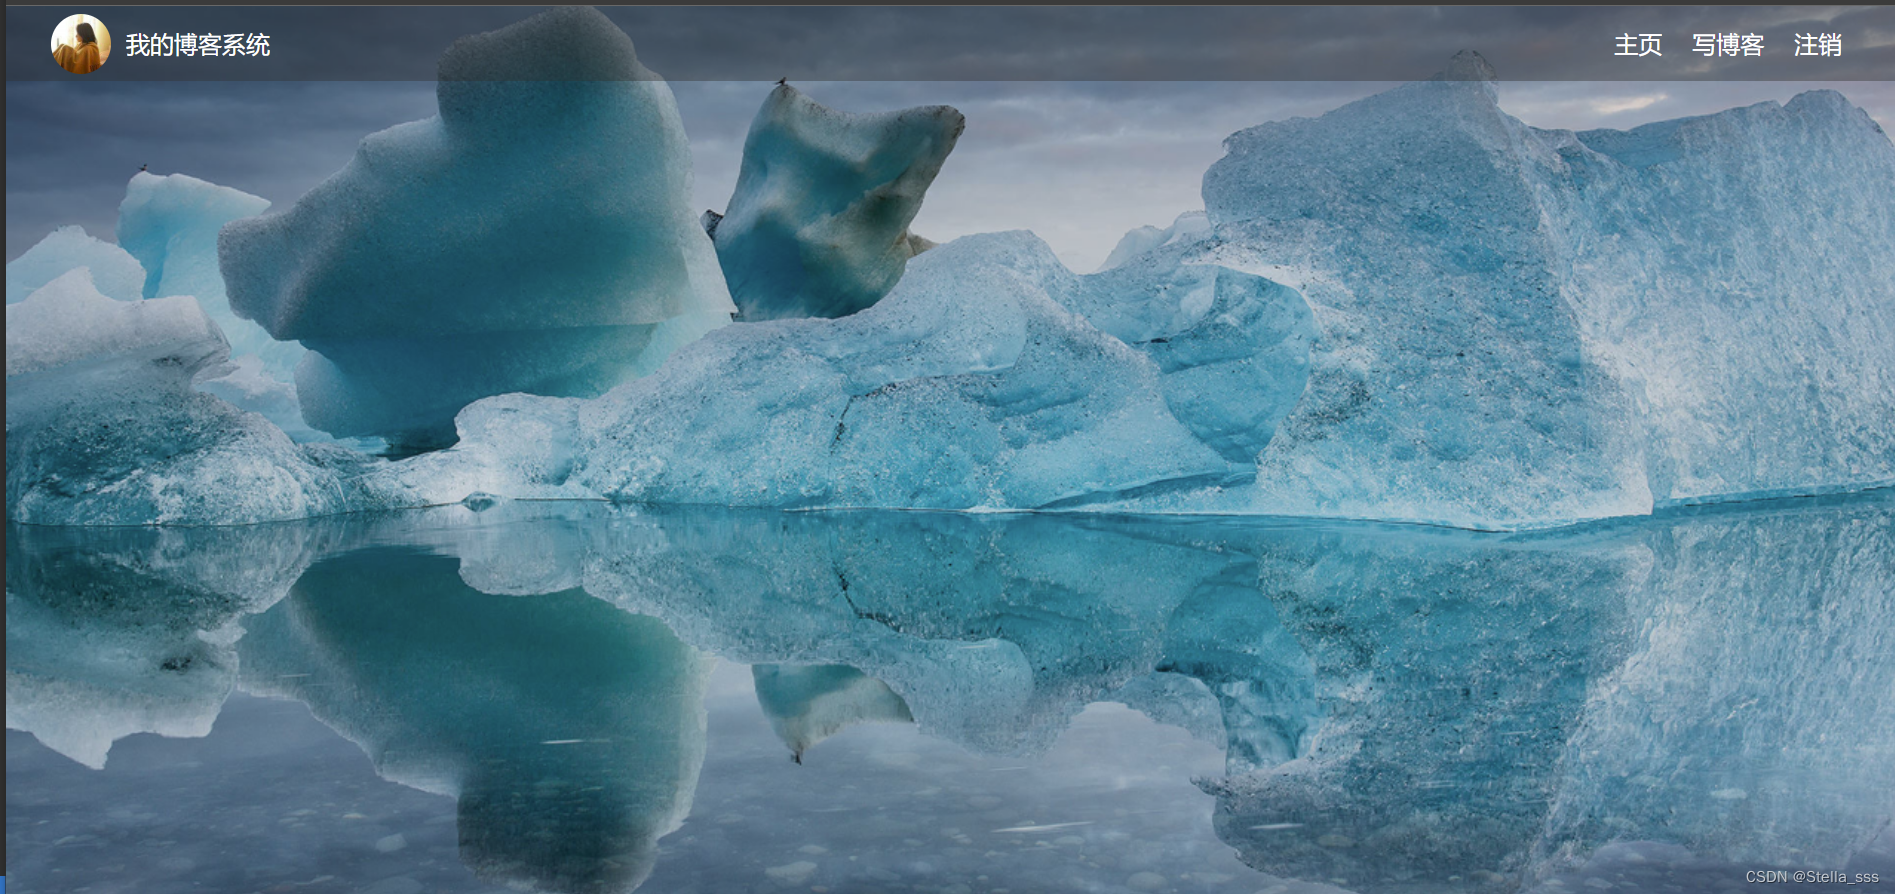
效果如下:
接下来对上面的布局进行调整。
首先创建common.css,这里我是创建了一个css文件夹,里面专门用于放css文件。
因为导航栏存在于每个页面中,因此为了方便后续其他页面使用,在这里把样式写到一个css文档中。
- 清除浏览器默认样式
- 准备一个背景图
- 需要把 html 和 body 高度都设为100%,使背景的高度和浏览器窗口高度一样
- 导航栏内部使用 flex 布局,用来排列 logo 和一些按钮
* {

    margin: 0;
    padding: 0;
    box-sizing: border-box;
}

/* 设置整体页面高度 */
html, body {

    height: 100%;
    background-image: url(../背景图.png);
    background-position: center center;
    background-size: cover;
    background-repeat: no-repeat;
}

/* 上方导航栏 */
.nav {

    width: 100%;
    height: 50px;
    background-color: rgba(51, 51, 51, 0.4);
    color: #fff;

    display: flex;
    justify-content: left;
    align-items: center;
}

/* 导航栏中的图标 */
.nav img {

    width: 40px;
    height: 40px;
    margin-left: 30px;
    margin-right: 10px;
    border-radius: 50%;
}

/* 导航栏中的占位器 */
.nav .spacer {

    width: 70%;
}

/* 导航栏中的按钮 */
.nav a {

    color: #fff;
    text-decoration: none;
    padding: 0 10px;
}
写完要记得在 blog_list.html 中引入
<link rel="stylesheet" href="../css/common.css">
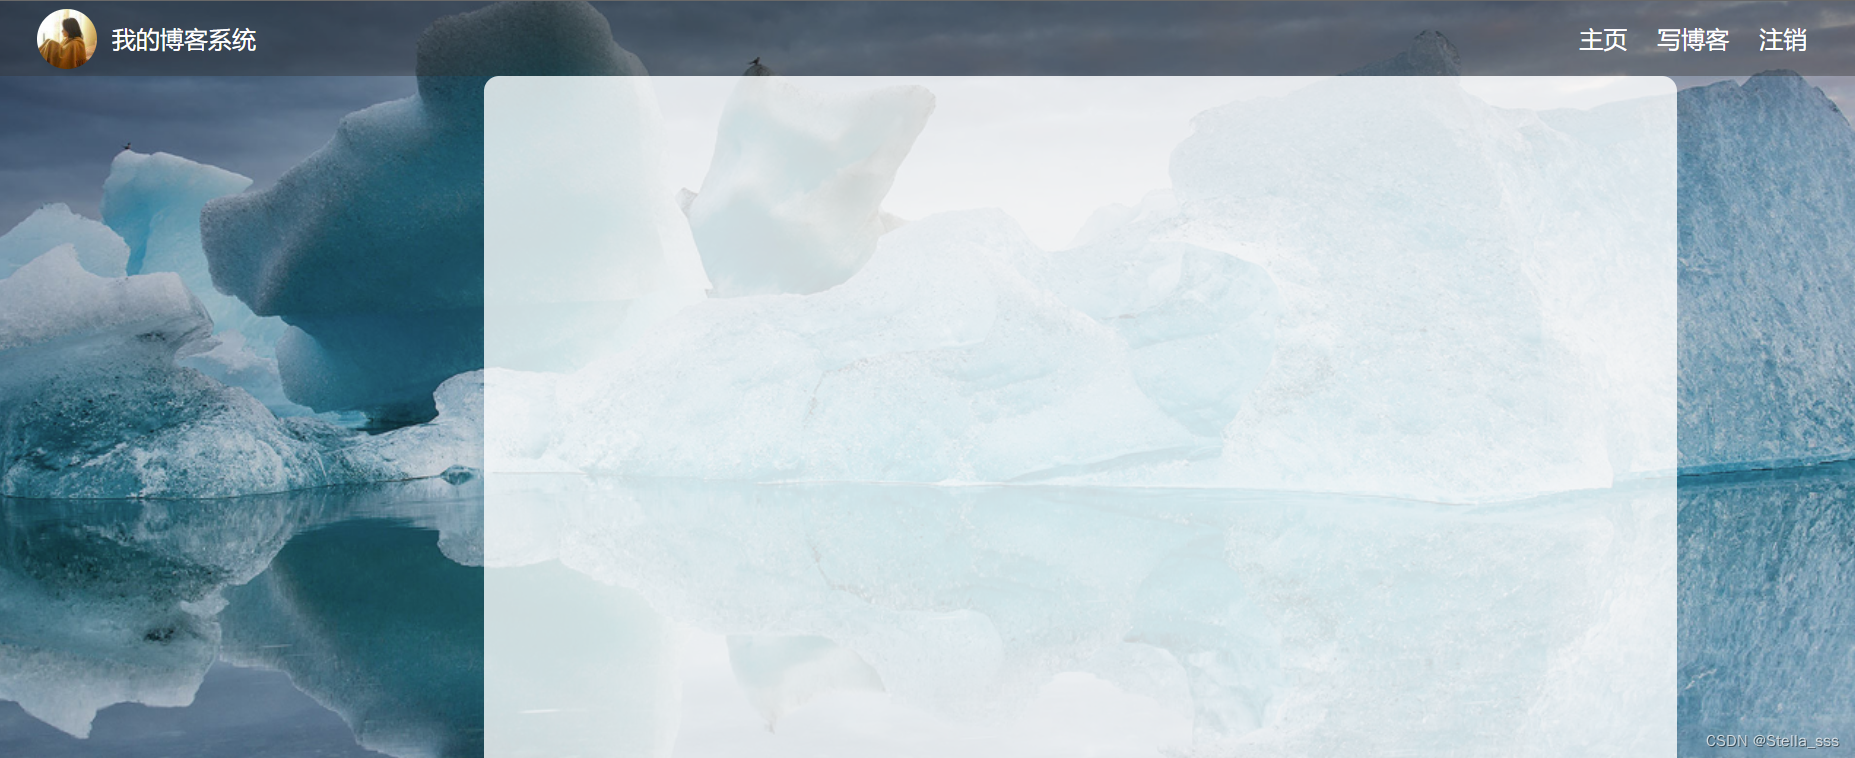
效果如下:
实现版心
接下来实现版心,首先编辑blog_list.html
- container 作为版心,实现居中对齐的效果
- 左侧放用户信息
- 右侧放博客列表
    <!-- 版心 -->
    <div class="container">
        <!-- 左侧个人信息 -->
        <div class="container-left"></div>
        <!-- 右侧内容详情 -->
        <div class="container-right"></div>
    </div>
接下来调整样式,编辑common.css
/* 页面内容  版心 */
.container {

    /* 使用 calc 计算高度 */
    height: calc(100% - 50px);
    /* 设置版心宽度 */
    width: 1000px;
    /* 水平居中 */
    margin: 0 auto;
    /* 使用弹性布局 */
    display: flex;
    justify-content: space-between;
    align-items: center;
}

/* 左侧部分,用来放置用户信息 */
.container-left {

    height: 100%;
    width: 200px;
}

/* 右侧部分,用来放置正文 */
.container-right {

    height: 100%;
    /* 和左侧部分中间留出50px间隙 */
    width: 795px;
    /* 若内容溢出则自动加上滚动条 */
    overflow: auto;
    background-color: rgba(255, 255, 255, 0.8);
    border-radius: 10px;
}
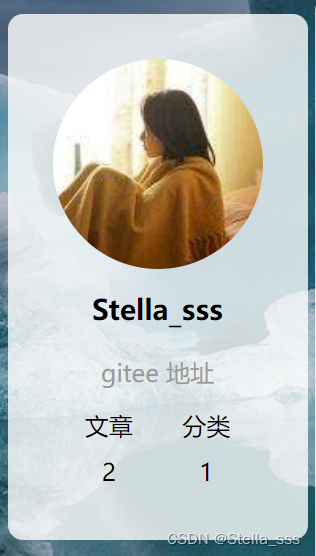
实现个人信息
编辑blog_list.html
- 把个人信息放到一个.card div 中
- 个人信息中包含头像、用户名、用户的github,用户的文章数量和分类数量
 <!-- 左侧个人信息 -->
        <div class="container-left">
            <div class="card">
                <img src="../头像.jpg" class="avtar" alt="">
                <h3>Stella_sss</h3>
                <a href="https://gitee.com/fang-qiuhui">gitee 地址</a>
                <div class="counter">
                    <span>文章</span>
                    <span>分类</span>
                </div>
                <div class="counter">
                    <span>2</span>
                    <span>1</span>
                </div>
            </div>
        </div>
编辑 common.css
/* 展示用户信息的卡片 */
.card {

    background-color: rgba(255, 255, 255, 0.8);
    border-radius: 10px;
    padding: 30px;
}

/* 用户头像 */
.card img {

    width: 140px;
    height: 140px;
    border-radius: 50%;
}

/* 用户名 */
.card h3 {

    text-align: center;
    padding: 10px;
}

/* 用户gitee连接 */
.card a {

    display: block;
    text-align: center;
    color: #999;
    text-decoration: none;
    padding: 10px;
}

/* 展示文章数目的面板 */
.card .counter {

    padding: 5px;
    display: flex;
    justify-content: space-around;
}
效果展示:
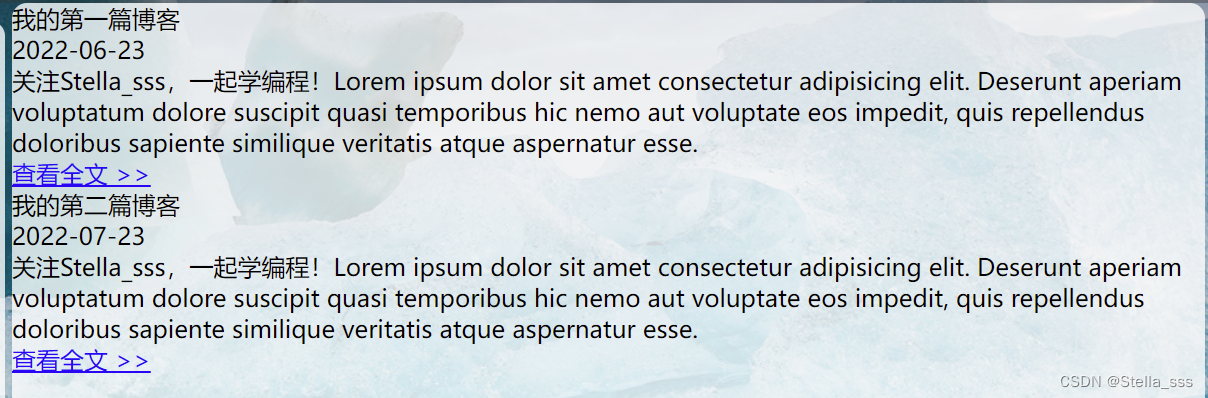
实现博客列表
编辑 blog_list.html
- 每个博客使用 div.blog 来表示
- 每个博客中包含标题、发布时间、描述、查看全文按钮
<!-- 右侧内容详情 -->
<div class="container-right">
<!-- 每篇博客包含标题,摘要,时间 -->
<div class="blog">
<div class="title">我的第一篇博客</div>
<div class="date">2022-06-23</div>
<div class="desc">
关注Stella_sss,一起学编程!Lorem ipsum dolor sit amet consectetur adipisicing elit. Deserunt aperiam voluptatum dolore suscipit quasi temporibus hic nemo aut voluptate eos impedit, quis repellendus doloribus sapiente similique veritatis atque aspernatur esse.
</div>
<a href="blog_content.html?blogId=1" class="detail">查看全文 >></a>
</div>
<div class="blog">
<div class="title">我的第二篇博客</div>
<div class="date">2022-07-23</div>
<div class="desc">
关注Stella_sss,一起学编程!Lorem ipsum dolor sit amet consectetur adipisicing elit. Deserunt aperiam voluptatum dolore suscipit quasi temporibus hic nemo aut voluptate eos impedit, quis repellendus doloribus sapiente similique veritatis atque aspernatur esse.
</div>
<a href="blog_content.html?blogId=2" class="detail">查看全文 >></a>
</div>
</div>
下面调整样式,因为这部分的内容其他页面中不再显示,故我们不再放到 common.css 中,而是单独放到一个新的 css 文件中。
创建 blog_list.css
- 使用伪类选择器 .blog .detail:hover,实现光标悬停时修改样式的功能
- 给.blog .detail 中加上过渡效果 transition:all 0.3s;使悬停的样式改变更逼真
/* 表示一篇博客 */
.blog {

    width: 100%;
    padding: 10px 20px;
}

/* 博客的标题 */
.blog .title {

    color: black;
    font-size: 20px;
    font-weight: 700;
    text-align: center;
    padding: 10px 0;
}

/* 博客的摘要 */
.blog .desc {

    color: #000;
    text-indent: 2em;
    margin-top: 10px;
}

.blog .date {

    color: #008000;
    margin-top: 10px;
    text-align: center;
}

/* 查看详情 按钮 */
.blog .detail {

    display: block;
    width: 120px;
    height: 40px;
    line-height: 40px;
    color: black;
    text-align: center;
    text-decoration: none;
    margin: 10px auto 0 auto;
    border: 2px solid black;

    /* 给颜色加上过渡效果 */
    transition: all 0.3s;
}

/* 查看详情按钮的鼠标 hover 效果 */
.blog .detail:hover {

    background-color: #000;
    color: #fff;
}
记得引入噢~

效果如下:
实现博客正文页
首先创建一个 blog_content.html
引入导航栏、版心、个人信息
编辑 blog_content.html,
引入导航栏、版心和个人信息,这部分代码和blog_list.html 中相同,因此我们直接复制即可。
<!DOCTYPE html>
<html lang="en">
<head>
    <meta charset="UTF-8">
    <meta http-equiv="X-UA-Compatible" content="IE=edge">
    <meta name="viewport" content="width=device-width, initial-scale=1.0">
    <title>blog_content</title>
    <link rel="stylesheet" href="../css/common.css">

</head>
<body>
    <!-- 导航栏 -->
    <div class="nav">
        <img src="../头像.jpg" alt="">
        <span class="title">我的博客系统</span>
        <!-- 用来占据中间位置 -->
        <span class="spacer"></span>
        <a href="blog_list.html">主页</a>
        <a href="blog_edit.html">写博客</a>
        <a href="login.html">注销</a>
    </div>

    <!-- 版心 -->
    <div class="container">
        <!-- 左侧个人信息 -->
        <div class="container-left">
            <div class="card">
                <img src="../头像.jpg" class="avtar" alt="">
                <h3>Stella_sss</h3>
                <a href="https://gitee.com/fang-qiuhui">gitee 地址</a>
                <div class="counter">
                    <span>文章</span>
                    <span>分类</span>
                </div>
                <div class="counter">
                    <span>2</span>
                    <span>1</span>
                </div>
            </div>
        </div>
        <div class="container-right">

        </div>
    </div>
</body>
</html>
效果如下:
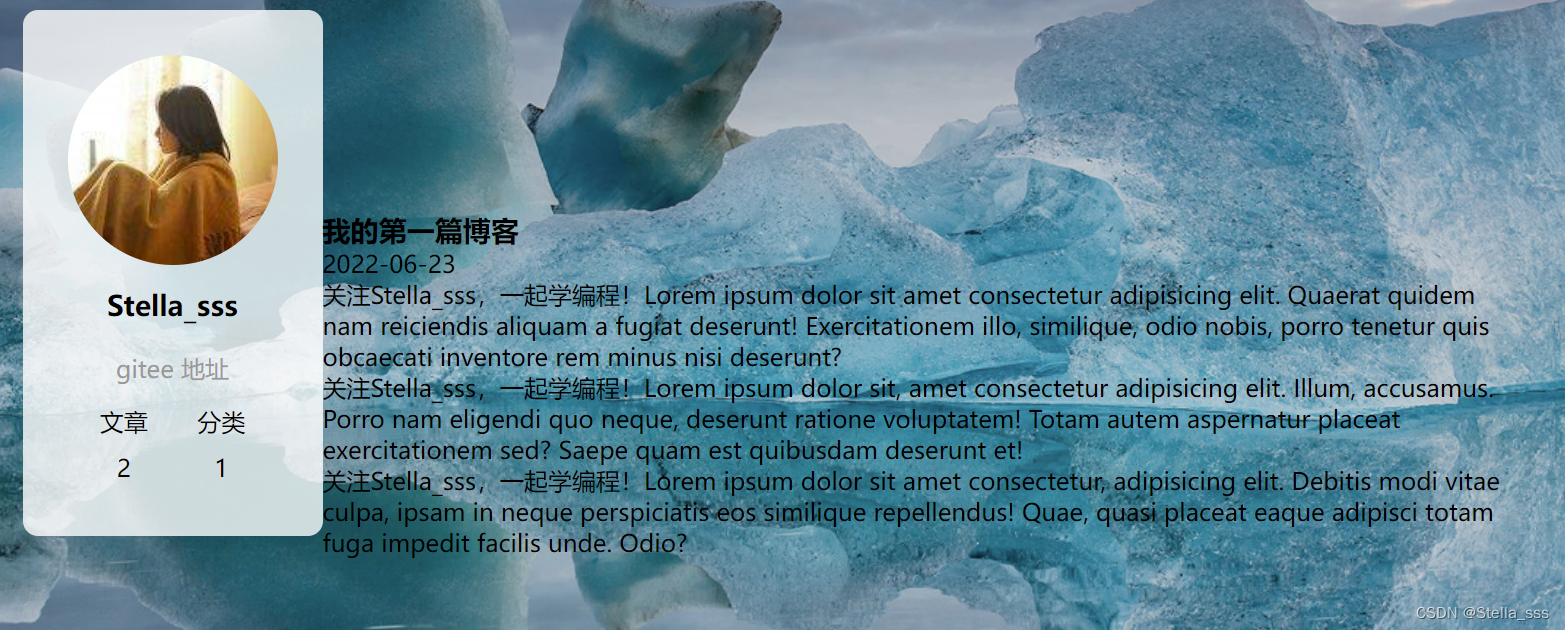
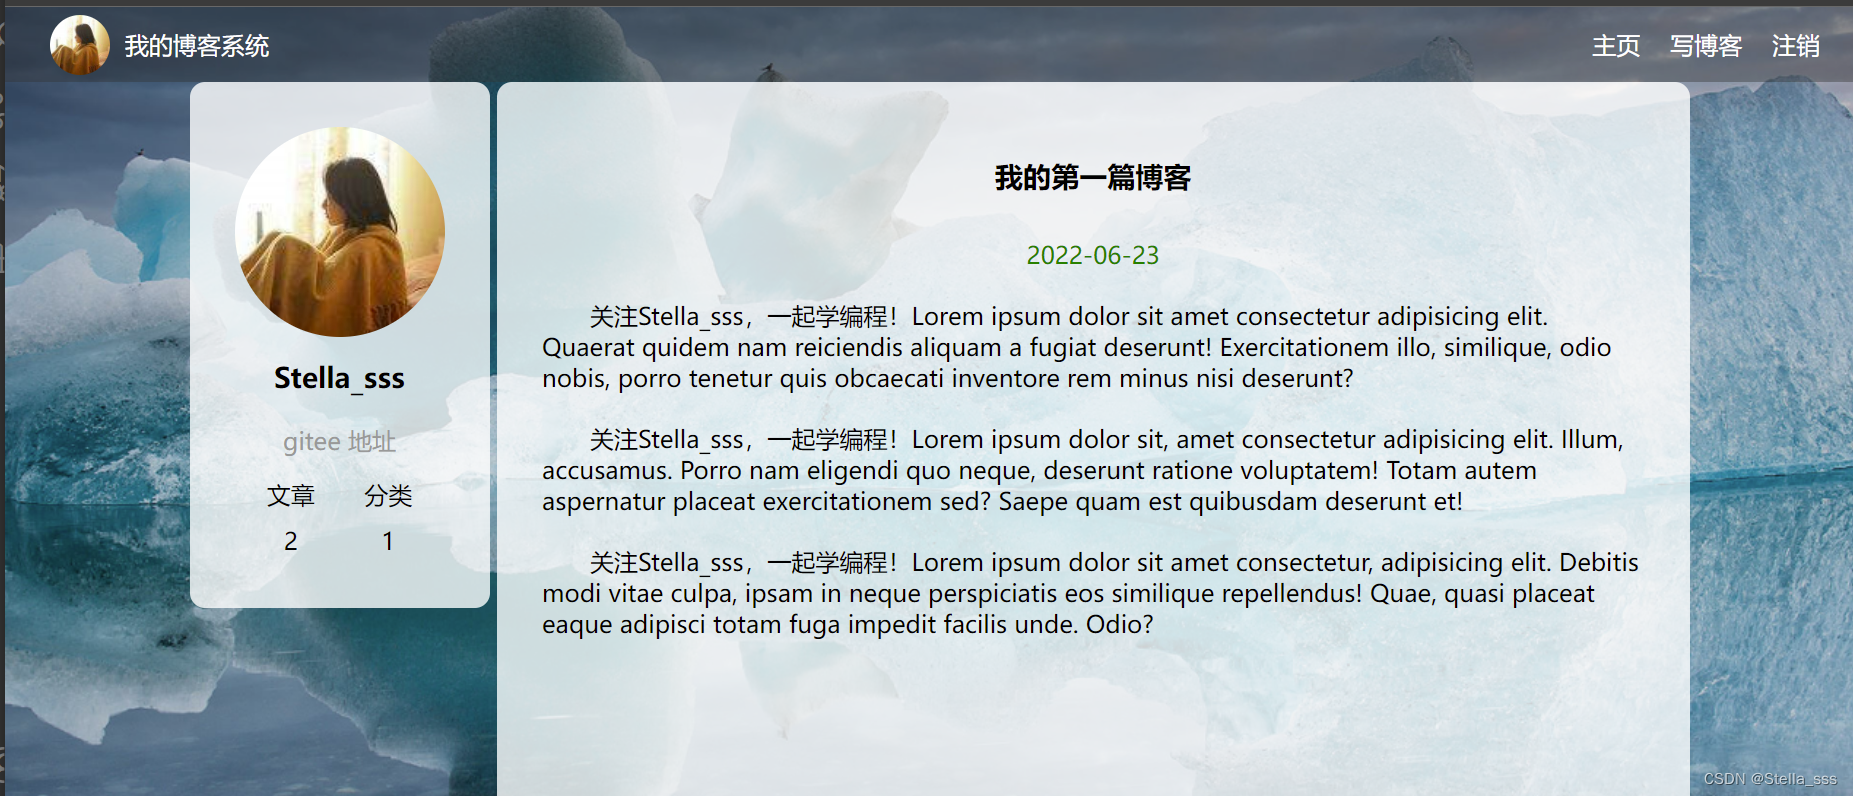
实现博客正文
编辑 blog_content.html
- 博客内容整体放到 div.blog-content 中.
- 博客内容中包含博客标题 (h3), 博客时间(div.date), 博客正文§
        <!-- 博客正文 -->
        <div class="blog-content">
            <!-- 博客标题 -->
            <h3>我的第一篇博客</h3>
            <div class="date">2022-06-23</div>
            <!-- 博客正文 -->
            <p>
                关注Stella_sss,一起学编程!Lorem ipsum dolor sit amet consectetur adipisicing elit. Quaerat quidem nam reiciendis aliquam a fugiat deserunt! Exercitationem illo, similique, odio nobis, porro tenetur quis obcaecati inventore rem minus nisi deserunt?
            </p>
            <p>
                关注Stella_sss,一起学编程!Lorem ipsum dolor sit, amet consectetur adipisicing elit. Illum, accusamus. Porro nam eligendi quo neque, deserunt ratione voluptatem! Totam autem aspernatur placeat exercitationem sed? Saepe quam est quibusdam deserunt et!
            </p>
            <p>
                关注Stella_sss,一起学编程!Lorem ipsum dolor sit amet consectetur, adipisicing elit. Debitis modi vitae culpa, ipsam in neque perspiciatis eos similique repellendus! Quae, quasi placeat eaque adipisci totam fuga impedit facilis unde. Odio?
            </p>
        </div>
效果如下:
下面调整样式:
首先创建 blog_content.css
/* 博客正文标题 */
.blog-content {

    padding: 30px;
}

/* 博客标题 */
.blog-content h3 {

    text-align: center;
    padding: 20px 0;
}

/* 博客日期 */
.blog-content .date {

    color: #008000;
    padding: 10px 0;
    text-align: center;
}

/* 博客内容段落 */
.blog-content p {

    text-indent: 2em;
    padding: 10px 0;
}
引入文件: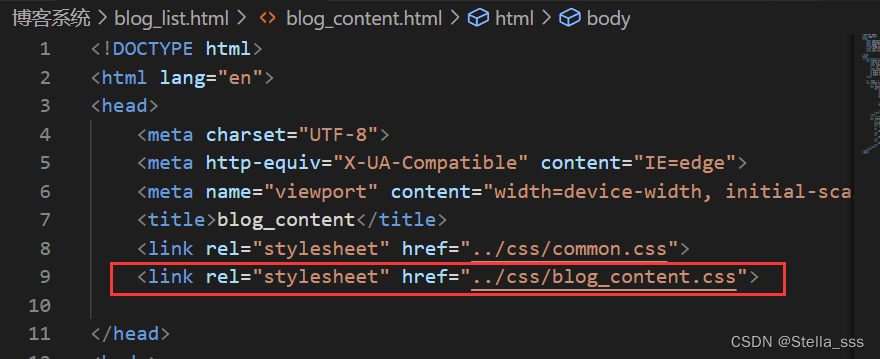
效果如下:
实现博客登录页
编辑login.html
引入导航栏
这部分内容大部分与前面相同,但是由于是未登录状态,因此导航栏右上角的链接应该只有登录一个,为了区别,这里我改成了请登录。
不要忘记引入样式 common.css 噢(样式中要把占位器长度加长一点,保证“请登录”字样在右上角)
<!DOCTYPE html>
<html lang="en">
<head>
    <meta charset="UTF-8">
    <meta http-equiv="X-UA-Compatible" content="IE=edge">
    <meta name="viewport" content="width=device-width, initial-scale=1.0">
    <title>login</title>
    <link rel="stylesheet" href="../css/common.css">
    <link rel="stylesheet" href="../css/login.css">
</head>
<body>
    <!-- 导航栏 -->
    <div class="nav">
        <img src="../头像.jpg" alt="">
        <span class="title">我的博客系统</span>
        <!-- 用来占据中间位置 -->
        <span class="spacer"></span>
        <a href="login.html">请登录</a>
    </div>

</body>
</html>
创建 login.css 文件, 复制common.css 文件中页面布局和导航栏的内容,占位器长度改为78%。
* {

    margin: 0;
    padding: 0;
    box-sizing: border-box;
}

/* 设置整体页面高度 */
html, body {

    height: 100%;
    background-image: url(../背景图.png);
    background-position: center center;
    background-size: cover;
    background-repeat: no-repeat;
}

/* 上方导航栏 */
.nav {

    width: 100%;
    height: 50px;
    background-color: rgba(51, 51, 51, 0.4);
    color: #fff;

    display: flex;
    justify-content: left;
    align-items: center;
}

/* 导航栏中的图标 */
.nav img {

    width: 40px;
    height: 40px;
    margin-left: 30px;
    margin-right: 10px;
    border-radius: 50%;
}

/* 导航栏中的占位器 */
.nav .spacer {

    width: 78%;
}

/* 导航栏中的按钮 */
.nav a {

    color: #fff;
    text-decoration: none;
    padding: 0 10px;
}
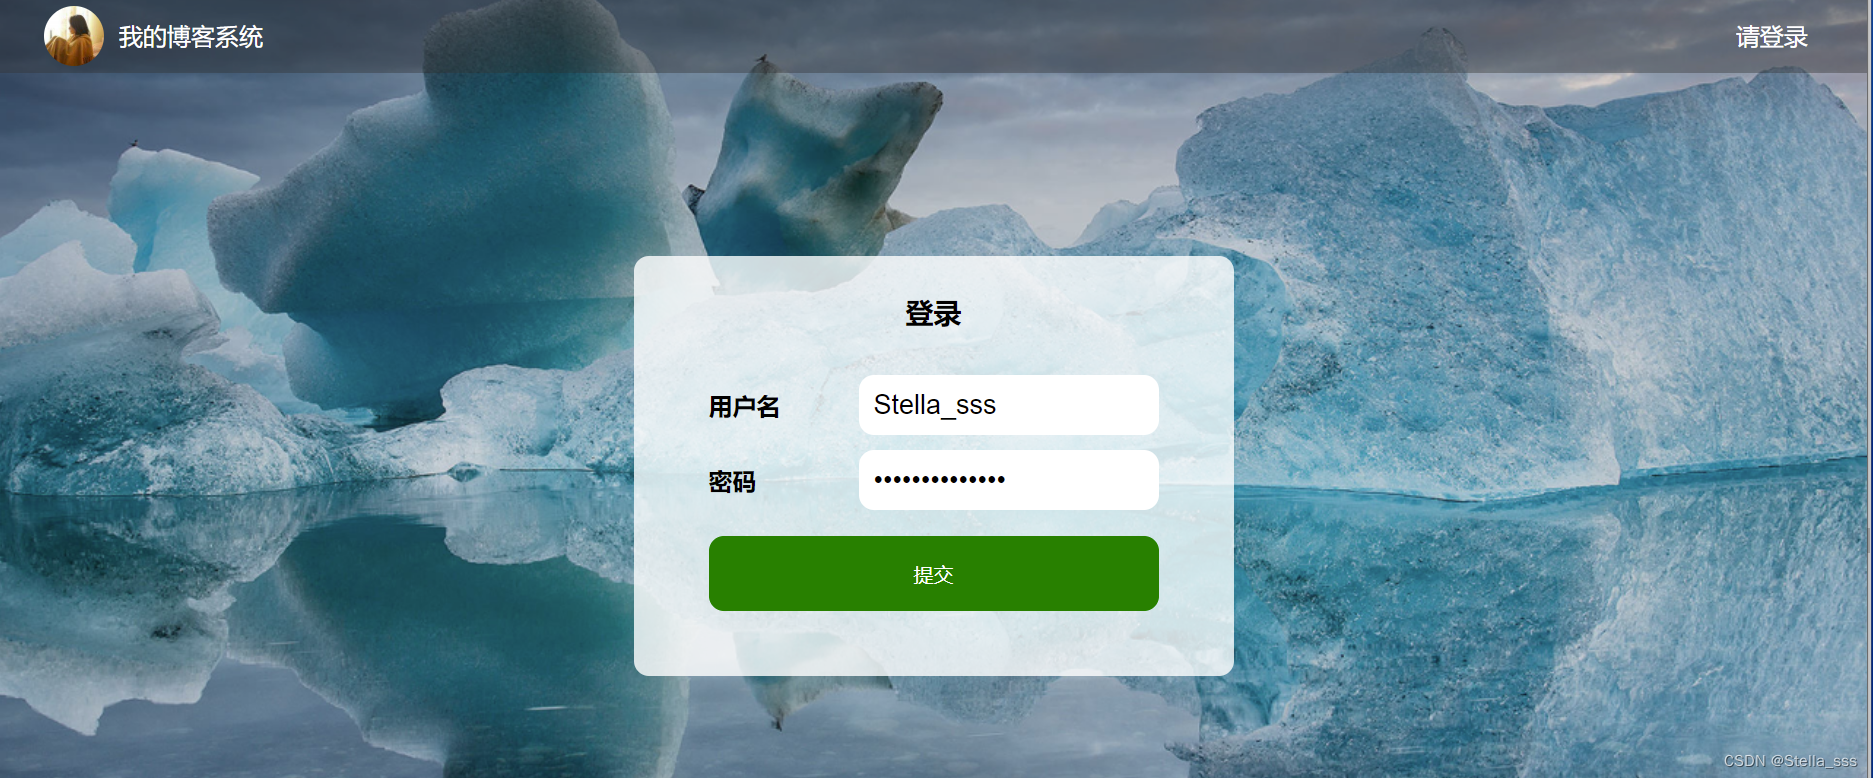
效果如下:

实现版心和登录框
编辑 login.html
- 登陆框整体放到 div.login-dialog 中.
- 内部包含三个行, 使用 div.row 表示.
- 每个行里分别包含, 用户名输入框, 密码输入框, 提交按钮.
    <!-- 版心 -->
    <div class="login-container">
        <!-- 中间的登录框 -->
        <div class="login-dialog">
            <h3>登录</h3>
            <div class="row">
                <span>用户名</span>
                <input type="text" id="username">
            </div>
            <div class="row">
                <span>密码</span>
                <input type="password" id="password">
            </div>
            <div class="row">
                <button id="submit">提交</button>
            </div>
        </div>
    </div>
效果如下:

编辑 login.css 文件
- 使用 flex 使登陆对话框能够在页面中水平垂直居中。
- 使用 #submit:active 伪类选择器, 实现点击按钮时样式切换的效果.
.login-container {

    width: 100%;
    height: calc(100% - 50px);
    display: flex;
    justify-content: center;
    align-items: center;
}

.login-dialog {

    width: 400px;
    height: 280px;
    background-color: rgba(255, 255, 255, 0.8);
    border-radius: 10px;
}

.login-dialog h3 {

    padding: 25px 0;
    text-align: center;
}

.login-dialog .row {

    height: 50px;
    display: flex;
    justify-content: center;
    align-items: center;
}

.login-dialog .row span {

    display: block;
    width: 100px;
    font-weight: 700;
}

#username, #password {

    width: 200px;
    height: 40px;
    line-height: 40px;
    font-size: 18px;
    border-radius: 10px;
    border: none;
    outline: none;
    text-indent: 10px;
}

#submit {

    width: 300px;
    height: 50px;
    color: white;
    background-color: green;
    border: none;
    border-radius: 10px;
    margin-top: 25px;
}

#submit:active {

    background-color: #666;
}
效果如下:
实现博客编辑页
编辑 blog_edit.html
引入导航栏
编辑 blog_edit.html
同前面的代码,直接复制即可~
<!DOCTYPE html>
<html lang="en">
<head>
<meta charset="UTF-8">
<meta http-equiv="X-UA-Compatible" content="IE=edge">
<meta name="viewport" content="width=device-width, initial-scale=1.0">
<title>blog_edit</title>
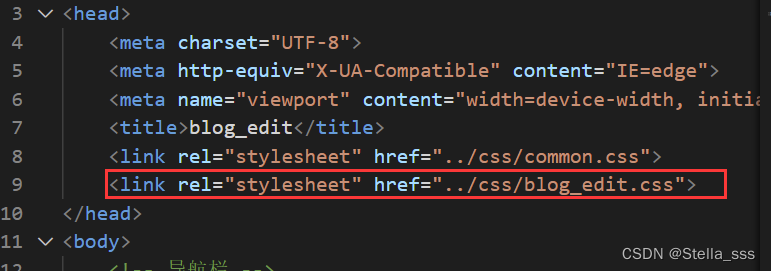
<link rel="stylesheet" href="../css/common.css">
</head>
<body>
<!-- 导航栏 -->
<div class="nav">
<img src="../头像.jpg" alt="">
<span class="title">我的博客系统</span>
<!-- 用来占据中间位置 -->
<span class="spacer"></span>
<a href="blog_list.html">主页</a>
<a href="blog_edit.html">写博客</a>
<a href="login.html">注销</a>
</div>
</body>
</html>
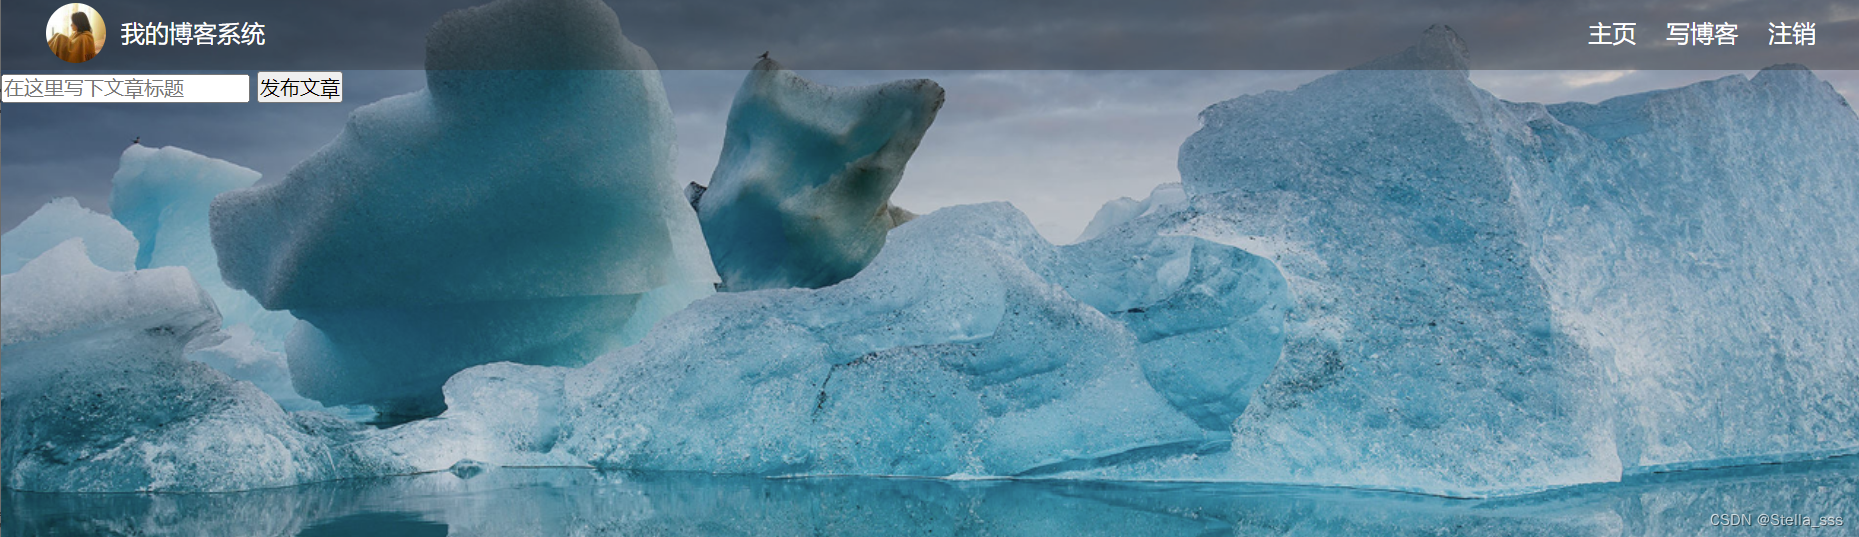
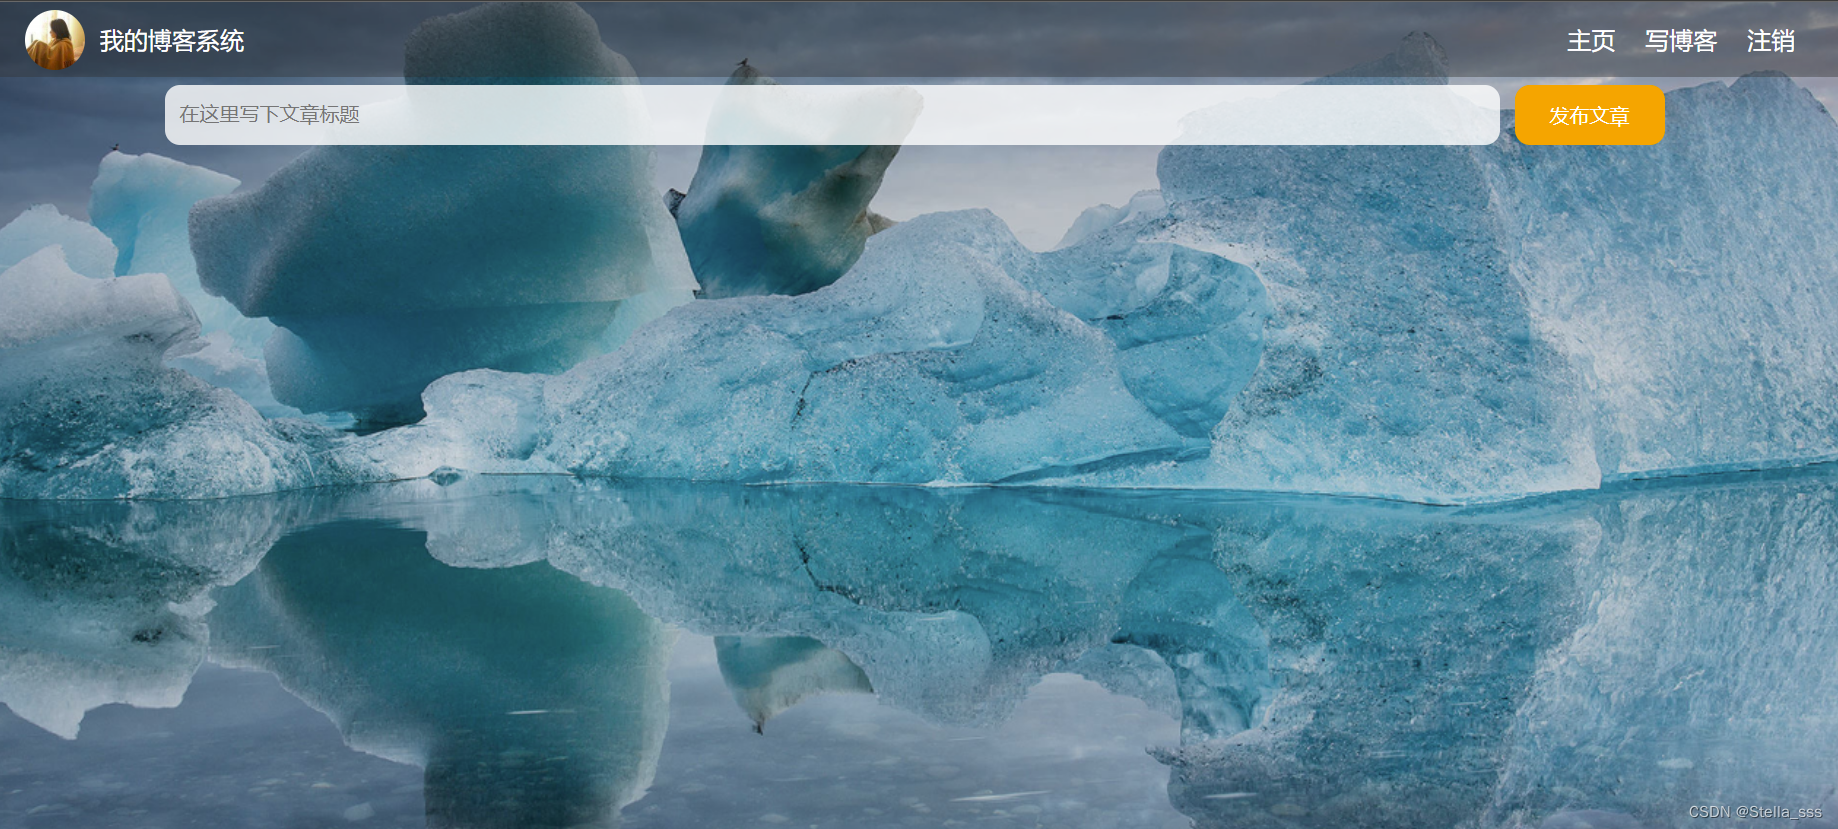
实现编辑区
编辑 blog_edit.html
- 整个编辑区放到 div.blog-edit-container 中.
- 其中包含一个标题编辑区, 和一个内容编辑区.
- 标题编辑区, 包含一个 input, 用来填写标题, 以及一个 button 按钮用于提交.
- 内容编辑区先创建一个 div#editor, 后面将使用 editor.md (使用第三方库)进行初始化.
    <!-- 编辑框容器 -->
    <div class="blog-edit-container">
        <!-- 标题编辑区 -->
        <div class="title">
            <input type="text" placeholder="在这里写下文章标题" id="title">
            <button id="submit">发布文章</button>
        </div>
        <!-- 创建编辑器标签 -->
        <div id="editor">

        </div>
    </div>
效果如下:
创建 blog_edit.css
- #editor 需要使用 opacity: 80%; 设置透明度. 如果直接使用 background-color 后面会被
editor.md 给覆盖掉.
.blog-edit-container {

    width: 1000px;
    height: calc(100% - 50px);
    margin: 0 auto;
}

.blog-edit-container .title {

    width: 100%;
    height: 50px;
    display: flex;
    justify-content: space-between;
    align-items: center;
}

#title {

    height: 40px;
    width: 890px;
    text-indent: 10px;
    border-radius: 10px;
    outline: none;
    border: none;
    background-color: rgba(255, 255, 255, 0.8);
}

#submit {

    height: 40px;
    width: 100px;
    color: white;
    background-color: orange;
    border: none;
    outline: none;
    border-radius: 10px;
}

#editor {

    border-radius: 10px;
    opacity: 80%;
}
记得引入哟~
效果如下:
引入editor.md
最后,要引入一个 Markdown 编辑器。
editor.md 是一个开元的页面 Markdown 编辑器组件。
官网:https://pandao.github.io/editor.md/
用法可以参考代码中的 examples 目录中的示例.

-
下载 editor.md
进入官网,下拉找到 Github 下载
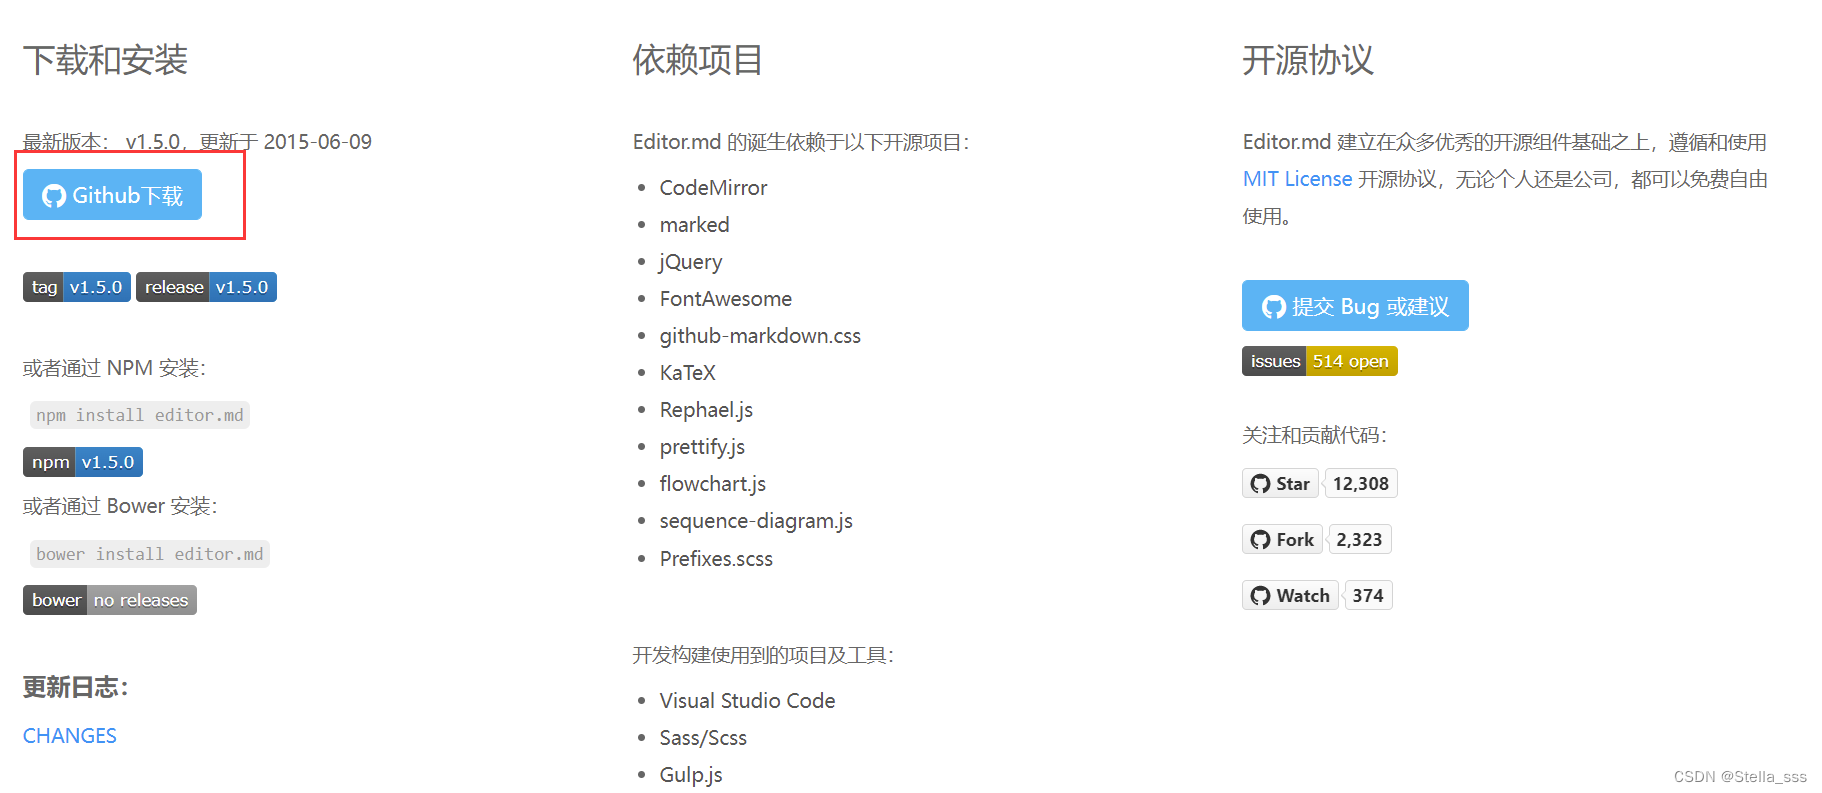
下载成功的压缩包文件:

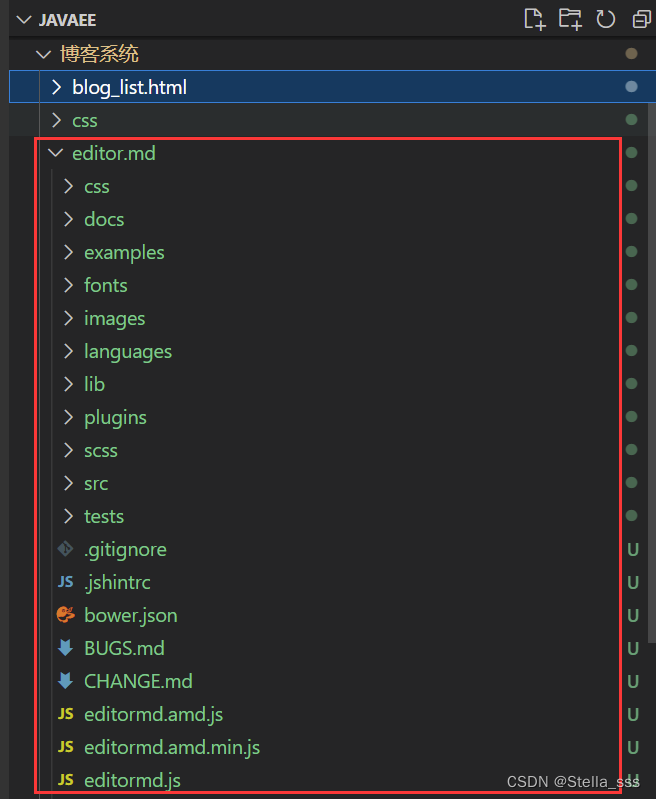
解压缩,然后放到博客系统的目录下,记得更名为editor.md噢~
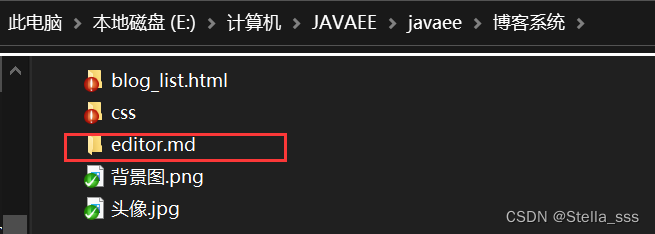
然后回到 VS Code 中查看目录:
-
引入 editor.md
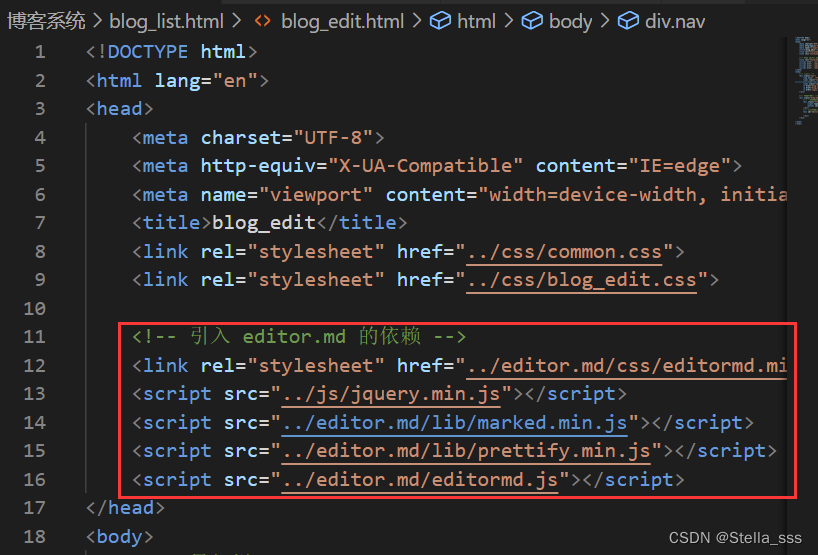
代码如下:
    <!-- 引入 editor.md 的依赖 -->
    <link rel="stylesheet" href="../editor.md/css/editormd.min.css">
    <script src="../js/jquery.min.js"></script>
    <script src="../editor.md/lib/marked.min.js"></script>
    <script src="../editor.md/lib/prettify.min.js"></script>
    <script src="../editor.md/editormd.js"></script>
注意,链接中的路径需要是真实存在的且与对应文件一一对应的,如第一个链接,我们可以自己在文件中查看。 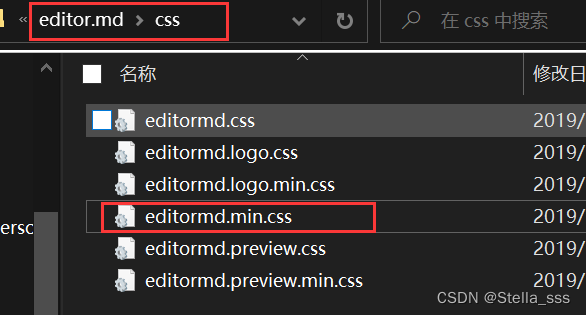
其中第二个链接表示的是 jQuery 库。
jQuery 不是 editor.md 的一部分,而是editor.md 依赖的库,因此这里我们需要额外安装一下 jQuery 这个库。
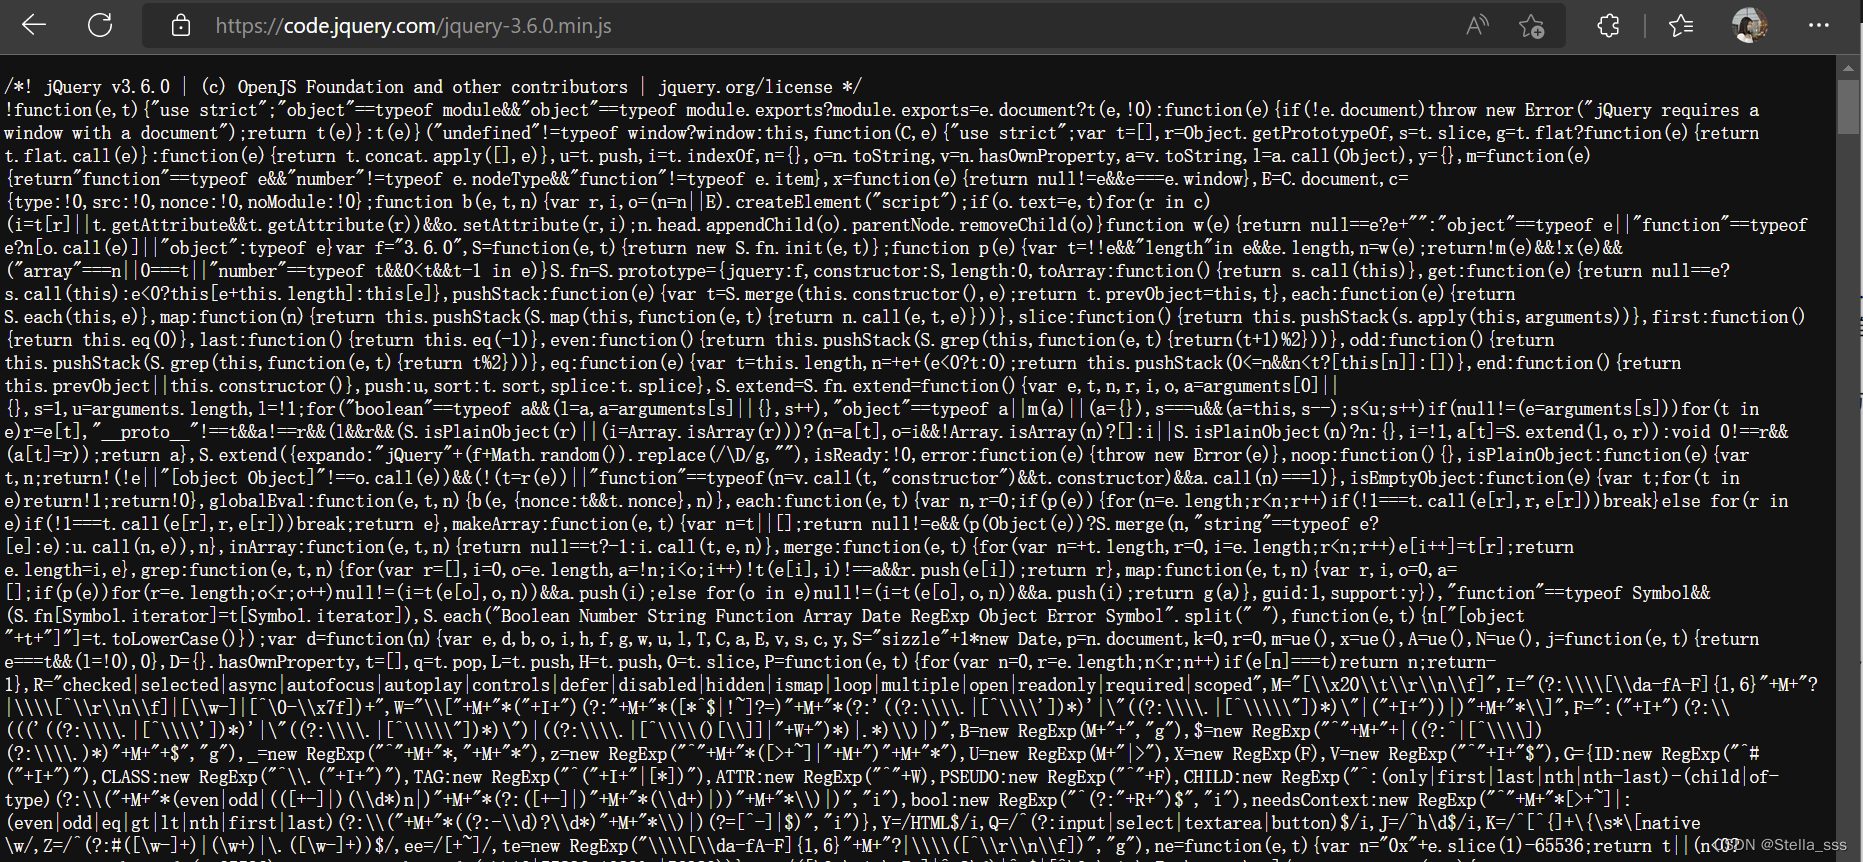
大家可以在网上搜索“jQuery cdn”,或者直接进入点击这个链接:https://releases.jquery.com/
选择 minified 版本,这个版本是被压缩过的(即使用去掉换行空格符,更换变量名之类的操作来缩短内容)

方法一:
打开 jQuery 的源码文件,直接复制粘贴到VSCode 中,保存到 jQuery 这个文件中即可。
方法二:
直接点击右边的复制图标,把这段带有 script 标签的代码复制到文件中。(弊端:网页不稳定的时候可能访问不了)

这里我使用的是方法一。
复制这里的这一段代码:

跳转打开,如下所示:
- 初始化 editor.md
注意是写在 body 标签内噢~
    <script>
        // 初始化编辑器
        var editor = editormd("editor", {

            // 这里的尺寸必须在这里设置,设置样式会被 editormd 自动覆盖掉。
            width: "100%",
            // 高度 100% 意思是和父元素一样高,要在父元素的基础上去掉标题编辑区的高度
            height: "calc(100% - 50px)",
            // 编辑器中的初始内容
            markdown: "# 关注Stella_sss,一起学编程",
            // 指定 editor.md 依赖的插件路径(注意这里一定要写正确!!博主就在这里卡了好久……)
            path: "../editor.md/lib/"
        });
    </script>
保存查看效果:
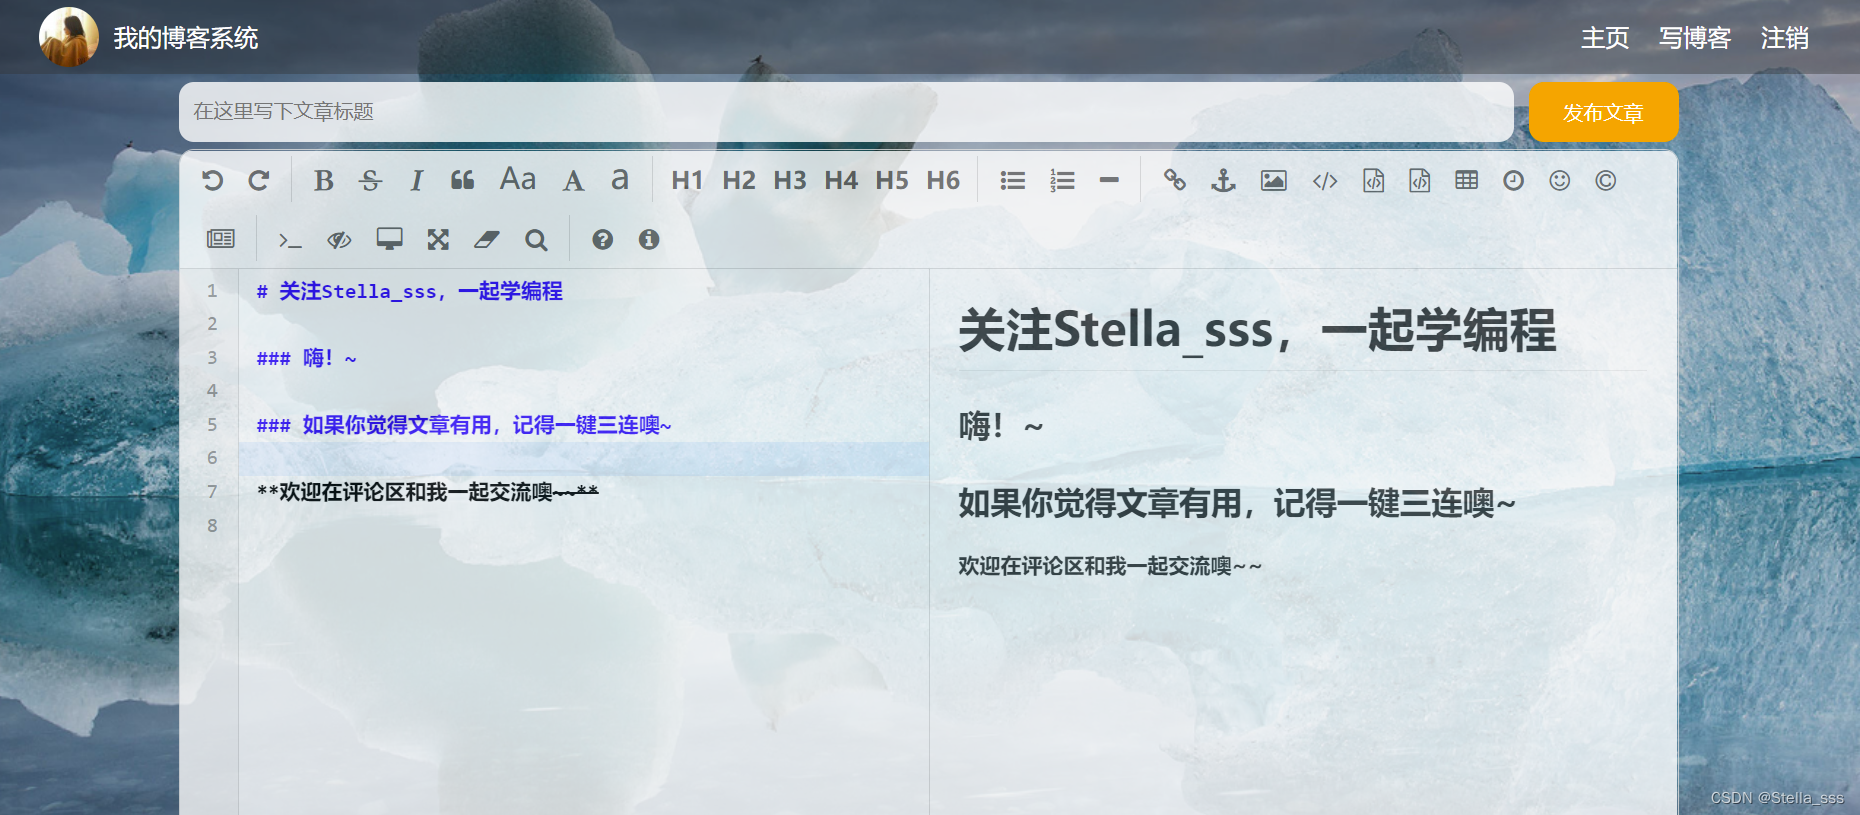
好啦~~
今天的博客页面到这里就全部写完啦~
完整源码已经上传到Gitee啦!文末自取哟!
以上只是通过 html 和 js 对网页的页面进行设计,后续我们还要将它变成一个真正可以实现登录、写文章、发布文章功能的博客系统,因此我们还需要继续深入学习!
欢迎持续关注我,一起实现一个真真正正的博客系统!

智能推荐
In-Sight Explorer 仿真器无法正常启动与连接问题解决过程-程序员宅基地
文章浏览阅读2.5k次。In-Sight Explorer 仿真器无法正常启动与连接问题解决过程一、问题出现经过在某天突然报错查不到问题所在偶然间发现这个二、问题解决过程1.首先查看下自己的端口占用情况2. 再查看下自己默认动态的端口区段3. 修改端口区段中动态端口配置5. 重启电脑后生效并检查6. 重新打开In-Sight软件的仿真器OK三、总结一、问题出现经过在某天突然报错一段时间没打开In-Sight IDE软件了,突然有天打开发现这个IDE软件启动报错:服务端口1096端口…查不到问题所在显然是端口占用问题,但通_in-sight explorer
【密评】商用密码应用安全性评估从业人员考核题库(三)-程序员宅基地
文章浏览阅读2.3k次。多项选择题 按照《关键信息基础设施安全保护条例》,某商用密码服务机构的信息系统被依法认定为关键信息基础设施,在日常安全审计中,发现该信息系统近日来遭受持续的APT攻击,导致了大量商用密码业务数据的泄露,信息系统所在机构立即采取了相应的应急处置措施,但为了减少对于自身信誉的影响,选择不向主管部门报告,针对该行为,下列表述正确的是( )。单项选择题 根据密码分析者所掌握的分析资料的不同,密码分析一般可为四类:唯密文攻击、已知明文攻击、选择明文攻击、选择密文攻击,其中()是在公开的网络中能获得的最现实的能力。
fatal: destination path '.' already exists and is not an empty directory. 错误及解决办法_c:\users\prl\desktop\thicknessvaries' already exis-程序员宅基地
文章浏览阅读10w+次,点赞16次,收藏17次。今天在使用Git for Windows clone代码时,遇到了题目所示的错误,简单来说就是目标路径‘.’已经存在并且不是一个空目录。可是在我在文件夹下并没有看到任何文件,显示“该文件夹为空”,然后自然而然地,我想到了这个'.'路径是不是被Windows隐藏了?于是我打开工具->文件夹选项->查看->显示隐藏文件,终于发现了隐藏文件夹“.git”。删掉该文件夹后,再次执行git cl_c:\users\prl\desktop\thicknessvaries' already exists and is not an empty dir
python处理表格数据-60万行的Excel数据,Python轻松处理-程序员宅基地
文章浏览阅读507次。原标题:60万行的Excel数据,Python轻松处理一个朋友在某运动品牌公司上班,老板给他布置了一个处理客户订单数据的任务。要求是根据订单时间和客户id判断生成四个新的数据:1、记录该客户是第几次光顾2、上一次的日期时间是什么时候3、与上次订单的间隔时间4、这是一个existing客户还是一个new客户(见定义)推荐下我自己创建的Python学习交流群960410445,这是Python学习交流..._python 逐条存储表格数据
CRMEB Min电商系统商城源码 v4.3.2_crmeb多商户源码-程序员宅基地
文章浏览阅读890次。CRMEB Min是CRMEB品牌全新推出的一款轻量级、高性能、前后端分离的开源电商系统,完善的后台权限管理、会员管理、订单管理、产品管理、客服系统、CMS管理、多端管理、页面DIY、数据统计、系统配置、组合数据管理、日志管理、数据库管理,一键开通短信、产品采集、物流查询等接口,系统采用TP6+Mysql+Uniapp+iView+Redis+workerman+form-builder等最流行热门的技术,支持队列、PHP快速生成表单、长链接、定时任务、事件订阅、图表统计、表格导出、自动接口文档,完善的使用_crmeb多商户源码
vue中input输入框限制输入小数点后1位_vue el-input 动态设置小数点后一位-程序员宅基地
文章浏览阅读822次。vue中input输入框限制输入小数点后1位:<input @input="InputChange" v-model="clllci" /> InputChange(e) { console.log(e.target.value.match(/^\d*(\.?\d{0,2})/g)[0],6666) this.clllci = e.target.value.match(/^\d*(\.?\d{0,2})/g)[0] || null; },..._vue el-input 动态设置小数点后一位
随便推点
软件设计模式初了解_对软件设计模式的认识-程序员宅基地
文章浏览阅读173次。软件设计模式一、软件设计模式的产生背景1、设计模式出处设计模式”这个术语最初并不是出现在软件设计中,而是被用于建筑领域的设计中。1977 年,美国著名建筑大师、加利福尼亚大学伯克利分校环境结构中心主任克里斯托夫·亚历山大(Christopher Alexander)在他的著作《建筑模式语言:城镇、建筑、构造》(A Pattern Language: Towns Building Construction)中描述了一些常见的建筑设计问题,并提出了 253 种关于对城镇、邻里、住宅、花园和房间等进行_对软件设计模式的认识
无问西东_粗布衣茅草房 铁骨铮铮-程序员宅基地
文章浏览阅读176次。梅贻琦对吴岭澜说:“人把自己置身于忙碌当中,有一种麻木的踏实,但丧失了真实,你的青春也不过只有这些日子。 什么是真实? 你看到什么,听到什么,做什么,和谁在一起 有一种,从心灵深处,满溢出来的不懊悔,也不羞耻的平和与喜悦。”1分24秒旋律的突变,配合电影中一群来路不明战机的出现,看的时候心立即就揪起来了,以为光耀遇到了敌机埋伏,旋律再次回归正常,看到了光耀队友们战机向贫民窟的孩子们投..._粗布衣茅草房 铁骨铮铮
云计算(五)——Mapreduce 的使用_mapreduce使用-程序员宅基地
文章浏览阅读1.5k次,点赞2次,收藏10次。一、Mapreduce 计算整数的最大值和最小值【实验目的】1)理解mapreduce执行原理2)理解map,reduce阶段3)函数的使用【实验原理】需求描述:对输入文件中数据进行计算找出这一组数据中的最大值和最小值。原始数据:1021039109200..._mapreduce使用
尚硅谷React实战项目踩坑记录_bundle.js:305982 warning: react does not recognize-程序员宅基地
文章浏览阅读1.7k次,点赞4次,收藏17次。本次实战项目素材来自尚硅谷的React全展现全栈,项目内容是使用react + antd的方式开发后台管理系统,本文在这里记录一下开发时踩到的小坑以及解决方案,希望能对你有帮助!_bundle.js:305982 warning: react does not recognize the `eventkey` prop on a
计算机网络思科参考答案--IP 编址考试_哪一项是 ipv6 地址 2002:0420:00c4:1008:0025:0190:0000:09-程序员宅基地
文章浏览阅读4.5w次,点赞42次,收藏286次。请参见图示。 管理员必须向路由器 A 网络中的所有成员发送一条消息。 那么网络 172.16.16.0/22 的广播地址是什么?172.16.23.255172.16.255.255172.16.16.255172.16.20.255 172.16.19.255请参见图示。 思考一下 10.16.10.0/24 网络范围内已经使用了的地址和必须保留的地址,下列哪个子网地址可以分配给包含 25 台主机的网络?10.16.10.240/2810.16.10.12..._哪一项是 ipv6 地址 2002:0420:00c4:1008:0025:0190:0000:0990 的简写格式?
【python】python二手房数据抓取分析可视化(源码)【独一无二】_二手房数据爬取与可视化分析-程序员宅基地
文章浏览阅读4.9k次,点赞9次,收藏9次。博__主:米码收割机技__能:C++/Python语言公众号:测试开发自动化【获取源码+商业合作】荣__誉:阿里云博客专家博主、51CTO技术博主专__注:专注主流机器人、人工智能等相关领域的开发、测试技术。_二手房数据爬取与可视化分析